
在Winform程序中设置管理员权限及为用户组添加写入权限
2017-12-04 1514
在我们一些Winform程序中,往往需要具有一些特殊的权限才能操作系统文件,我们可以设置运行程序具有管理员权限或者设置运行程序的目录具有写入的权限,如果是在操作系统里面,我们可以设置运行程序以管理员身份运行,或者设置Users用户组在运行目录中具有写入权限都可以解决问题,不过如果我们想通过C#代码进行自动的处理,那么应该如何实现呢?
1、系统设置管理员权限或者目录写入权限
如果我们需要让程序以管理员身份运行,那么可以通过设置快捷方式的属性或者应用程序的属性为【以管理员身份运行此程序】即可实现,如下所示。

如果我们需要一些写入文件的权限,如我们程序可能需要操作SQLite文件数据库,那么也可以通过设置Users用户组在运行目录中具有写入权限都可以解决问题,否则可能会出现【 attempt to write a readonly database】的错误。
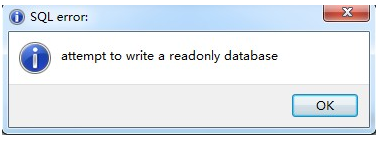
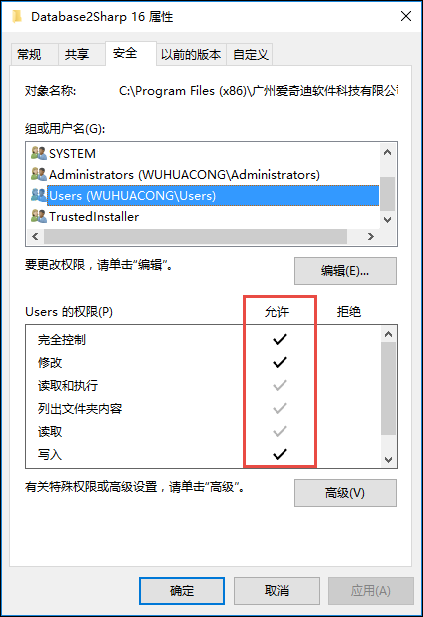
我们设置步骤如下所示:找到SQLite数据库所在的文件夹,单击右键,属性->安全,为Users用户组添加写入权限。
2、使用C#代码实现
上面的步骤可以解决我们实际碰到的权限访问问题,那么我们如果使用C#代码,应该如何实现这些操作呢?
对于第一个以管理员身份运行程序的处理操作,我们是可以通过程序修改配置的方式实现,这样可以避免一些Winform程序运行时刻的权限问题:
1)在通过winform程序执行cmd命令时,某些情况下如果不是以管理员身份运行,则会提示命令无效。
2)或者通过winform程序执行Windows Service 服务时,也需要以管理员身份才能调用Service服务。
3)处理其他需要管理员身份的相关操作。
我们如果是编译Winform程序,只需要几步就可以在让程序在运行的时候获得管理员身份,如下所示在我们Winform的UI项目【属性】【安全性】里面,勾选ClickOne的设置。
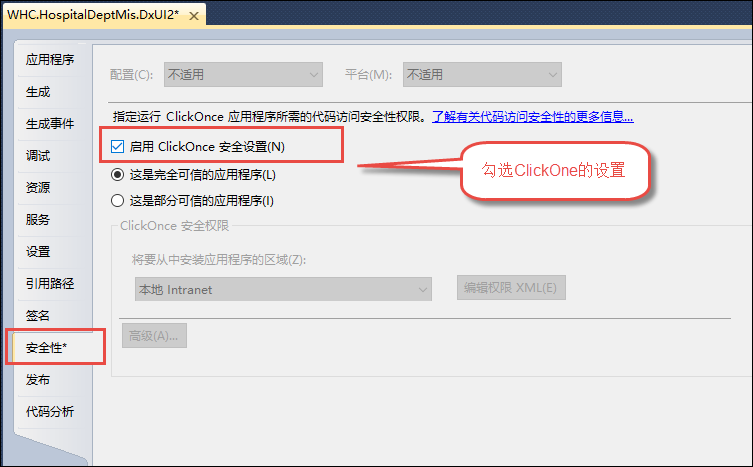
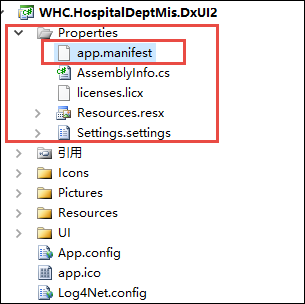
然后我们就可以看到在UI项目【Properties】目录里面,生成了一个app.manifest文件。
这个app.manifest文件是自动生成的,我们修改其中的一项设置,然后取消上面勾选ClickOne的设置就可以了。
把其中app.manifest文件的内容:
<requestedExecutionLevel level=”asInvoker” uiAccess=”false” />
改为:
<requestedExecutionLevel level=”requireAdministrator” uiAccess=”false” />
即可,这样取消上面勾选ClickOne的设置,然后重新编译整个程序即可。
在程序运行的时候,会提示“用户账户控制”来获取管理员权限运行,点击“是”则获取了管理员权限。
对于需要为指定目录设置用户组权限,那么也是可以通过C#代码进行处理的。
一般情况下,我们可以在程序安装或者启动的时候,对目录进行用户组权限的处理,这样程序运行起来就自然具有对应目录的读写权限了。
如我们在程序启动的时候处理,那么我们可以在Main函数的里面进行设置。
        /// <summary>
        /// 应用程序的主入口点。
        /// </summary>
        [STAThread]
        private static void Main()
        {

        }
为了方便处理,我们添加一个公共的函数,用来处理用户组的目录权限访问操作,C#代码如下所示。
        /// <summary>
        /// 为指定用户组,授权目录指定完全访问权限
        /// </summary>
        /// <param name="user">用户组,如Users</param>
        /// <param name="folder">实际的目录</param>
        /// <returns></returns>
        private static bool SetAccess(string user, string folder)
        {
            //定义为完全控制的权限
            const FileSystemRights Rights = FileSystemRights.FullControl;

            //添加访问规则到实际目录
            var AccessRule = new FileSystemAccessRule(user, Rights,
                InheritanceFlags.None,
                PropagationFlags.NoPropagateInherit,
                AccessControlType.Allow);

            var Info = new DirectoryInfo(folder);
            var Security = Info.GetAccessControl(AccessControlSections.Access);

            bool Result;
            Security.ModifyAccessRule(AccessControlModification.Set, AccessRule, out Result);
            if (!Result) return false;

            //总是允许再目录上进行对象继承
            const InheritanceFlags iFlags = InheritanceFlags.ContainerInherit | InheritanceFlags.ObjectInherit;

            //为继承关系添加访问规则
            AccessRule = new FileSystemAccessRule(user, Rights,
                iFlags,
                PropagationFlags.InheritOnly,
                AccessControlType.Allow);

            Security.ModifyAccessRule(AccessControlModification.Add, AccessRule, out Result);
            if (!Result) return false;

            Info.SetAccessControl(Security);

            return true;
        }
然后我们在Main函数里面进行调用就可以了。
        /// <summary>
        /// 应用程序的主入口点。
        /// </summary>
        [STAThread]
        private static void Main()
        {
            //为用户组指定对应目录的完全访问权限
           SetAccess("Users", Application.StartupPath);

            //界面汉化
            System.Threading.Thread.CurrentThread.CurrentUICulture = new System.Globalization.CultureInfo("zh-Hans");
            DevExpress.UserSkins.BonusSkins.Register();
            DevExpress.Skins.SkinManager.EnableFormSkins();

            Application.EnableVisualStyles();
            Application.SetCompatibleTextRenderingDefault(false);
            Application.ThreadException += new System.Threading.ThreadExceptionEventHandler(Application_ThreadException);

            //登录界面
            Login dlg = new Login();
            dlg.StartPosition = FormStartPosition.CenterScreen;
            if (DialogResult.OK == dlg.ShowDialog())
            {
                if (dlg.bLogin)
                {
                    SplashScreen.Splasher.Show(typeof(SplashScreen.frmSplash));

                    gc.MainDialog = new MainForm();
                    gc.MainDialog.StartPosition = FormStartPosition.CenterScreen;

                    Application.Run(gc.MainDialog);
                }

            }
            dlg.Dispose();
        }
这样在程序运行后,我们就可以看到对应目录具有完全的读写操作权限了,这样对于一些如读写SQLite出错的问题,也就迎刃而解了。
以上就是我对于两种不同权限访问的处理经验总结,希望给在Winform开发中的同行参考,感谢耐心的阅读和支持。
本文转自博客园伍华聪的博客,原文链接:在Winform程序中设置管理员权限及为用户组添加写入权限,如需转载请自行联系原博主。
C# Winform对文件夹的权限判断及处理
WindowsIdentity类可以获取当前执行者的身份信息
[csharp] view plain copy
- /// <summary>
- /// 递归搜索文件方法
- /// </summary>
- /// <param name=”path”>搜索的目录</param>
- /// <param name=”name”>搜索的文件名</param>
- public void GetDir(string path,string name)
- {
- DirectoryInfo di = new DirectoryInfo(path);
- DirectorySecurity s = new DirectorySecurity(path, AccessControlSections.Access);
- //判断目录是否 可以访问
- if (!s.AreAccessRulesProtected)
- {
- foreach (DirectoryInfo d in di.GetDirectories())
- {
- foreach (FileInfo fi in di.GetFiles())
- {
- if (fi.Name.Contains(name))
- {
- txtInfo.AppendText(“文件名:”+fi.Name + ” 路径:” + fi.FullName + ” \n”);
- }
- }
- GetDir(d.FullName, name);
- }
- }
- }
对执行的程序设定执行身份权限
如果程序不是以管理员身份运行,操作本地文件会提示:System.UnauthorizedAccessException异常
Vista 和 Windows 7 操作系统为了加强安全,增加了 UAC(用户账户控制) 的机制,如果 UAC 被打开,用户即使是以管理员权限登录,其应用程序默认情况下也无法对系统目录,系统注册表等可能影响系统运行的设置进行写操作。这个机制大大增强了系统的安全性,但对应用程序开发者来说,我们不能强迫用户去关闭UAC,但有时我们开发的应用程序又需要以 Administrator 的方式运行,即 Win7 中 以 as administrator 方式运行,那么我们怎么来实现这样的功能呢?
我们在 win7 下运行一些安装程序时,会发现首先弹出一个对话框,让用户确认是否同意允许这个程序改变你的计算机配置,但我们编写的应用程序默认是不会弹出这个提示的,也无法以管理员权限运行。本文介绍了 C# 程序如何设置来提示用户以管理员权限运行。
首先在项目中增加一个 Application Manifest File

默认的配置如下:
<?xml version=”1.0″ encoding=”utf-8″?>
<asmv1:assembly manifestVersion=”1.0″ xmlns=”urn:schemas-microsoft-com:asm.v1″
xmlns:asmv1=”urn:schemas-microsoft-com:asm.v1″ xmlns:asmv2=”urn:schemas-microsoft-com:asm.v2″
xmlns:xsi=”http://www.w3.org/2001/XMLSchema-instance”>
<assemblyIdentity version=”1.0.0.0″ name=”MyApplication.app”/>
<trustInfo xmlns=”urn:schemas-microsoft-com:asm.v2″>
<security>
<requestedPrivileges xmlns=”urn:schemas-microsoft-com:asm.v3″>
<!– UAC Manifest Options
If you want to change the Windows User Account Control level replace the
requestedExecutionLevel node with one of the following.
<requestedExecutionLevel level=”asInvoker” uiAccess=”false” />
<requestedExecutionLevel level=”requireAdministrator” uiAccess=”false” />
<requestedExecutionLevel level=”highestAvailable” uiAccess=”false” />
If you want to utilize File and Registry Virtualization for backward
compatibility then delete the requestedExecutionLevel node.
–>
<requestedExecutionLevel level=”asInvoker” uiAccess=”false” />
</requestedPrivileges>
</security>
</trustInfo>
</asmv1:assembly>
我们可以看到这个配置中有一个 requestedExecutionLevel 项,这个项用于配置当前应用请求的执行权限级别。这个项有3个值可供选择,如下表所示:
| Value | Description | Comment |
| asInvoker | The application runs with the same access token as the parent process. | Recommended for standard user applications. Do refractoring with internal elevation points, as per the guidance provided earlier in this document. |
| highestAvailable | The application runs with the highest privileges the current user can obtain. | Recommended for mixed-mode applications. Plan to refractor the application in a future release. |
| requireAdministrator | The application runs only for administrators and requires that the application be launched with the full access token of an administrator. | Recommended for administrator only applications. Internal elevation points are not needed. The application is already running elevated. |
asInvoker : 如果选这个,应用程序就是以当前的权限运行。
highestAvailable: 这个是以当前用户可以获得的最高权限运行。
requireAdministrator: 这个是仅以系统管理员权限运行。
默认情况下是 asInvoker。
highestAvailable 和 requireAdministrator 这两个选项都可以提示用户获取系统管理员权限。那么这两个选项的区别在哪里呢?
他们的区别在于,如果我们不是以管理员帐号登录,那么如果应用程序设置为 requireAdministrator ,那么应用程序就直接运行失败,无法启动。而如果设置为 highestAvailable,则应用程序可以运行成功,但是是以当前帐号的权限运行而不是系统管理员权限运行。如果我们希望程序在非管理员帐号登录时也可以运行(这种情况下应该某些功能受限制) ,那么建议采用 highestAvailable 来配置。
关于requestedExecutionLevel 设置的权威文档请参考下面链接:
Create and Embed an Application Manifest (UAC)
下面是修改后的配置文件:
<?xml version=”1.0″ encoding=”utf-8″?>
<asmv1:assembly manifestVersion=”1.0″ xmlns=”urn:schemas-microsoft-com:asm.v1″
xmlns:asmv1=”urn:schemas-microsoft-com:asm.v1″ xmlns:asmv2=”urn:schemas-microsoft-com:asm.v2″
xmlns:xsi=”http://www.w3.org/2001/XMLSchema-instance”>
<assemblyIdentity version=”1.0.0.0″ name=”MyApplication.app”/>
<trustInfo xmlns=”urn:schemas-microsoft-com:asm.v2″>
<security>
<requestedPrivileges xmlns=”urn:schemas-microsoft-com:asm.v3″>
<!– UAC Manifest Options
If you want to change the Windows User Account Control level replace the
requestedExecutionLevel node with one of the following.
<requestedExecutionLevel level=”asInvoker” uiAccess=”false” />
<requestedExecutionLevel level=”requireAdministrator” uiAccess=”false” />
<requestedExecutionLevel level=”highestAvailable” uiAccess=”false” />
If you want to utilize File and Registry Virtualization for backward
compatibility then delete the requestedExecutionLevel node.
–>
<requestedExecutionLevel level=”requireAdministrator” uiAccess=”false” />
</requestedPrivileges>
</security>
</trustInfo>
</asmv1:assembly>
配置文件修改后,我们运行应用程序,就会首先弹出这样一个提示框,点 Yes 后,程序才可以继续运行,并且获得系统管理员的权限。

下面再来看看程序如何知道当前运行在系统管理员权限还是非系统管理员权限:
using System.Security.Principal
public static bool IsAdministrator()
{
WindowsIdentity identity = WindowsIdentity.GetCurrent();
WindowsPrincipal principal = new WindowsPrincipal(identity);
return principal.IsInRole(WindowsBuiltInRole.Administrator);
}
这段代码可以用于判断当前程序是否运行在系统管理员权限下。如果配置为 asInvoker,在win7 下,这个函数会返回 false ,如果是 requireAdministrator 则返回 true。
using System;
using System.Collections;
using System.IO;
using System.Security.AccessControl;
static class Tester
{
public static void Main()
{
try
{
string filename = @”f:\k”; //目标目录
string account = @”Administrator”;//用户名
string userrights = @”RW”;//权限字符串,自己定义的
AddDirectorySecurity(filename, account, userrights);
Console.ReadLine();
}
catch (Exception e)
{
Console.WriteLine(e);
Console.ReadLine();
}
}
static public void AddDirectorySecurity(string FileName, string Account, string UserRights)
{
FileSystemRights Rights = new FileSystemRights();
if (UserRights.IndexOf(“R”) >= 0)
{
Rights = Rights | FileSystemRights.Read;
}
if (UserRights.IndexOf(“C”) >= 0)
{
Rights = Rights | FileSystemRights.ChangePermissions;
}
if (UserRights.IndexOf(“F”) >= 0)
{
Rights = Rights | FileSystemRights.FullControl;
}
if (UserRights.IndexOf(“W”) >= 0)
{
Rights = Rights | FileSystemRights.Write;
}
bool ok;
DirectoryInfo dInfo = new DirectoryInfo(FileName);
DirectorySecurity dSecurity = dInfo.GetAccessControl();
InheritanceFlags iFlags = new InheritanceFlags();
iFlags = InheritanceFlags.ContainerInherit | InheritanceFlags.ObjectInherit;
FileSystemAccessRule AccessRule2 = new FileSystemAccessRule(Account, Rights, iFlags, PropagationFlags.None, AccessControlType.Allow);
dSecurity.ModifyAccessRule(AccessControlModification.Add, AccessRule2, out ok);
dInfo.SetAccessControl(dSecurity);
//列出目标目录所具有的权限
DirectorySecurity sec = Directory.GetAccessControl(FileName, AccessControlSections.All);
foreach (FileSystemAccessRule rule in sec.GetAccessRules(true, true, typeof(System.Security.Principal.NTAccount)))
{
Console.WriteLine(“———————————-“);
Console.WriteLine(rule.IdentityReference.Value);
if ((rule.FileSystemRights & FileSystemRights.Read) != 0)
Console.WriteLine(rule.FileSystemRights.ToString());
}
Console.Read();
}
}
“BACKUP DATABASE permission denied in database ”.” when running a Vault Backup
By: 
Support
Issue:
When running a Vault Backup using Autodesk Data Management Server Console (ADMS) or backup scripts, permission denied error appear in the ADMS Console log or backup log.
07/03/2016 09:38:43 Backing Up Databases... 0/8 07/03/2016 09:38:44 Connectivity.Application.VaultManager.ServiceException: BACKUP DATABASE permission denied in database '<databasename>'. BACKUP DATABASE is terminating abnormally. ---> System.Data.SqlClient.SqlException: BACKUP DATABASE permission denied in database '<databasename>'. BACKUP DATABASE is terminating abnormally. ..
Causes:
There are potentially multiple causes of this behaviour. Known causes include:
- Admin Ownership resides on a subscriber.
- AUTODESKVAULT SQL instance was not configured correctly following the guidelines in the Advanced Configuration Guide
- It has been modified in an unsupported manner.
Solution:
- Ensure Administrative Ownership resides on the Publisher.
- Try detaching and attaching the erroring database in Autodesk Data Management Server Console (ADMS), and retry the backup operation.
- If Step 1 or 2 do not work, review the permissions in both SQL and Window OS by following these steps:
- Log into the AUTODESKVAULT SQL instance as a user with System Administrator privileges.
- Expand “Databases”.
- Right-click the database in question and select “Properties”.
- Select the “Permissions” page.
- Check the “ADMS-hostname” account does not Deny permission to “Backup database”.

-
Check the permissions in Window Server:
- In Windows Explorer, navigate to the folder containing the database files. (.mdf and .ldf files).
- Note: The default location of these files is in this folder:- C:\Program Files\Microsoft SQL Server\MSSQLxx.AUTODESKVAULT\MSSQL\DATA.
- Contact the server administrator if the location of the files has been changed and cannot be found.
- Right-click both the .mdf and .ldf file and select “Properties”.
- Compare the “Groups or user names” and their subsequent “Permissions” are consistent (the same) with a database that is working (for example the KnowledgeVaultMaster). Note: The user name or group may be different than that shown in this image.
- In Windows Explorer, navigate to the folder containing the database files. (.mdf and .ldf files).

- Also, click the “Advanced” and compare the “Owner” set for the file.

Notes:
- Check all the SQL server and Window server machine if replication involved.
- If the database is replicated, it is not possible to detach it unless unreplicate database from every subscriber. Read more about at How to unreplicate a Vault database and re-enable it in the ADMS Console.
- Attaching the database from the ADMS Console automatically set the correct Windows and SQL permissions on the database.
- Attaching a Vault database triggers a File Validation for every file in the FileStore and detaching a database from the Console is not deleted the database.
- If reattaching the databases in ADMS does correct the permissions, backup the databases using SQL Management Studio followed by uninstalling and reinstalling the SQL Instance.
原文地址:http://www.cnblogs.com/ioriwellings/p/16550024.html