一、反射机制
1.1、创建JavaBean类
package star.light.pojo;

public class User {
    private String name;
    private int age;

    public User() {
    }

    public User(String name, int age) {
        this.name = name;
        this.age = age;
    }

    public String getName() {
        return name;
    }

    public void setName(String name) {
        this.name = name;
    }

    public int getAge() {
        return age;
    }

    public void setAge(int age) {
        this.age = age;
    }

    @Override
    public String toString() {
        return "User{" +
                "name='" + name + '\'' +
                ", age=" + age +
                '}';
    }
}
1.2、测试程序
package star.light.test;

import java.lang.reflect.Field;
import java.lang.reflect.Method;

public class UserTest {
    public static void main(String[] args) throws Exception {
        // 通过反射机制创建对象,假设已知要创建的类的属性名,且该类符合javabean规范
        // 通过反射机制,获取类
        String nameString = "name";
        String ageString = "age";

        Class classObject = Class.forName("star.light.pojo.User");

        // 通过反射机制获取无参构造器,创建对象
        Object object = classObject.getDeclaredConstructor().newInstance();

        // 通过反射机制,获取私有属性
        Field usernameField = classObject.getDeclaredField(nameString);
        Field ageField = classObject.getDeclaredField(ageString);
        // 允许通过反射机制访问私有属性
        usernameField.setAccessible(true);
        // 设置私有属性的值
        usernameField.set(object,"Sakura");

        // 获取属性对象的set方法名
        String setMethodName = "set" + ageString.toUpperCase().charAt(0) + ageString.substring(1);
        // 通过反射机制,获取方法
        Method setAgeMehtod = classObject.getDeclaredMethod(setMethodName, ageField.getType());
        // 通过反射机制,调用方法
        setAgeMehtod.invoke(object, 10);

        System.out.println(object);
    }
}
二、Spring框架IOC的底层实现
2.1、引入依赖
<?xml version="1.0" encoding="UTF-8"?>
<project xmlns="http://maven.apache.org/POM/4.0.0"
         xmlns:xsi="http://www.w3.org/2001/XMLSchema-instance"
         xsi:schemaLocation="http://maven.apache.org/POM/4.0.0 http://maven.apache.org/xsd/maven-4.0.0.xsd">
    <modelVersion>4.0.0</modelVersion>

    <groupId>star.light</groupId>
    <artifactId>myspring</artifactId>
    <version>1.0-SNAPSHOT</version>

    <packaging>jar</packaging>

    <properties>
        <maven.compiler.source>11</maven.compiler.source>
        <maven.compiler.target>11</maven.compiler.target>
    </properties>

    <dependencies>
        <dependency>
            <groupId>org.dom4j</groupId>
            <artifactId>dom4j</artifactId>
            <version>2.1.3</version>
        </dependency>

        <dependency>
            <groupId>jaxen</groupId>
            <artifactId>jaxen</artifactId>
            <version>1.2.0</version>
        </dependency>
    </dependencies>
</project>
2.2、核心接口实现
package star.light.frame.core;

/**
 * Spring框架应用上下文接口
 */
public interface ApplicationContext {
    Object getBean(String beanName);    // 根据bean的名称(id)获取相对应的bean对象
}
package star.light.frame.core;

import org.dom4j.*;
import org.dom4j.io.SAXReader;

import java.io.InputStream;
import java.lang.reflect.Field;
import java.lang.reflect.Method;
import java.util.HashMap;
import java.util.List;
import java.util.Map;

public class ClassPathXmlApplicationContext implements ApplicationContext {
    private Map<String, Object> singletonObject = new HashMap<>();

    /**
     * 解析配置文件,初始化所有的bean对象
     * @param configLocation 配置文件路径,配置文件应当放在类路径下
     */
    public ClassPathXmlApplicationContext(String configLocation) {
        // 解析配置文件,然后实例化Bean,将Bean存放到singletonObject集合中

        try {
            // 这是dom4j解析XML文件的核心对象
            SAXReader reader = new SAXReader();
            // 获取一个输入流,指向配置文件
            InputStream inputStream = ClassLoader.getSystemClassLoader().getResourceAsStream(configLocation);
            // 读文件
            Document document = reader.read(inputStream);
            // 获取所有的bean标签
            List<Node> beanNodes = document.selectNodes("//bean");
            // 遍历bean标签
            beanNodes.forEach(beanNode -> {
                try {
                    // 向下转型,为了使用Element接口里更加丰富的方法
                    Element beanElement = (Element) beanNode;
                    String id = beanElement.attributeValue("id");
                    String className = beanElement.attributeValue("class");
                    // 通过反射机制创建对象,将其放在Map集合中,提前曝光
                    Class classObject = Class.forName(className);
                    Object beanObject = classObject.getDeclaredConstructor().newInstance();
                    // 将Bean曝光,加入Map集合
                    singletonObject.put(id,beanObject);
                } catch (Exception e) {
                    e.printStackTrace();
                }
            });

            // 再次重新把所有的bean标签遍历一次,这次主要给对象的属性赋值
            beanNodes.forEach(beanNode -> {
                try {
                    Element beanElement = (Element) beanNode;
                    // 获取id
                    String id = beanElement.attributeValue("id");
                    // 获取className
                    String className = beanElement.attributeValue("class");
                    // 获取类
                    Class classObject = Class.forName(className);
                    // 获取该bean标签下所有的属性标签
                    List<Element> properties = beanElement.elements("property");
                    // 遍历所有的属性标签
                    properties.forEach(property -> {
                        try {
                            // 获取属性名
                            String propertyName = property.attributeValue("name");
                            // 获取属性
                            Field field = classObject.getDeclaredField(propertyName);
                            // 获取set方法名
                            String setMethodName = "set" + propertyName.toUpperCase().charAt(0) + propertyName.substring(1);
                            // 获取set方法
                            Method setMethod = classObject.getDeclaredMethod(setMethodName, field.getType());
                            // 获取具体的值
                            String value = property.attributeValue("value");
                            Object actualValue = null;      // 真值
                            String ref = property.attributeValue("ref");
                            if (value != null) {
                                // 说明这个值是简单类型
                                // 调用set方法
                                // 这里只支持以下类型为简单类型
                                // byte、short、int、long、float、double、boolean、char
                                // Byte、Short、Integer、Long、Float、Double、Boolean、Character
                                // String
                                // 获取属性类型名
                                String propertyTypeSimpleName = field.getType().getSimpleName();
                                switch (propertyTypeSimpleName){
                                    case "byte":
                                        actualValue = Byte.parseByte(value);
                                        break;
                                    case "short":
                                        actualValue = Short.parseShort(value);
                                        break;
                                    case "int":
                                        actualValue = Integer.parseInt(value);
                                        break;
                                    case "long":
                                        actualValue = Long.parseLong(value);
                                        break;
                                    case "float":
                                        actualValue = Float.parseFloat(value);
                                        break;
                                    case "double":
                                        actualValue = Double.parseDouble(value);
                                        break;
                                    case "boolean":
                                        actualValue = Boolean.parseBoolean(value);
                                        break;
                                    case "char":
                                        actualValue = value.charAt(0);
                                        break;
                                    case "Byte":
                                        actualValue = Byte.valueOf(value);
                                        break;
                                    case "Short":
                                        actualValue = Short.valueOf(value);
                                        break;
                                    case "Integer":
                                        actualValue = Integer.valueOf(value);
                                        break;
                                    case "Long":
                                        actualValue = Long.valueOf(value);
                                        break;
                                    case "Float":
                                        actualValue = Float.valueOf(value);
                                        break;
                                    case "Double":
                                        actualValue = Double.valueOf(value);
                                        break;
                                    case "Boolean":
                                        actualValue = Boolean.valueOf(value);
                                        break;
                                    case "Character":
                                        actualValue = Character.valueOf(value.charAt(0));
                                        break;
                                    case "String":
                                        actualValue = value;
                                        break;
                                }
                                setMethod.invoke(singletonObject.get(id),actualValue);
                            }
                            if (ref != null) {
                                // 说明这个值是非简单类型
                                // 调用set方法
                                setMethod.invoke(singletonObject.get(id),singletonObject.get(ref));
                            }

                        } catch (Exception e) {
                            e.printStackTrace();
                        }
                    });
                } catch (ClassNotFoundException e) {
                    e.printStackTrace();
                }
            });
        } catch (DocumentException e) {
            e.printStackTrace();
        }
    }

    @Override
    public Object getBean(String beanName) {
        return singletonObject.get(beanName);
    }
}
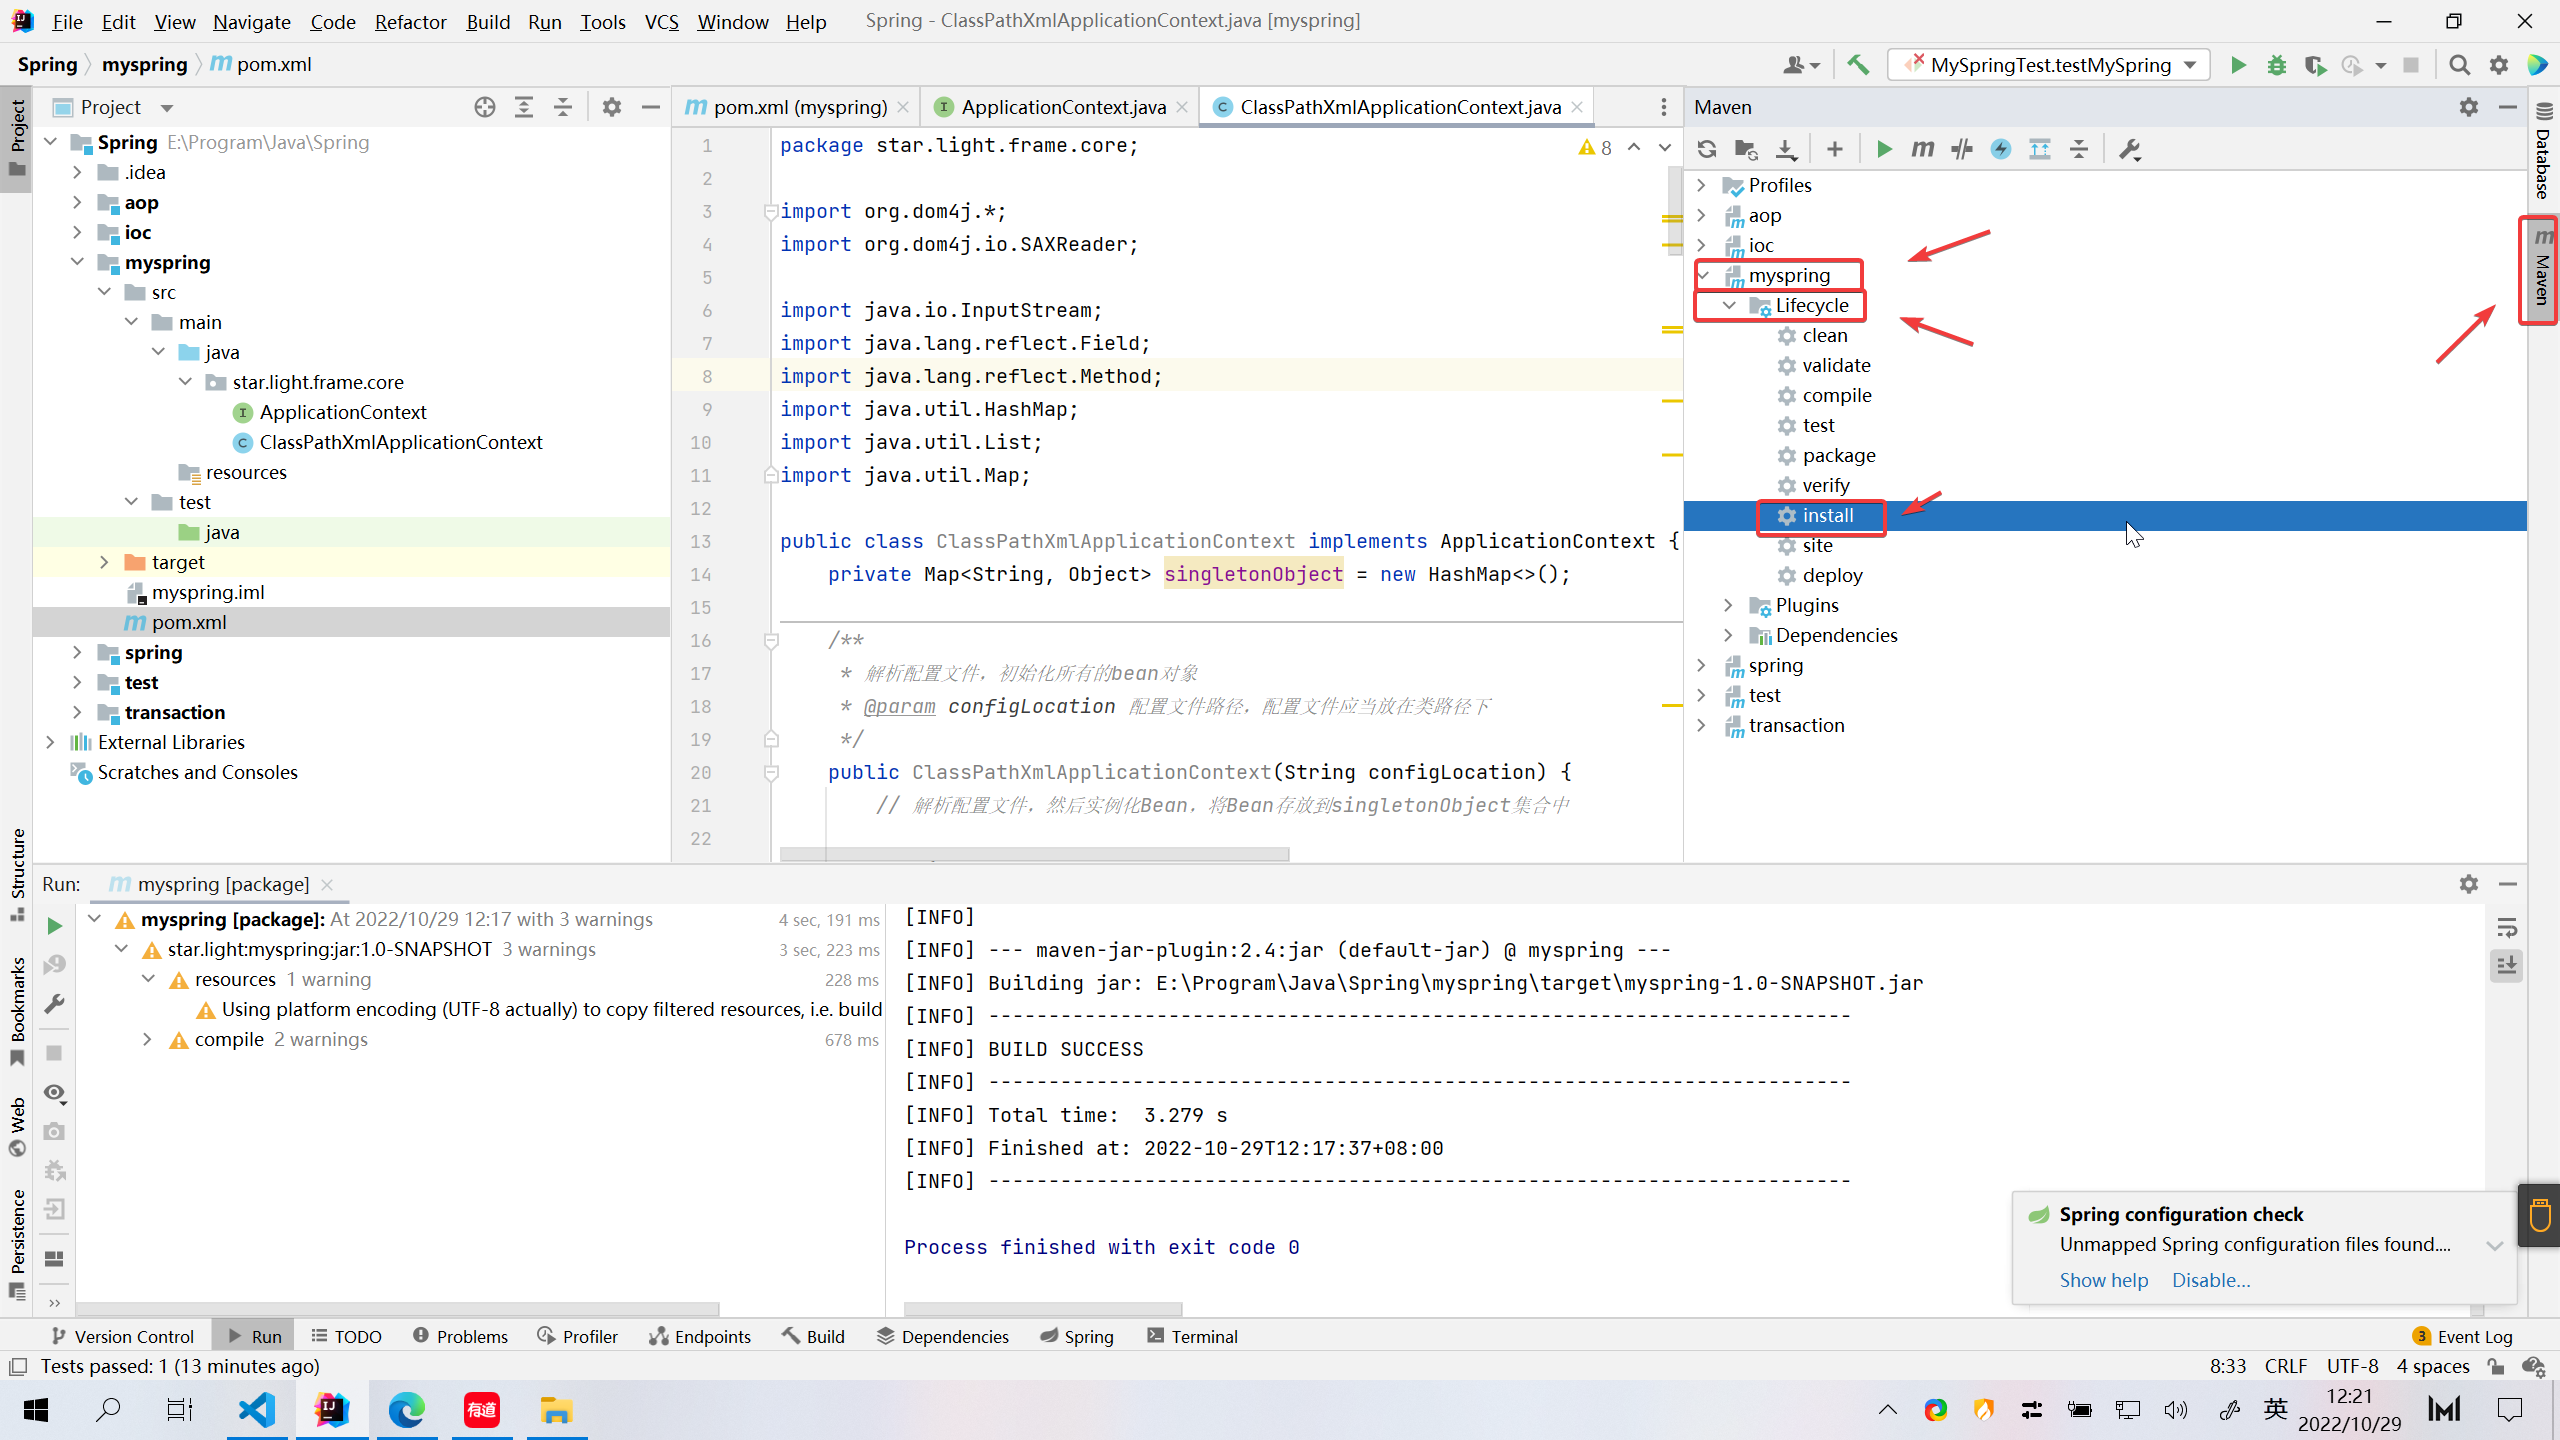
2.3、打包

三、框架的测试
3.1、引入依赖
<?xml version="1.0" encoding="UTF-8"?>
<project xmlns="http://maven.apache.org/POM/4.0.0"
         xmlns:xsi="http://www.w3.org/2001/XMLSchema-instance"
         xsi:schemaLocation="http://maven.apache.org/POM/4.0.0 http://maven.apache.org/xsd/maven-4.0.0.xsd">
    <modelVersion>4.0.0</modelVersion>

    <groupId>star.light</groupId>
    <artifactId>test</artifactId>
    <version>1.0-SNAPSHOT</version>

    <properties>
        <maven.compiler.source>11</maven.compiler.source>
        <maven.compiler.target>11</maven.compiler.target>
    </properties>

    <dependencies>
        <!-- 引入自己写的框架的依赖 -->
        <dependency>
            <groupId>star.light</groupId>
            <artifactId>myspring</artifactId>
            <version>1.0-SNAPSHOT</version>
        </dependency>

        <dependency>
            <groupId>junit</groupId>
            <artifactId>junit</artifactId>
            <version>4.12</version>
            <scope>test</scope>
        </dependency>
    </dependencies>
</project>
3.2、创建Bean类
package star.light.bean;

public class Wife {
    private String name;
    private Husband husband;

    public Wife() {
    }

    public Wife(String name, Husband husband) {
        this.name = name;
        this.husband = husband;
    }

    public String getName() {
        return name;
    }

    public void setName(String name) {
        this.name = name;
    }

    public Husband getHusband() {
        return husband;
    }

    public void setHusband(Husband husband) {
        this.husband = husband;
    }

    @Override
    public String toString() {
        return "Wife{" +
                "name='" + name + '\'' +
                ", husband=" + husband.getName() +
                '}';
    }
}
package star.light.bean;

public class Husband {
    private String name;
    private Wife wife;

    public Husband() {
    }

    public Husband(String name, Wife wife) {
        this.name = name;
        this.wife = wife;
    }

    public String getName() {
        return name;
    }

    public void setName(String name) {
        this.name = name;
    }

    public Wife getWife() {
        return wife;
    }

    public void setWife(Wife wife) {
        this.wife = wife;
    }

    @Override
    public String toString() {
        return "Husband{" +
                "name='" + name + '\'' +
                ", wife=" + wife.getName() +
                '}';
    }
}
3.3、创建核心配置文件
配置文件的取命随意,这里取命为 spring-config.xml,存放在类的根目录下;
<?xml version="1.0" encoding="UTF-8"?>
<beans>

    <bean id="husband" class="star.light.bean.Husband">
        <property name="name" value="李小狼"></property>
        <property name="wife" ref="wife"></property>
    </bean>

    <bean id="wife" class="star.light.bean.Wife">
        <property name="name" value="木之本樱"></property>
        <property name="husband" ref="husband"></property>
    </bean>
</beans>
3.4、测试程序
package star.light.test;

import org.junit.Test;
import star.light.frame.core.ApplicationContext;
import star.light.frame.core.ClassPathXmlApplicationContext;

public class MySpringTest {

    @Test
    public void testMySpring(){
        ApplicationContext applicationContext = new ClassPathXmlApplicationContext("spring-config.xml");
        Object huaband = applicationContext.getBean("husband");
        System.out.println(huaband);
        Object wife = applicationContext.getBean("wife");
        System.out.println(wife);
    }
}
原文地址:http://www.cnblogs.com/nanoha/p/16852118.html
1. 本站所有资源来源于用户上传和网络,如有侵权请邮件联系站长!
2. 分享目的仅供大家学习和交流,请务用于商业用途!
3. 如果你也有好源码或者教程,可以到用户中心发布,分享有积分奖励和额外收入!
4. 本站提供的源码、模板、插件等等其他资源,都不包含技术服务请大家谅解!
5. 如有链接无法下载、失效或广告,请联系管理员处理!
6. 本站资源售价只是赞助,收取费用仅维持本站的日常运营所需!
7. 如遇到加密压缩包,默认解压密码为"gltf",如遇到无法解压的请联系管理员!
8. 因为资源和程序源码均为可复制品,所以不支持任何理由的退款兑现,请斟酌后支付下载
声明:如果标题没有注明"已测试"或者"测试可用"等字样的资源源码均未经过站长测试.特别注意没有标注的源码不保证任何可用性
