
转载:https://www.cnblogs.com/cdaniu/p/16460065.html
学习之前要具备的知识点
数据绑定基本概念
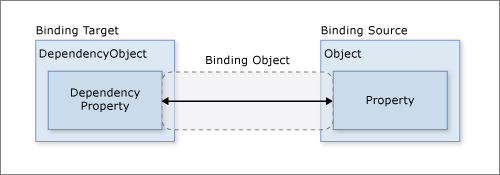
不论要绑定什么元素,也不论数据源是什么性质,每个绑定都始终遵循下图所示的模型。
形象地讲,Binding就像一个盒子,盒子里装了一些机关用于过滤和控制数据,盒子两端各接着一根管子,管子是由管壳和管芯构成的,看上去就像下面的图:
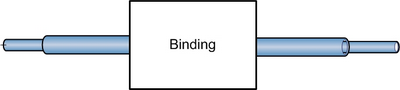
当脑子里有了这样一个形象之后,遵循下面的步骤就OK了:
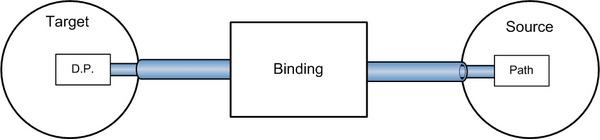
- Source:确定哪个对象作为数据源,5种数据源
- Target:确定哪个对象作为目标
- Binding:声明一个Binding实例,binding看成中间有类型转换器typeconvert
- 把一根管子接到Source上并把管芯插在Source的Path(属性或索引,不能是公有字段、不能是私有信息;xmldom是xpath)上
- 把另一根管子接到Target上并把管芯插在Target的依赖属性上
如果有必要,可以在3与4之间设置Binding的“关卡”们。其实,第3步之后的顺序不是固定的,只是这个步骤比较好记——一概向右连接。所得结果看上去是这样:
通常情况下,每个绑定具有四个组件:
- 绑定目标对象。
- 目标属性。目标属性必须为依赖属性。 大多数 UIElement 属性都是依赖属性,而大多数依赖属性(只读属性除外)默认支持数据绑定。 (仅派生自 DependencyObject 的类型才能定义依赖属性;所有 UIElement 类型都派生自
DependencyObject。) - 绑定源。绑定源可以是.NET 对象、 XMLDom 形式的数据、 UIElement、任何列表对象、ADO.NET对象 或 Web 服务对象,或包含 XML 数据的 XmlNode。 有关详细信息,请参阅绑定源概述。
- 指向绑定源中要使用的值的路径(PropertyPath或者xpath)。
D.P.的全称是“Dependency Property”,直译过来就是“依赖式属性”,意思是说它自己本身是没有值的,它的值是“依赖”在其它对象的属性值上、通过Binding的传递和转换而得来的。表现在例子里,它就是Target上的被数据所驱动的联动属性了!
这里是等价的C#代码,我把它写在了Window1的构造函数里:

public Window1()
{
    InitializeComponent();

    // 1. 我打算用slider1作为Source
    // 2. 我打算用textBox1作为Target
    Binding binding = new Binding();
    binding.Source = this.slider1;  //默认源是
    binding.Path = new PropertyPath("Value");  //Value是属性名称  Path不能xml类,xmldom要用xpath
    this.textBox1.SetBinding(TextBox.TextProperty, binding);
}
有意思的是,Source端的操作,接管子和插管芯分两步,而Target端却是在SetBinding方法中一步完成。注意啦,TextBox.TextProperty就是一个Dependency Property的庐山真面目!
上面的代码稍有简化的余地,那就是把Path的设定转移到Binding的构造中去:
public Window1()
{
    InitializeComponent();

    // 1. 我打算用slider1作为Source
    // 2. 我打算用textBox1作为Target
    Binding binding = new Binding("Value");
    binding.Source = this.slider1;//默认源是DataContent
    this.textBox1.SetBinding(TextBox.TextProperty, binding);
}
我们还可以为binding设些“关卡”:
public Window1()
{
    InitializeComponent();


    // 1. 我打算用slider1作为Source
    // 2. 我打算用textBox1作为Target
    Binding binding = new Binding("Value");
    binding.Source = this.slider1;//默认源是DataContent
    binding.Mode = BindingMode.TwoWay;//4种依赖源模式
    binding.UpdateSourceTrigger = UpdateSourceTrigger.PropertyChanged;//4种方式更新源
    this.textBox1.SetBinding(TextBox.TextProperty, binding);
}
绑定源类型
Windows Presentation Foundation (WPF) 数据绑定支持以下绑定源类型:
-
.NET 公共语言运行时 (CLR) 对象
可以绑定到任何公共语言运行时 (CLR) 对象的公共属性、子属性和索引器。 绑定引擎使用 CLR 反射来获取属性值。 实现了 ICustomTypeDescriptor 或具有已注册 TypeDescriptionProvider 的对象也可以使用绑定引擎。
有关如何实现可用作绑定源的类的详细信息,请参阅本文后面的在对象上实现绑定源。
-
动态对象
可以绑定到对象的可用属性和索引器,该对象实现 IDynamicMetaObjectProvider 接口。 如果可以访问代码中的成员,则可以绑定到该成员。 例如,如果动态对象使用户可以通过
someObjet.AProperty访问代码中的成员,则可以通过将绑定路径设置为AProperty来绑定到该成员。 -
ADO.NET 对象
可以绑定到 ADO.NET 对象,例如 DataTable。 ADO.NET DataView 实现 IBindingList 接口,该接口提供绑定引擎侦听的更改通知。
-
XML 对象
可以绑定到 XmlNode、XmlDocument 或 XmlElement,并对其运行
XPath查询。 访问 XML 数据(标记中的绑定源)的便捷方法是使用 XmlDataProvider 对象。 有关详细信息,请参阅使用 XMLDataProvider 和 XPath 查询绑定到 XML 数据 (.NET Framework)。使用 LINQ to XML,还可以绑定到 XElement 或 XDocument,或者绑定到对这些类型的对象运行查询而得到的结果。 使用 LINQ to XML 访问 XML 数据(标记中的绑定源)的便捷方法是使用 ObjectDataProvider 对象。 有关详细信息,请参阅绑定到 XDocument、XElement 或 LINQ for XML 查询结果 (.NET Framework)。
-
可以绑定到任何 DependencyObject 的依赖属性。 有关示例,请参阅绑定两个控件的属性 (.NET Framework)。
更改通知-属性改变时通知界面的过程分析
原理:通知就是clr中事件源-订阅的模式。当属性变更时候触发事件,并且传递最新值
如果使用的是 OneWay 或 TwoWay 绑定(因为当绑定源属性动态更改时,希望自己的 UI 随之更新),必须实现适当的属性更改通知机制。 对于 CLR 或动态类,建议的机制是实现 INotifyPropertyChanged 接口。 有关详细信息,请参阅实现属性更改通知。
如果创建的 CLR 对象未实现 INotifyPropertyChanged,必须安排自己的通知系统,才能确保绑定中所用的数据保持最新状态。 可以通过支持要更改通知的每个属性的 PropertyChanged 模式来提供更改通知。 若要支持此模式,请为每个属性定义一个 PropertyNameChanged 事件,其中 PropertyName 是属性的名称。 每次更改属性时都会引发该事件。更简单方式是让动态类实现INotifyPropertyChanged接口,该接口封装PropertyChanged事件。
继承INotifyPropertyChanged的对象 就是事件源,实现PropertyChanged的属性的就是触发器,Bing就是订阅事件。Bing是如何实现事件的订阅?BindingExpression在调用UpdateTarget时最终会调用PropertyChangedEventManager的StartListening订阅INotifyPropertyChanged的PropertyChanged事件,至此两个绑定的属性产生了联系 .
// System.ComponentModel.PropertyChangedEventManager是弱事件,其实就是第三方 目的就是降低订阅者和事件源的耦合度
protected override void StartListening(object source)
{
    INotifyPropertyChanged notifyPropertyChanged = (INotifyPropertyChanged)source;
    notifyPropertyChanged.PropertyChanged += OnPropertyChanged;
//OnPropertyChanged方法 在PropertyChangedEventManager类中

}
在Binding数据源时会开始监听StartListening,根据传入的 DataContext数据源类对象,来订阅事件。在Set属性时触发事件,调用OnPropertyChanged方法实时更改界面值。
知识点1、【WPF】MVVM是如何解耦的
2、弱事件模式
自定义数据源
自定义数据源:
在我们项目组日常的工作中,经常需要自己写一个类,并且拿它的实例当作数据源。怎样才能让一个类成为“合格的”数据源呢?
要诀就是:
为这个类定义一些Property,相当于为Binding提供Path
让这个类实现INotifyPropertyChanged接口。实现这个接口的目的是当Source的属性值改变后通知Binding(不然人家怎么知道源头的数据变了并进行联动协同呢?),好让Binding把数据传输给Target——本质上还是使用事件机制来做,只是掩盖在底层、不用程序员去写event handler了。
public class MyMarkupExtension : MarkupExtension, INotifyPropertyChanged
    {
        public MyMarkupExtension() { }
        private string firstStr;

        public String FirstStr
        {
            get => firstStr;
            set {
                firstStr = value;
                NotifyPropertyChanged();
            }        }
        public MyMarkupExtension(string firstStr) { }
        private void NotifyPropertyChanged([CallerMemberName] String propertyName = "")
        {
            PropertyChanged?.Invoke(this, new PropertyChangedEventArgs(propertyName));
        }

        public String SecondStr { get; set; }
        public event PropertyChangedEventHandler? PropertyChanged;
        public override object ProvideValue(IServiceProvider serviceProvider)
        {
            return FirstStr + " " + SecondStr;
        }
    }
| 应用 |
        Binding binding = new Binding();
            binding.Source = myMarkupExtension;
            binding.Path = new PropertyPath("FirstStr");
            teb.SetBinding(TextBlock.TextProperty, binding);
| OK,此时,你可以尝试使用MyMarkupExtension类的实例作为数据源了!MyMarkupExtension 同时也解除扩展标记接口,因此也是一个自定义扩展标记。 |
解除数据绑定
原理:利用依赖对象提供的ClearValue()方法解除绑定
BindingOperations类包装依赖对象的ClearValue()方法后提供了.ClearBinding()\ClearAllBinding(),用法如下:
 BindingOperations.ClearBinding(lbl, Label.FontSizeProperty);//解除lable元素的FontSizeProperty依赖属性的绑定
 BindingOperations.ClearAllBindings(lbl);//解除lable元素的所有属性的绑定
在数据绑定中,绑定源对象是指用户从其获取数据的对象。 本文讨论可以用作绑定源的对象类型,如 .NET CLR 对象、XML 和 DependencyObject 对象。
PropertyPath类用在对象的数据绑定中(Data Binding)
数据绑定是一个WPF特性,因此你可以把任何依赖对象属性绑定到目标值。然而,数据绑定的源不是必须是依赖属性;它可以是任何属性类型,只要这个属性类型能被应用程序数据提供器识别就可以。PropertyPath特别是用于ObjectDataProvider,对象数据提供器用来从公共运行时(CLR)对象和它们的属性中获取绑定源。
记住,XML数据绑定不适用PropertyPath,因为它在Binding中不用Path,而是XPath。你可以用XPath和有效的XPath语法指向数据的XML DOM。XPath也是被规定为字符串,但是不在这里讲解。
理解数据绑定中的属性路径的关键是你能把绑定定位到它的属性值,或者你可以绑定到列表或者集合属性。如果你要绑定到集合,比如绑定一个ListBox,ListBox会根据集合中项目的数量自动进行扩展。
绑定对象数据提供器ObjectDataProvider绑定方法
使用ObjectDataProvider对象作为Binding的Source
语法
<object Path="[index1,index2...]" ... />
<object Path="propertyName[index,index2...]" ... />
<Rectangle Fill="{Binding ColorGrid[20,30].SolidColorBrushResult}" ... />

<Binding Path="propertyName.propertyName2" ... />
<object Path="propertyName/propertyNameX" ... />
<object Path="[index1,index2...]" ... />
<object Path="propertyName[index,index2...]" ... />
三种绑定数据方式
WPF里分三种Binding:Binding, PriorityBinding,MultiBinding,这三种Binding的基类都是BindingBase,而BindingBase又继承于MarkupExtension
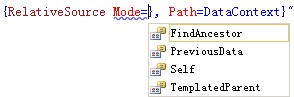
Bing绑定方式之RelativeSource
bing 绑定方式的相对源头 有四种模式下面一一介绍
1.RelativeSource Mode=Self 模式:
目标元素应用作此绑定的源。当要将元素的一个属性绑定到同一元素的另一个属性时。
<StackPanel Orientation="Vertical" DataContext="上海世博会" Name="stackPanel">
        <Border BorderThickness="2" BorderBrush="BlueViolet">
            <TextBlock Name="绑定自己的属性" Text="{Binding RelativeSource={RelativeSource Mode=Self}, Path=Name}"></TextBlock>
        </Border>
    </StackPanel>
但是把 Xmal 改成如下时 !此时Path=Name 并不会去容器的Name 属性 寻找 StackPanel Name=“stackPanel”
<TextBlock Text=”{Binding RelativeSource={RelativeSource Mode=Self}, Path=Name}”></TextBlock>
 此时为空
此时为空
但是:当Path=DataContext 就会出现另一个效果
  <StackPanel Orientation="Vertical" DataContext="上海世博会" Name="stackPanel">
        <Border BorderThickness="2" BorderBrush="BlueViolet">
            <TextBlock Name="绑定自己的属性" Text="{Binding RelativeSource={RelativeSource Mode=Self}, Path=DataContext}" DataContext="北京欢迎你"></TextBlock>
        </Border>
    </StackPanel>
把 DataContext=”北京欢迎你” 。删除后 Path=DataContext 就会向上寻找 DataContext 只到找到为止。
<TextBlock Name=”绑定自己的属性” Text=”{Binding RelativeSource={RelativeSource Mode=Self}, Path=DataContext}”></TextBlock>1.Self模式

2.PreviousData 模式:
允许您绑定所显示数据项列表中以前的数据项(不是包含数据项的控件)。源码:
<Window x:Class="WPFBindingDemo.RelativeSourceWindow"
        xmlns="http://schemas.microsoft.com/winfx/2006/xaml/presentation"
        xmlns:x="http://schemas.microsoft.com/winfx/2006/xaml"
        xmlns:local="clr-namespace:WPFBindingDemo"
        xmlns:collection="clr-namespace:System.Collections;assembly=mscorlib"
        xmlns:sys="clr-namespace:System;assembly=mscorlib"
        Title="RelativeSourceWindow" Height="300" Width="300">
    <Window.Resources>
        <collection:ArrayList x:Key="cillectionkey">
            <sys:String>上海</sys:String>
            <sys:String>北京</sys:String>
            <sys:String>天津</sys:String>
            <sys:String>南京</sys:String>
        </collection:ArrayList>
    </Window.Resources>
    <StackPanel Orientation="Vertical">
        <ListBox ItemsSource="{StaticResource ResourceKey=cillectionkey}">
            <ListBox.ItemTemplate>
                <DataTemplate>
                    <StackPanel Orientation="Horizontal">
                        <TextBlock Text="{Binding}"></TextBlock>
                        <TextBlock Text="{Binding RelativeSource={RelativeSource Mode=PreviousData}}" Margin="15 0 0 0"></TextBlock>
                    </StackPanel>
                </DataTemplate>
            </ListBox.ItemTemplate>
        </ListBox>
    </StackPanel>
</Window>

3.TemplatedParent模式
在其中应用 ControlTemplate 的控件是此绑定的源。这一点可用来在模板级别应用绑定中的验证错误信息。
<StackPanel Orientation="Vertical">
        <Button Width="150" Height="35" Margin="0 20 0 0" Content="TemplateBinding">
            <Button.Background>
                <LinearGradientBrush StartPoint="0,0.5" EndPoint="1,0.5">
                    <GradientStop Color="BlueViolet" Offset="0.0"></GradientStop>
                    <GradientStop Color="WhiteSmoke" Offset="0.5"></GradientStop>
                    <GradientStop Color="BlueViolet" Offset="1.0"></GradientStop>
                </LinearGradientBrush>
            </Button.Background>
            <Button.Template>
                <ControlTemplate>
                    <Border BorderThickness="{Binding RelativeSource={RelativeSource Mode=TemplatedParent}, Path=BorderThickness}"
                            Background="{Binding RelativeSource={RelativeSource Mode=TemplatedParent}, Path=Background}">
                        <TextBlock Text="{TemplateBinding Button.Content}"></TextBlock>
                    </Border>
                </ControlTemplate>
            </Button.Template>
        </Button>

    </StackPanel>
TemplateBinding和Binding的区别
TemplateBinding是为了某个特定场景优化出来的数据绑定版本–需要把ControlTemplate里面的某个Property绑定到应用该ControlTemplate的控件的对应Property上。
TemplateBinding 用法:
在属性赋值中直接的用法:

<object property="{TemplateBinding targetProperty}" .../>

在模板或样式中用Setter属性的用法:

<Setter Property="propertyName" Value="{TemplateBinding targetProperty}" .../>

两者区别:
1. Binding比TemplateBinding更加灵活强大,但是开销也更大。TemplateBinding在使用场景有限制,但是效率较高。Template非常类似{Binding RelativeSource={RelativeSource TemplatedParent}}构造的Binding。
2. TemplateBinding同样允许我们定义Converter和ConverterParameter,在一定程度上加强了TemplateBinding的应用功能和范围.
3. 最重要的区别:TemplateBinding仅仅支持单向的数据绑定,从应用Template的控件到Template(from templated control to template)。如果我们需要反向或者双向的绑定,唯一的选择就是应用Binding和RelativeSource。
使用时如何选择:
如果我们需要一个单向的绑定,使数据从应用template的控件(templated parent)到template,我们就该使用高效而简单的TemplateBinding,其他情况下都使用Binding。
4.FindAncestor模式
FindAncestor:引用数据绑定元素父链中的上级。 您可以使用它绑定到特定类型或其子类的上级。 如果您要指定 AncestorType 和/或 AncestorLevel,可以使用此模式
AncestorType 获取或设置要查找的上级节点的类型。如果未显式设置 Mode 属性,那么设置 AncestorType 或 AncestorLevel 属性将把 Mode 属性值隐式锁定为 FindAncestor。
<StackPanel Orientation="Vertical" Margin="0 20 0 0">
        <Button Background="BlanchedAlmond">
            <StackPanel>
                <Button  Margin="20 0 0 0" HorizontalAlignment="Left" Background="RoyalBlue">
                    <StackPanel>
                          <Button Margin="{Binding Path=Margin, RelativeSource={RelativeSource AncestorType=Button, Mode=FindAncestor}}"
                                       Content="上海世博会"></Button>
                        <Button Content="北京奥运会"></Button>
                    </StackPanel>
                </Button>
            </StackPanel>
        </Button>
    </StackPanel>
<StackPanel Orientation="Vertical" Margin="0 20 0 0">
        <Button Background="BlanchedAlmond"><!--AncestorLevel=2-->
            <StackPanel>
                <Button  Margin="20 0 0 0" HorizontalAlignment="Left" Background="RoyalBlue"><!--AncestorLevel=1-->
                    <StackPanel>
                          <Button Margin="{Binding Path=Margin, RelativeSource={RelativeSource AncestorType=Button, Mode=FindAncestor}}"
                                       Content="上海世博会"></Button>
                        <Button Content="北京奥运会" Background="{Binding Path=Background, RelativeSource={RelativeSource AncestorType={x:Type Button},
 AncestorLevel=1, Mode=FindAncestor}}">
                        </Button>
                    </StackPanel>
                </Button>
            </StackPanel>
        </Button>
    </StackPanel>
AncestorLevel=1 修改成 AncestorLevel=2 背景设为
AncestorLevel=2, Mode=FindAncestor}}”></Button>
原文地址:http://www.cnblogs.com/wenzihaoduo/p/16879870.html