
一、前台首页组件编写
需要创建4个组件
HomeView.vue 页面组件
Header.vue   头部组件
Banner.vue   轮播图组件
Footer.vue   尾部组件
1.HomeView.vue
<template>
  <div class="home">
    <Header></Header>
    <Banner></Banner>
    <br><br><br><br><br><br><br><br><br><br><br><br><br><br><br><br><br><br><br><br><br><br><br><br><br><br><br><br><br><br>
    <Footer></Footer>
  </div>
</template>

<script>
import Header from '@/components/Header'
import Banner from '@/components/Banner'
import Footer from '@/components/Footer'
// @ is an alias to /src
// import HelloWorld from '@/components/HelloWorld.vue'
// import axios from 'axios'
// import settings from "@/assets/js/settings";
export default {
  name: 'HomeView',
  data(){
    return {}
  },
  created() {
    // this.$cookies.set('token', 'xzz')
    // this.$axios.post(settings.BASE_URL + 'test/', {
    // headers:{'token':'xxhshhsh'}
    // }).then(res => {
    //   console.log(res)
    // })
  },
  components: {
    Header, Banner, Footer
  }
}
</script>

<style>

#app{
  height: 100%;
  width: 100%;
}

</style>
2.Header.vue
<template>
  <div class="header">
    <div class="slogan">
      <p>老男孩IT教育 | 帮助有志向的年轻人通过努力学习获得体面的工作和生活</p>
    </div>
    <div class="nav">
      <ul class="left-part">
        <li class="logo">
          <router-link to="/">
            <img src="../assets/img/head-logo.svg" alt="">
          </router-link>
        </li>
        <li class="ele">
          <span @click="goPage('/free-course')" :class="{active: url_path === '/free-course'}">免费课</span>
        </li>
        <li class="ele">
          <span @click="goPage('/actual-course')" :class="{active: url_path === '/actual-course'}">实战课</span>
        </li>
        <li class="ele">
          <span @click="goPage('/light-course')" :class="{active: url_path === '/light-course'}">轻课</span>
        </li>
      </ul>

            <div class="right-part">
        <div>
          <span @click="loginClick">登录</span>
          <span class="line">|</span>
          <span @click="registerClick">注册</span>
        </div>
      </div>
    </div>
<!--    登录注册模态框-->
    <Login v-if="is_login" @close="close_login" @go="registerClick"></Login>
    <Register v-if="is_register" @close="close_register" @go="loginClick"></Register>
  </div>
</template>

<script>
import Login from '@/components/Login'
import Register from "@/components/Register";
export default {
  name: "Header",
  data() {
    return {
      url_path:sessionStorage.url_path || '/',
      is_login:false,
      is_register:false,
    }
  },
  methods:{
    goPage(url_path){
      // 当前路由不用跳转
      if(this.url_path !== url_path){
        // 传入的参数,如果是不等于当前路径就跳转
        this.$router.push(url_path);
      }
      sessionStorage.url_path=url_path;
    },
    loginClick(){
      this.is_login = !this.is_login;
      this.is_register= false;
    },
    registerClick(){
      this.is_register = !this.is_register;
      this.is_login = false;
    },
    close_login(){
      this.is_login = false;
    },
    close_register() {
      this.is_register = false;
    }
  },
  created(){
    sessionStorage.url_path = this.$route.path
    this.url_path = this.$route.path
  },
  components: {
    Login,Register
  }
}
</script>

<style scoped>
.header {
  background-color: white;
  box-shadow: 0 0 5px 0 #aaa;
}

.header:after {
  content: "";
  display: block;
  clear: both;
}

.slogan {
  background-color: #eee;
  height: 40px;
}

.slogan p {
  width: 1200px;
  margin: 0 auto;
  color: #aaa;
  font-size: 13px;
  line-height: 40px;
}

.nav {
  background-color: white;
  user-select: none;
  width: 1200px;
  margin: 0 auto;

}

.nav ul {
  padding: 15px 0;
  float: left;
}

.nav ul:after {
  clear: both;
  content: '';
  display: block;
}

.nav ul li {
  float: left;
}

.logo {
  margin-right: 20px;
}

.ele {
  margin: 0 20px;
}

.ele span {
  display: block;
  font: 15px/36px '微软雅黑';
  border-bottom: 2px solid transparent;
  cursor: pointer;
}

.ele span:hover {
  border-bottom-color: orange;
}

.ele span.active {
  color: orange;
  border-bottom-color: orange;
}

.right-part {
  float: right;
}

.right-part .line {
  margin: 0 10px;
}

.right-part span {
  line-height: 68px;
  cursor: pointer;
}
ul {
  list-style: none;
}
</style>
3.Banner.vue
<template>
  <div class="banner">
    <el-carousel :interval="5000" arrow="always" height="400px">
      <el-carousel-item v-for="item in bannerList" :key="item.title">
        <div v-if="item.link.indexOf('http') == -1">
          <router-link :to="item.link"><img :src="item.image" alt=""></router-link>
        </div>
        <div v-else>
          <a :href="item.link"><img :src="item.image" alt=""></a>
        </div>

      </el-carousel-item>
    </el-carousel>

  </div>

</template>


<script>

export default {
  name: "Banner",


  data() {
    return {
      bannerList: []
    }
  },
  created() {
    this.$axios.get(this.$settings.BASE_URL + 'home/banner/').then(res => {
      this.bannerList = res.data.request
    })
  }
}
</script>

<style scoped>
.el-carousel__item {
  height: 400px;
  min-width: 1200px;
}

.el-carousel__item img {
  height: 400px;
  margin-left: calc(50% - 1920px / 2);
}

.el-carousel__item h3 {
  color: #475669;
  font-size: 18px;
  opacity: 0.75;
  line-height: 300px;
  margin: 0;
}

.el-carousel__item:nth-child(2n) {
  background-color: #99a9bf;
}

.el-carousel__item:nth-child(2n+1) {
  background-color: #d3dce6;
}
</style>
4.Footer.vue
<template>
  <div class="home">
    <Header></Header>
    <Banner></Banner>
    <br><br><br><br><br><br><br><br><br><br><br><br><br><br><br><br><br><br><br><br><br><br><br><br><br><br><br><br><br><br>
    <Footer></Footer>
  </div>
</template>

<script>
import Header from '@/components/Header'
import Banner from '@/components/Banner'
import Footer from '@/components/Footer'
// @ is an alias to /src
// import HelloWorld from '@/components/HelloWorld.vue'
// import axios from 'axios'
// import settings from "@/assets/js/settings";
export default {
  name: 'HomeView',
  data(){
    return {}
  },
  created() {
    // this.$cookies.set('token', 'xzz')
    // this.$axios.post(settings.BASE_URL + 'test/', {
    // headers:{'token':'xxhshhsh'}
    // }).then(res => {
    //   console.log(res)
    // })
  },
  components: {
    Header, Banner, Footer
  }
}
</script>

<style>

#app{
  height: 100%;
  width: 100%;
}

</style>
5.Login.vue(登录模态框分析)
<template>
    <div class="login">
        <div class="box">
            <i class="el-icon-close" @click="close_login"></i>
            <div class="content">
                <div class="nav">
                    <span :class="{active: login_method === 'is_pwd'}"
                          @click="change_login_method('is_pwd')">密码登录</span>
                    <span :class="{active: login_method === 'is_sms'}"
                          @click="change_login_method('is_sms')">短信登录</span>
                </div>
                <el-form v-if="login_method === 'is_pwd'">
                    <el-input
                            placeholder="用户名/手机号/邮箱"
                            prefix-icon="el-icon-user"
                            v-model="username"
                            clearable>
                    </el-input>
                    <el-input
                            placeholder="密码"
                            prefix-icon="el-icon-key"
                            v-model="password"
                            clearable
                            show-password>
                    </el-input>
                    <el-button type="primary">登录</el-button>
                </el-form>
                <el-form v-if="login_method === 'is_sms'">
                    <el-input
                            placeholder="手机号"
                            prefix-icon="el-icon-phone-outline"
                            v-model="mobile"
                            clearable
                            @blur="check_mobile">
                    </el-input>
                    <el-input
                            placeholder="验证码"
                            prefix-icon="el-icon-chat-line-round"
                            v-model="sms"
                            clearable>
                        <template slot="append">
                            <span class="sms" @click="send_sms">{{ sms_interval }}</span>
                        </template>
                    </el-input>
                    <el-button type="primary">登录</el-button>
                </el-form>
                <div class="foot">
                    <span @click="go_register">立即注册</span>
                </div>
            </div>
        </div>
    </div>
</template>

<script>
export default {
  name: "Login",
  data(){
    return {
      username:'',
      password:'',
      mobile:'',
      sms:'',
      login_method:'is_pwd',
      sms_interval:'获取验证码',
      is_send:false,

    }
  },
  methods:{
    close_login(){
      this.$emit('close')
    },
    go_register(){
      this.$emit('go')
    },
    change_login_method(method){
      this.login_method = method;
    },
    check_mobile(){
      if (!this.mobile) return;
      if(!this.mobile.match(/^1[3-9][0-9]{9}$/)){
        this.$message({
          message:'手机号有误',
          type:'warning',
          duration:1000,
          onClose:() =>{
            this.mobile = '';
          }
        });
        return false;

      }
      this.is_send = true;
    },
    send_sms() {
                if (!this.is_send) return;
                this.is_send = false;
                let sms_interval_time = 60;
                this.sms_interval = "发送中...";
                let timer = setInterval(() => {
                    if (sms_interval_time <= 1) {
                        clearInterval(timer);
                        this.sms_interval = "获取验证码";
                        this.is_send = true; // 重新回复点击发送功能的条件
                    } else {
                        sms_interval_time -= 1;
                        this.sms_interval = `${sms_interval_time}秒后再发`;
                    }
          }, 1000);
    }
  }
}
</script>

<style scoped>
    .login {
        width: 100vw;
        height: 100vh;
        position: fixed;
        top: 0;
        left: 0;
        z-index: 10;
        background-color: rgba(0, 0, 0, 0.3);
    }

    .box {
        width: 400px;
        height: 420px;
        background-color: white;
        border-radius: 10px;
        position: relative;
        top: calc(50vh - 210px);
        left: calc(50vw - 200px);
    }

    .el-icon-close {
        position: absolute;
        font-weight: bold;
        font-size: 20px;
        top: 10px;
        right: 10px;
        cursor: pointer;
    }

    .el-icon-close:hover {
        color: darkred;
    }

    .content {
        position: absolute;
        top: 40px;
        width: 280px;
        left: 60px;
    }

    .nav {
        font-size: 20px;
        height: 38px;
        border-bottom: 2px solid darkgrey;
    }

    .nav > span {
        margin: 0 20px 0 35px;
        color: darkgrey;
        user-select: none;
        cursor: pointer;
        padding-bottom: 10px;
        border-bottom: 2px solid darkgrey;
    }

    .nav > span.active {
        color: black;
        border-bottom: 3px solid black;
        padding-bottom: 9px;
    }

    .el-input, .el-button {
        margin-top: 40px;
    }

    .el-button {
        width: 100%;
        font-size: 18px;
    }

    .foot > span {
        float: right;
        margin-top: 20px;
        color: orange;
        cursor: pointer;
    }

    .sms {
        color: orange;
        cursor: pointer;
        display: inline-block;
        width: 70px;
        text-align: center;
        user-select: none;
    }
</style>
6.Register.vue(注册模态框分析)
<template>
    <div class="register">
        <div class="box">
            <i class="el-icon-close" @click="close_register"></i>
            <div class="content">
                <div class="nav">
                    <span class="active">新用户注册</span>
                </div>
                <el-form>
                    <el-input
                            placeholder="手机号"
                            prefix-icon="el-icon-phone-outline"
                            v-model="mobile"
                            clearable
                            @blur="check_mobile">
                    </el-input>
                    <el-input
                            placeholder="密码"
                            prefix-icon="el-icon-key"
                            v-model="password"
                            clearable
                            show-password>
                    </el-input>
                    <el-input
                            placeholder="验证码"
                            prefix-icon="el-icon-chat-line-round"
                            v-model="sms"
                            clearable>
                        <template slot="append">
                            <span class="sms" @click="send_sms">{{ sms_interval }}</span>
                        </template>
                    </el-input>
                    <el-button type="primary">注册</el-button>
                </el-form>
                <div class="foot">
                    <span @click="go_login">立即登录</span>
                </div>
            </div>
        </div>
    </div>
</template>

<script>
    export default {
        name: "Register",
        data() {
            return {
                mobile: '',
                password: '',
                sms: '',
                sms_interval: '获取验证码',
                is_send: false,
            }
        },
        methods: {
            close_register() {
                this.$emit('close', false)
            },
            go_login() {
                this.$emit('go')
            },
            check_mobile() {
                if (!this.mobile) return;
                if (!this.mobile.match(/^1[3-9][0-9]{9}$/)) {
                    this.$message({
                        message: '手机号有误',
                        type: 'warning',
                        duration: 1000,
                        onClose: () => {
                            this.mobile = '';
                        }
                    });
                    return false;
                }
                this.is_send = true;
            },
            send_sms() {
                if (!this.is_send) return;
                this.is_send = false;
                let sms_interval_time = 60;
                this.sms_interval = "发送中...";
                let timer = setInterval(() => {
                    if (sms_interval_time <= 1) {
                        clearInterval(timer);
                        this.sms_interval = "获取验证码";
                        this.is_send = true; // 重新回复点击发送功能的条件
                    } else {
                        sms_interval_time -= 1;
                        this.sms_interval = `${sms_interval_time}秒后再发`;
                    }
                }, 1000);
            }
        }
    }
</script>

<style scoped>
    .register {
        width: 100vw;
        height: 100vh;
        position: fixed;
        top: 0;
        left: 0;
        z-index: 10;
        background-color: rgba(0, 0, 0, 0.3);
    }

    .box {
        width: 400px;
        height: 480px;
        background-color: white;
        border-radius: 10px;
        position: relative;
        top: calc(50vh - 240px);
        left: calc(50vw - 200px);
    }

    .el-icon-close {
        position: absolute;
        font-weight: bold;
        font-size: 20px;
        top: 10px;
        right: 10px;
        cursor: pointer;
    }

    .el-icon-close:hover {
        color: darkred;
    }

    .content {
        position: absolute;
        top: 40px;
        width: 280px;
        left: 60px;
    }

    .nav {
        font-size: 20px;
        height: 38px;
        border-bottom: 2px solid darkgrey;
    }

    .nav > span {
        margin-left: 90px;
        color: darkgrey;
        user-select: none;
        cursor: pointer;
        padding-bottom: 10px;
        border-bottom: 2px solid darkgrey;
    }

    .nav > span.active {
        color: black;
        border-bottom: 3px solid black;
        padding-bottom: 9px;
    }

    .el-input, .el-button {
        margin-top: 40px;
    }

    .el-button {
        width: 100%;
        font-size: 18px;
    }

    .foot > span {
        float: right;
        margin-top: 20px;
        color: orange;
        cursor: pointer;
    }

    .sms {
        color: orange;
        cursor: pointer;
        display: inline-block;
        width: 70px;
        text-align: center;
        user-select: none;
    }
</style>
App.vue
<template>
  <div id="app">
    <router-view/>
  </div>
</template>
二、登录注册功能设计
后端接口
1.账号/手机号/邮箱+密码登录接口
2.手机号+验证码登录接口
3.发送手机验证码接口(第三方发送短信)
4.判断接口---》手机号,验证码,密码
5.判断手机号是否存在接口
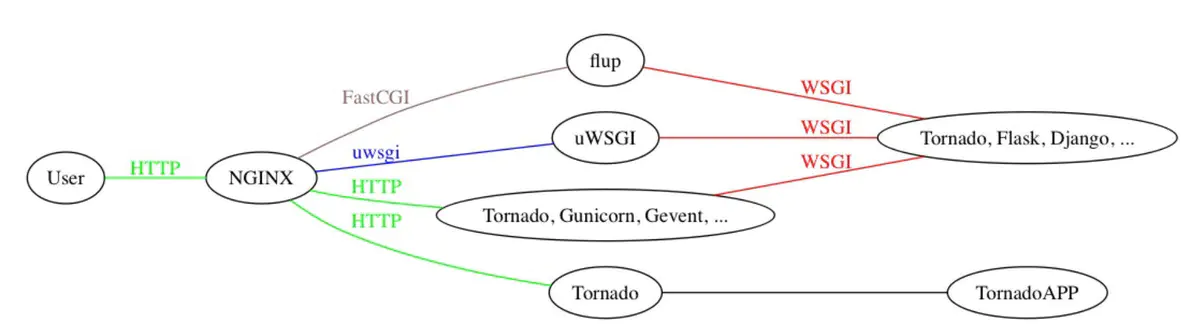
补充:cgi fastcig WSGI uwsgi uWSGI
1 CGI
cgi:
    通用网关接口(Common Gateway Interface/CGI)是一种重要的互联网技术,可以让一个客户端从网页浏览器向执行在网络服务器上的程序请求数据。CGI描述了服务器和请求处理程序之间传输数据的一种标准
    用来规范web服务器传输到php解释器中的数据类型以及数据格式,包括URL、查询字符串、POST数据、HTTP header等,也就是为了保证web server传递过来的数据是标准格式的

    '''
    一个标准,定义了客户端服务器之间如何传数据
    '''
2 fastCGI
	快速通用网关接口 (Fast Common Gateway Interface/FastCGI) 是一种让交互程序与Web服务器通信的协议, 它是早期 CGI 的一个增强版本
    像一个常驻(long-live)型的CGI,废除了CGI fork-and-execute(来一个请求fork一个新进程处理,处理完再把握进程kill掉)的工作方式,转而使用一种长生存期的方法,减少了进程的消耗,从而使服务器可以同时处理更多的网页请求
    '''
    是 CGId 升级版
    '''
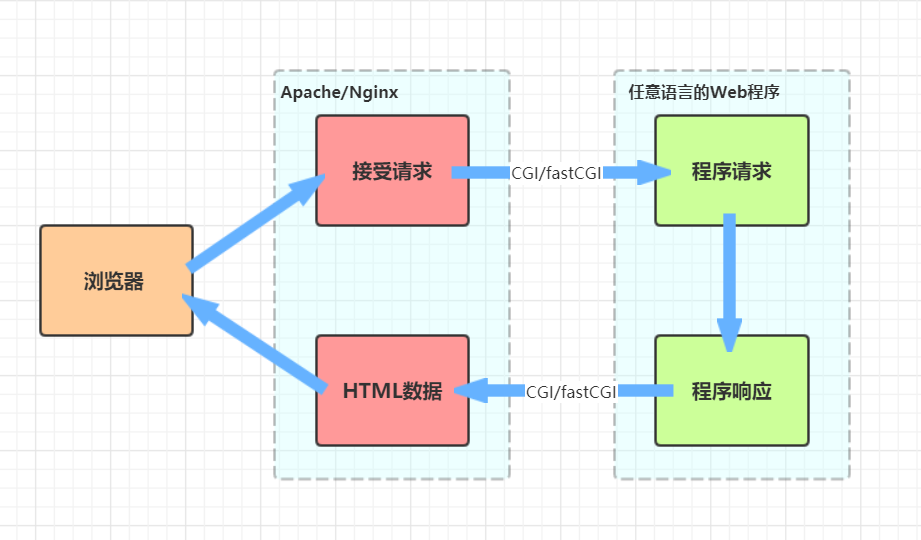
3 WSGI
	全称 Web Server Gateway Interface 或者 Python Web Server Gateway Interface
    Web服务器网关接口,目的是为了Python 语言定义的 Web 服务器和 Web 应用程序或框架之间的一种简单而通用的接口; 自从 WSGI 被开发出来以后, 许多其它语言中也出现了类似接口。
    WSGI 是作为 Web 服务器与 Web 应用程序或应用框架之间的一种低级别的接口, 以提升可移植 Web 应用开发的共同点; WSGI 是基于现存的 CGI 标准而设计的。
    '''
    网关的作用就是在协议之间进行转换
    而这个是为 Python 定义的 web 服务器和 web 框架之间的接口标准
    '''
-
实现WSGI协议的模块 :
* django : wsgiref模块, 本质上就是编写一socket服务端, 用于接收用户请求
* Flask : werkzeug、wsgi模块, 本质上就是编写一个socket服务端,用于接收用户请求
4 wsgiref
Python中的一个WSGI模块 : wsgiref
用纯Python编写的WSGI服务器的 ‘‘参考实现’’是指该实现完全符合WSGI标准,但是不考虑任何运行效率,仅供开发和测试使用
5 uWSGI
* uWSGI 是一个Web服务器, 它实现了WSGI、uwsgi、http等协议, 用于接收前端服务器转发的动态请求并处理后发给 web 应用程序,类似的web服务器。
*
注意
uWSGI : 用c语言写的,性能比较高
gunicorn : python写的, 在unix上被广泛使用
tornado : python写的, 异步非阻塞web服务器, 也可以部署django项目
wsgiref、werkzeug(是符合WSGI协议的web服务器+工具包(封装了一些东西))

Nginx中HttpUwsgiModule的作用是与uWSGI服务器进行交换

'''
Web Server, 实现了WSGI的服务器, 处理发来的请求
'''
6 uwsgi
* 是uWSGI服务器实现的独有的线路协议, 用于定义传输信息的类型, 是用于前端服务器与 uwsgi 的通信规范
* uwsgi和WSGI都是基于CGI扩展出来的

'''
uWSGI自有的一个协议
'''
7 区分 WSGI、uwsgi、uWSGI
* WSGI是一种通信协议,
* uwsgi是uWSGI自有的一种线路协议,常用于在uWSGI服务器与其他网络服务器的数据通信,而uWSGI是实现了uwsgi和WSGI两种协议的Web服务器
三、首页中间部分样式
HomeView.vue
<template>
  <div class="home">
    <Header></Header>
    <Banner></Banner>
    <div class="course">
      <el-row>
        <el-col :span="6" v-for="(o, index) in 8" :key="o" class="course_detail">
          <el-card :body-style="{ padding: '0px' }">
            <img src="https://tva1.sinaimg.cn/large/e6c9d24egy1h1g0zd133mj20l20a875i.jpg"
                 class="image">
            <div style="padding: 14px;">
              <span>推荐课程</span>
              <div class="bottom clearfix">
                <time class="time">价格:999</time>
                <el-button type="text" class="button">查看详情</el-button>
              </div>
            </div>
          </el-card>
        </el-col>
      </el-row>
    </div>
    <img src="https://tva1.sinaimg.cn/large/e6c9d24egy1h1g112oiclj224l0u0jxl.jpg" alt="" width="100%" height="500px">


    <Footer></Footer>
  </div>
</template>

<script>
import Header from '@/components/Header'
import Banner from '@/components/Banner'
import Footer from '@/components/Footer'
// @ is an alias to /src
// import HelloWorld from '@/components/HelloWorld.vue'
// import axios from 'axios'
// import settings from "@/assets/js/settings";
export default {
  name: 'HomeView',
  data(){
    return {}
  },
  created() {
    // this.$cookies.set('token', 'xzz')
    // this.$axios.post(settings.BASE_URL + 'test/', {
    // headers:{'token':'xxhshhsh'}
    // }).then(res => {
    //   console.log(res)
    // })
  },
  components: {
    Header, Banner, Footer
  }
}
</script>

<style>

#app{
  height: 100%;
  width: 100%;
}

.time {
  font-size: 13px;
  color: #999;
}

.bottom {
  margin-top: 13px;
  line-height: 12px;
}

.button {
  padding: 0;
  float: right;
}

.image {
  width: 100%;
  display: block;
}

.clearfix:before,
.clearfix:after {
  display: table;
  content: "";
}

.clearfix:after {
  clear: both
}

.course_detail {
  padding: 50px;
}
</style>
四、多方式登录接口
- 需要前端传来的username(用户名、邮箱、手机号)和password数据的post请求
- 然后后端视图层用序列化校验
user/views.py
import re

from django.shortcuts import render

# Create your views here.
from rest_framework.exceptions import APIException

from rest_framework.viewsets import ViewSet, GenericViewSet, ViewSetMixin
from rest_framework.decorators import action
from .models import UserInfo
from .serializer import UserMulLoginSerializer

from utilss.response import APIResponse


class UserView(ViewSet):
    @action(methods=['POST'], detail=False)
    def mul_login(self, request):
        # # 1. 老写法
        # username = request.data.get('username')
        # password = request.data.get('password')
        # # 查询用户
        # UserInfo.objects.filter(username=username, password=password)
        # # 签发token然后返回
        # # 2. 新写法:使用序列化类
        ser = UserMulLoginSerializer(data=request.data)
        # jwt 模块的登录就这么写
        ser.is_valid(raise_exception=True)  # 会执行序列化类字段自己的校验规则,局部钩子,全局钩子
        # 用户名密码校验通过,在序列化类中---》签发token
        token = ser.context.get('token')
        username = ser.context.get('username')
        icon = ser.context.get('icon')
        # 前端看到的样子{code:100,msg:成功,token:adsfa,username:root,icon:http://adsfasd.png}
        return APIResponse(token=token, username=username, icon=icon)
user/serializer.py
from rest_framework import serializers
from .models import UserInfo
import re
from django.contrib.auth import authenticate
from rest_framework.exceptions import ValidationError
from rest_framework_jwt.settings import api_settings

jwt_payload_handler = api_settings.JWT_PAYLOAD_HANDLER
jwt_encode_handler = api_settings.JWT_ENCODE_HANDLER


class UserMulLoginSerializer(serializers.ModelSerializer):
    username = serializers.CharField()  # 重写,优先用现在的,就没有unique的限制

    class Meta:
        model = UserInfo
        fields = ['username', 'password']

    # 封装之隐藏属性 __表示隐藏, _并不是隐藏,公司约定成俗 _表示只在内部用,如果外部想用也可以用。
       def _get_user(self, attrs):
        # attr 是校验过后的数据:字段自己的校验规则【不写则字段因为自己有规则会有问题】和局部钩子
        username = attrs.get('username')
        password = attrs.get('password')
        # username可能是用户名,邮箱,手机号---》使用正则判断
        if re.match(r'^1[3-9][0-9]{9}$', username):
            user = UserInfo.objects.filter(mobile=username).first()
        elif re.match(r'^[A-Za-z0-9\u4e00-\u9fa5]+@[a-zA-Z0-9_-]+(.[a-zA-Z0-9_-]+)+$', username):
            # sa@adsf  会有bug,用户名中如果有@,登录不了了
            # user = authenticate(email=username, password=password)
            user = UserInfo.objects.filter(email=username).first()
        else:
            user = authenticate(username=username, password=password)
        if user and user.check_password(password):
            return user
        else:
            raise APIException('用户名或密码错误')

    def _get_token(self, user):
        try:
            payload = jwt_payload_handler(user)
            token = jwt_encode_handler(payload)
            return token
        except Exception as e:
            raise ValidationError(str(e))

    def validate(self, attrs):
        # 取出用户名和密码,校验用户是否存在
        user = self._get_user(attrs)
        # 签发token
        token = self._get_token(user)
        # 把token放到序列化类对象中
        self.context['token'] = token
        self.context['username'] = user.username
        self.context['icon'] = 'http://127.0.0.1:8000/media/' + str(user.icon)
        # self.context['icon'] = user.icon  # 这是个对象,可能会有问题
        # 以后如果有问题都抛出异常
        # 如果没有问题返回attrs
        return attrs
序列化数据校验的注意点:
-
__xxx 和 _xxx 的区别: 前者是隐藏后者不是隐藏,而是公司自己用的。外部可以调用不会有些格式和规则。 -
if re.match(r'^1[3-9][0-9]{9}$', username): user = authenticate(mobile=username, password = password) elif re.match('邮箱正则', username) 注意:authenticate 只能接收 username 和password 的字段,如果username为空,会出现异常。 所以我们在不校验username,而校验其他的话,不用authenticate, 可以先走数据库查询当前用户是否存在,然后校验密码时用user.check_password(password)针对加密密码校验,调用user里面的check_password -
字段自己的规则 unique = True 在没有写字段自己的校验时,valid校验字段自己的规则时会自动走数据库查询,有记录就会抛异常,要重写字段添加 username = serializers.CharField() # 重写,优先用现在的,就没有unique的限制unique = False 因为是继承了 ModelSerializer 需要写上面的代码重写序列化字段 如果继承 Serializer 则直接重写并设定 unique = False -
icon序列化后是文件对象,需要转化成字符串形式 再加前缀的'http://127.0.0.1/media/' + str(icon)
user/urls.py
from rest_framework.routers import SimpleRouter


router = SimpleRouter()
# 127.0.0.1:8080/api/v1/user/userinfo/mul_login
router.register('userinfo', views.UserView, 'userinfo')
# router.register('userinfo', views.UserView, 'userinfo')
urlpatterns = [
]
urlpatterns += router.urls
五、手机号是否存在接口
- 发送get请求:
http://127.0.0.1:8000/api/v1/user/userinfo/mobile/?mobile=13735760306
user/views.py
class UserView(ViewSet):
    @action(methods=['GET'], detail=False)
    def mobile(self, request):
        try:
            mobile = request.query_params.get('mobile')
            UserInfo.objects.get(mobile=mobile)  # 有且只有一个才不报错,
            return APIResponse(msg='手机号存在')  # {code:100,msg:手机号存在}
        except Exception as e:
            raise APIException('手机号不存在')  # {code:999,msg:手机号不存在}
六、腾讯云短信介绍和申请
-
需要借助短信运营商来发送短信,并且我们需要写一些发送消息的接口
-
腾讯云开放平台可以提供很多开放的接口
-
注册腾讯云平台:
https://console.cloud.tencent.com/smsv2 -
申请使用腾讯云短信
1.创建签名:使用公众号申请
2.申请模板:{1}为您的登录验证码,请于{2}分钟内填写,如非本人操作,请忽略本短信。
3.免费赠送100条
4.代码发送短信参照文档:https://cloud.tencent.com/document/product/382/13444
七、什么是api和sdk
API定义:
API(Application Programming Interface,应用程序编程接口)是一些预先定义的函数,目的是提供应用程序与开发人员基于某软件或硬件得以访问一组例程的能力,而又无需访问源码,或理解内部工作机制的细节。

* 例程是某个系统对外提供的功能接口或服务的集合
总结:封装的函数,避免重复造轮子
SDK定义:
Software Development Kit 软件开发工具包
基于API,使用某个编程语言封装的包,是各大主流语言。
比喻:
生活讲讲两者的关系:
有一杯密封饮料,它的名字叫做“SDK”。
饮料上插着吸管,吸管的名字叫“API”。
把你叫做“XX系统”。

如果你想喝到SDK里的饮料(让系统拥有SDK中的功能),你必须通过API这根吸管来实现(通过API连接你的系统和SDK工具包),否则你就喝不到饮料。
总结:
SDK=放着你想要的软件功能的软件包
API=SDK上唯一的接口
八、腾讯短信sdk使用步骤
	 1 已开通短信服务,创建签名和模板并通过审核    # 开了
    2 如需发送国内短信,需要先 购买国内短信套餐包。 #赠送了
    3 已准备依赖环境:Python 2.7 - 3.6 版本。    #我们有
    4 已在访问管理控制台 >API密钥管理页面获取 SecretID 和 SecretKey。
    https://console.cloud.tencent.com/cam/capi
        SecretID 用于标识 API 调用者的身份。
        SecretKey 用于加密签名字符串和服务器端验证签名字符串的密钥,SecretKey 需妥善保管
    5 短信的调用地址为sms.tencentcloudapi.com。
九、腾讯短信功能二次封装
- 有封装v2版本,我们选择用封装v3版本
- pythonSDK使用文档:https://cloud.tencent.com/document/product/382/43196#
- 下载模块:
pip3 install tencentcloud-sdk-python
1.短信功能(未封装的代码)
# -*- coding: utf-8 -*-
from tencentcloud.common import credential
from tencentcloud.common.exception.tencent_cloud_sdk_exception import TencentCloudSDKException
# 导入对应产品模块的client models。
from tencentcloud.sms.v20210111 import sms_client, models

# 导入可选配置类
from tencentcloud.common.profile.client_profile import ClientProfile
from tencentcloud.common.profile.http_profile import HttpProfile
try:
    # 必要步骤:
    # 实例化一个认证对象,入参需要传入腾讯云账户密钥对secretId,secretKey。
    # 这里采用的是从环境变量读取的方式,需要在环境变量中先设置这两个值。
    # 你也可以直接在代码中写死密钥对,但是小心不要将代码复制、上传或者分享给他人,
    # 以免泄露密钥对危及你的财产安全。
    # SecretId、SecretKey 查询: https://console.cloud.tencent.com/cam/capi
    cred = credential.Credential("secretId", "secretKey")
    # cred = credential.Credential(
    #     os.environ.get(""),
    #     os.environ.get("")
    # )

    # 实例化一个http选项,可选的,没有特殊需求可以跳过。
    httpProfile = HttpProfile()
    # 如果需要指定proxy访问接口,可以按照如下方式初始化hp(无需要直接忽略)
    # httpProfile = HttpProfile(proxy="http://用户名:密码@代理IP:代理端口")
    httpProfile.reqMethod = "POST"  # post请求(默认为post请求)
    httpProfile.reqTimeout = 30    # 请求超时时间,单位为秒(默认60秒)
    httpProfile.endpoint = "sms.tencentcloudapi.com"  # 指定接入地域域名(默认就近接入)

    # 非必要步骤:
    # 实例化一个客户端配置对象,可以指定超时时间等配置
    clientProfile = ClientProfile()
    clientProfile.signMethod = "TC3-HMAC-SHA256"  # 指定签名算法
    clientProfile.language = "en-US"
    clientProfile.httpProfile = httpProfile

    # 实例化要请求产品(以sms为例)的client对象
    # 第二个参数是地域信息,可以直接填写字符串ap-guangzhou,支持的地域列表参考 https://cloud.tencent.com/document/api/382/52071#.E5.9C.B0.E5.9F.9F.E5.88.97.E8.A1.A8
    client = sms_client.SmsClient(cred, "ap-guangzhou", clientProfile)
    req = models.SendSmsRequest()
    req.SmsSdkAppId = "1400787878"
	req.SignName = "腾讯云"
    # 模板 ID: 必须填写已审核通过的模板 ID
    # 模板 ID 可前往 [国内短信](https://console.cloud.tencent.com/smsv2/csms-template) 或 [国际/港澳台短信](https://console.cloud.tencent.com/smsv2/isms-template) 的正文模板管理查看
    req.TemplateId = "449739"
    # 模板参数: 模板参数的个数需要与 TemplateId 对应模板的变量个数保持一致,,若无模板参数,则设置为空
    req.TemplateParamSet = ["1234"]
    # 下发手机号码,采用 E.164 标准,+[国家或地区码][手机号]
    # 示例如:+8613711112222, 其中前面有一个+号 ,86为国家码,13711112222为手机号,最多不要超过200个手机号
    req.PhoneNumberSet = ["+8613711112222"]
    # 用户的 session 内容(无需要可忽略): 可以携带用户侧 ID 等上下文信息,server 会原样返回
    req.SessionContext = ""
    # 短信码号扩展号(无需要可忽略): 默认未开通,如需开通请联系 [腾讯云短信小助手]
    req.ExtendCode = ""
    # 国际/港澳台短信 senderid(无需要可忽略): 国内短信填空,默认未开通,如需开通请联系 [腾讯云短信小助手]
    req.SenderId = ""

    resp = client.SendSms(req)

    # 输出json格式的字符串回包
    print(resp.to_json_string(indent=2))


except TencentCloudSDKException as err:
    print(err)
2.短信功能(封装成包)
-
我们不用记录日志
log,因为这样的话,这个包就使用了外层的模块,以后别人想要使用这个包时会有影响。 -
后期别的项目,也要使用发送短信===>只要把包copy到项目中即可
封装包:
- 目录结构:
libs文件夹tx_sms===>包名__init__.pysettings.py===>配置文件sms.py===>核心文件
__init__.py
from .sms import get_code, send_sms_phone
settings.py
SECRET_ID = ''  	# 腾讯云账户密钥对 secretId
SECRET_KEY = '' 	# 腾讯云账户密钥对 secretKey
APP_ID = ''			# 短信应用ID
SIGN_NAME = ''  	# 短信签名内容
TEMPLATE_ID = ''	# 模板 ID
sms.py
import random
from tencentcloud.common import credential
from tencentcloud.common.exception.tencent_cloud_sdk_exception import TencentCloudSDKException
# 导入对应产品模块的client models。
from tencentcloud.sms.v20210111 import sms_client, models

# 导入可选配置类
from tencentcloud.common.profile.client_profile import ClientProfile
from tencentcloud.common.profile.http_profile import HttpProfile
from . import settings


def get_code(num=4):
    code = ''
    for i in range(num):
        code += str(random.randint(0, 9))
    return code


def send_sms_phone(mobile, code):
    try:
        cred = credential.Credential(settings.SECRET_ID, settings.SECRET_KEY)
        httpProfile = HttpProfile()
        httpProfile.reqMethod = "POST"  # post请求(默认为post请求)
        httpProfile.reqTimeout = 30  # 请求超时时间,单位为秒(默认60秒)
        httpProfile.endpoint = "sms.tencentcloudapi.com"  # 指定接入地域域名(默认就近接入)

        # 非必要步骤:
        # 实例化一个客户端配置对象,可以指定超时时间等配置
        clientProfile = ClientProfile()
        clientProfile.signMethod = "TC3-HMAC-SHA256"  # 指定签名算法
        clientProfile.language = "en-US"
        clientProfile.httpProfile = httpProfile
        client = sms_client.SmsClient(cred, "ap-guangzhou", clientProfile)
        req = models.SendSmsRequest()
        req.SmsSdkAppId = settings.APP_ID  # 腾讯短信创建app把app的id号复制过来https://console.cloud.tencent.com/smsv2/app-manage
        # 短信签名内容: 使用 UTF-8 编码,必须填写已审核通过的签名
        # 签名信息可前往 [国内短信](https://console.cloud.tencent.com/smsv2/csms-sign) 或 [国际/港澳台短信](https://console.cloud.tencent.com/smsv2/isms-sign) 的签名管理查看
        req.SignName = settings.SIGN_NAME
        # 模板 ID: 必须填写已审核通过的模板 ID
        # 模板 ID 可前往 [国内短信](https://console.cloud.tencent.com/smsv2/csms-template) 或 [国际/港澳台短信](https://console.cloud.tencent.com/smsv2/isms-template) 的正文模板管理查看
        req.TemplateId = settings.TEMPLATE_ID
        # 模板参数: 模板参数的个数需要与 TemplateId 对应模板的变量个数保持一致,,若无模板参数,则设置为空
        req.TemplateParamSet = [code, '1']
        # 下发手机号码,采用 E.164 标准,+[国家或地区码][手机号]
        # 示例如:+8613711112222, 其中前面有一个+号 ,86为国家码,13711112222为手机号,最多不要超过200个手机号
        req.PhoneNumberSet = ["+86" + mobile, ]
        # 用户的 session 内容(无需要可忽略): 可以携带用户侧 ID 等上下文信息,server 会原样返回
        req.SessionContext = ""
        req.ExtendCode = ""
        req.SenderId = ""

        resp = client.SendSms(req)

        # 输出json格式的字符串回包
        # 字符串类型
        print(type(resp.to_json_string(indent=2)))

        return True
    except TencentCloudSDKException as err:

        return False
views.py(短信验证码接口)
class UserView(ViewSet):
    @action(methods=['GET'], detail=False)
    def send_sms(self, request):
        mobile = request.query_params.get('mobile')
        if re.match(r'^1[3-9][0-9]{9}$', mobile):
            code = get_code()
            print(code)  # 保存验证码,存入缓存,django自带缓存框架
            # 放在 内存中,只要重启就没了,后期用redis放在redis中,重启项目还在。
            cache.set('sms_code_%s' % mobile, code)
            # cache.get('sms_code_%s' % mobile, code)
            res = send_sms_phone(mobile, code)
            if res:
                return APIResponse(msg='发送短信成功!')
            else:
                # raise APIException('发送短信失败!')
                return APIResponse(msg='发送短信失败!', code=101)
        else:
            return APIResponse(msg='手机号不合法', code=102)
短信验证码接口:http://127.0.0.1:8000/api/v1/user/userinfo/send_sms/?mobile=13735760305
views.py(短信登录接口) 封装后
class UserView(ViewSet):

    def get_serializer(self, data):
        # 判断如果请求的是action是:mul_login,返回UserMulLoginSerializer
        # 判断如果请求的action是:mobile_login,返回UserMobileLoginSerializer
        if self.action == 'mul_login':
            return UserMulLoginSerializer(data=data)
        elif self.action == 'mobile_login':
            return UserMobileLoginSerializer(data=data)
        else:
            return RegisterSerializer(data=data)

    def common_login(self, data):
        ser = self.get_serializer(data=data)
        ser.is_valid(raise_exception=True)
        token = ser.context.get('token')
        username = ser.context.get('username')
        icon = ser.context.get('icon')
        return APIResponse(token=token, username=username, icon=icon)

     @action(methods=['POST'], detail=False)
    def mobile_login(self, request):
        return self.common_login(data=request.data)
serializer.py(短信登录)
class Common_get_token:
    def _get_token(self, user):
        try:
            payload = jwt_payload_handler(user)
            token = jwt_encode_handler(payload)
            return token
        except Exception as e:
            raise ValidationError(str(e))

    def validate(self, attrs):
        # 取出用户名和密码,校验用户是否存在
        user = self._get_user(attrs)
        # 签发token
        token = self._get_token(user)
        # 把token放到序列化类对象中
        self.context['token'] = token
        self.context['username'] = user.username
        self.context['icon'] = 'http://127.0.0.1:8000/media/' + str(user.icon)
        # self.context['icon'] = user.icon  # 这是个对象,可能会有问题
        # 以后如果有问题都抛出异常
        # 如果没有问题返回attrs
        return attrs

class UserMobileLoginSerializer(serializers.ModelSerializer, Common_get_token):
    mobile = serializers.CharField()  # 重写,优先用现在的,就没有unique的限制
    code = serializers.CharField()  # UserInfo 表中没有需要重写字段

    class Meta:
        model = UserInfo
        fields = ['mobile', 'code']

    # 封装之隐藏属性 __表示隐藏, _并不是隐藏,公司约定成俗 _表示只在内部用,如果外部想用也可以用。
    def _get_user(self, attrs):
        # attr 是校验过后的数据:字段自己的校验规则【不写则字段因为自己有规则会有问题】和局部钩子
        mobile = attrs.get('mobile')
        code = attrs.get('code')
        # 校验code是否正确
        old_code = cache.get('sms_code_%s' % mobile, code)
        cache.set('sms_code_%s' % mobile, '')  # 验证码用过要清除
        if code == old_code:  # 万能验证码,在测试阶段,测试用的
            user = UserInfo.objects.filter(mobile=mobile).first()
            return user
        raise APIException('验证码错误!')
短信登录接口:手机号+验证码
http://127.0.0.1:8000/api/v1/user/userinfo/mobile_login/
views.py(短信注册接口) 封装后\调用ViewSet
	@action(methods=['POST'], detail=False)
    def mobile_register(self, request):
        ser = RegisterSerializer(data=request.data)
        ser.is_valid(raise_exception=True)
        ser.save()
        return APIResponse(code=100, msg='注册成功')
serializer.py(注册)
class RegisterSerializer(serializers.ModelSerializer):
    code = serializers.CharField()  # UserInfo 表中没有需要重写字段
    mobile = serializers.CharField()
    password = serializers.CharField()

    class Meta:
        model = UserInfo
        fields = ['mobile', 'password', 'code', ]
        extra_kwargs = {
            'password': {
                'min_length': 3,
                'max_length': 8,
                'write_only': True,
            }
        }

    def validate_mobile(self, value):
        if re.match(r'^1[3-9][0-9]{9}$', value):
            return value
        raise APIException('手机号不合法!')

    def validate_password(self, value):
        if value:
            return value
        raise APIException('密码不能为空!')

    def validate(self, attrs):
        # 验证码校验 需要验证码和手机号两者参与
        mobile = attrs.get('mobile')
        code = attrs.pop('code')
        print(code)
        old_code = cache.get('sms_code_%s' % mobile, code)
        print(old_code)
        user = UserInfo.objects.filter(mobile=mobile).first()
        if not user:
            if code == old_code:
                # cache.set('sms_code_%s' % mobile, '') # 验证码刷新为空
                attrs['username'] = '手机用户' + mobile
                return attrs
            raise APIException('验证码错误')

        raise APIException('手机用户已存在!')

    def create(self, validated_data):
        return models.UserInfo.objects.create_user(**validated_data)
原文地址:http://www.cnblogs.com/bjyxxc/p/16886368.html
1. 本站所有资源来源于用户上传和网络,如有侵权请邮件联系站长!
2. 分享目的仅供大家学习和交流,请务用于商业用途!
3. 如果你也有好源码或者教程,可以到用户中心发布,分享有积分奖励和额外收入!
4. 本站提供的源码、模板、插件等等其他资源,都不包含技术服务请大家谅解!
5. 如有链接无法下载、失效或广告,请联系管理员处理!
6. 本站资源售价只是赞助,收取费用仅维持本站的日常运营所需!
7. 如遇到加密压缩包,默认解压密码为"gltf",如遇到无法解压的请联系管理员!
8. 因为资源和程序源码均为可复制品,所以不支持任何理由的退款兑现,请斟酌后支付下载
声明:如果标题没有注明"已测试"或者"测试可用"等字样的资源源码均未经过站长测试.特别注意没有标注的源码不保证任何可用性