
0x00 前言
逆向学习也好久了,代码混淆是很常见的题型,混淆方式也五花八门。但作为一个CTFer,大多处在解题者的角度,进行混淆处理和代码逆向。同时去混淆方式,也大多借助脚本,对混淆原理实质缺乏了解。于是准备做一次详细细致的系统性学习,并自己实现代码混淆,也对混淆后的程序做去混淆处理。借助整个实践流程,进一步提高逆向的能力,建立起属于自己的知识框架,这也是这篇文章的初衷!
【注:这里以汇编语言与逆向工程课程中学习的代码混淆章节为基础开展学习,观点性知识直接贴了课件里的内容,同时学习之余,参考了一些资料(这篇文章实质上就是知识梳理与补充),在此做如上说明】
0x01 代码混淆简介
概念:
- 一定程度上阻止逆向人员进行分析, 在源代码和中间层代码层面产生了代码混淆的概念。
- 通过技术手段实现计算机程序的代码转换, 形成一种功能上等价, 但是从代码层分析相对复杂的程序,增加逆向分析人员的分析成本。
- 代码混淆的根本目的就是干扰逆向工程,保护知识产权等, 而保护程序不被逆向又有多种方式, 代码混淆(Obfuscation)是其中的一种。
代码混淆种类以及工具介绍
从增加逆向工程难度的角度上来说
源码级混淆
-标识符重命名
将代码中的各种元素, 如变量、 函数、 类的名字改写成无意义的名字, 比如改写成单个字母或者数字, 又或者字母和数字的组合等, 使得阅读的人无法根据名字猜测其用途。
-等价表达式
重写代码中的部分逻辑, 将其变成功能上等价, 但是更难理解的形式, 比如将循环改成递归, 精简中间变量等。
-代码重排
打乱原有代码格式, 比如将多行代码挤到一行代码中。
-花指令
通过构造字节码插入程序的适当位置, 使得反汇编器出错, 产生无法反编译或者反编译出错的情况。
-自解密
通过对程序部分进行加密, 在即将运行时代码进行自解 密, 然后执行解密之后的代码。
机器码混淆
-平坦控制流
就是将程序原有的顺序、选择、循环结构统一重构为Switch结构,使得程序的结构图从原有正常形态转变为扁平状。
-伪造控制流
构造出根本不会去真正执行的控制流, 从而在静态分析时, 会对分析形成强烈的干扰, 增加逆向人员的分析工作量。
-指令替换
将原有的一条或者几条能形成某种功能的指令, 替换为大量的指令, 从而增加逆向分析的代码量, 从视觉上产生一种复杂感,增加逆向分析的难度。
混淆器
-对JS进行混淆的工具有诸如YUi Compressor, Google Closure Compiler, UglifyJS, JScrambler 等
-在windows下进行代码混淆最出名的工具
-
VMProtect, VMP能够实现代码虚拟化,将部分或者全部代码使用VMP混淆,将该部分代码转换为自身才能解释执行的代码,按照VMP自身实现的虚拟机架构去解释执行。
【相当于将中文转换为了英文, 只有掌握了英文的词, 语法和句,才能看懂英文写的文章。CTF 中常见的题型 , VM 虚拟机转化】
-OLLVM混淆器
-
LLVM命名最早源自于底层虚拟机(LowLevel Virtual Machine),是伊利诺伊大学的一个研究项目。
【提供了一套中立的中间代码IR和编译基础设施, 并围绕这些设施提供了一套全新的编译策略(使得优化能够在编译、 连接、 运行环境执行过程中, 以及安装之后以有效的方式进行)】
-
Obfuscator-LLVM是一个开源项目obfuscator-llvm/obfuscator (github.com)
【适用千LLVM所支持的所有语言(C,C++, Objective-C, Ada和Fortran)和目标平台(x86, x86-64, PowerPC, PowerPC-64, ARM, Thumb, SPARC, Alpha, CellSPU, MIPS, MSP430, SystemZ和Xcore) 】
0x02 花指令混淆
背景
-花指令通常用来抵御静态分析, 通过花指令混淆的程序, 会扰乱汇编代码的可读性。
-在静态分析下, 使反汇编器无法正常解析, 反编译器无法正常反编译。
-在反汇编的过程中, 存在一个数据与代码的区分问题。
-不同字节码包含的字节数不同, 有单字节指令, 也有多字节指令。
-如果首字节是多字节指令, 反汇编器在确定了第一个指令,也就是操作码以后, 就会确定该指令是包含多
-少字节码的指令, 然后将这些字节码转化为条汇编指令。
【举个例子,0xE8是x86中call指令的操作码,它后面通常要跟4个字节码,当反汇编器解析到0xE8这个字节码之后,会一一将后4个字节码连同0xE8起转化为一条call指令。】
【说明:
- 汇编码(Assembly Code)是用人类可读的汇编语言助记符书写的代码。
- 机器码(Machine Code)是用硬件可执行的二进制表示的代码。
- 十六进制码(Hex adecimal Code)是用人类可读的十六进制表示的代码。
】
两类反汇编算法
-线性扫描算法(LinearSweep)
- 从第一个字节开始, 以线性模式扫描整个代码段, 将一条指令的结束作为另一条指令的开始,逐条反汇编每条指令, 直到完成整个代码段的分析。
【由于没有考虑代码中可能混有的数据, 容易出错。】
-递归行进算法(Recursivetraversal)
- 对代码可能的执行路径进行扫描, 当解码出分支指令后, 就把这个分支指令的地址记录下来, 并反汇编各个分支 中的指令。
- 这种算法可以避免将代码中的数据作为指令解析。
花指令原理
在正常的程序中巧妙嵌入数据, 使得反汇编器在解析的时候,误认为是代码一同解析, 从而在静态分析层面干扰了逆向分析者, 这就是花指令。
花指令需要逆向分析者花时间将这些数据从程序中剔除掉, 还原原有正常程序, 从而正常地实现反汇 编和反编译。
常见的花指令混淆手段
Call, Jmp,Push类指令形成的混淆
► (1) Call指令混淆
- CALL OxE8后面的四个字节是地址
► (2) Jmp 类型混淆
-
JMP OxEB后面的二个字节是偏移
-
JMP OxE9后面的四个字节是偏移
-
JMP OxEA后面的四个字节是绝对地址
► (3) Jmp/Call esp/rax/rcx 类型混淆
- JMP/Call esp/rax/rcx OxEA后面跟待跳转寄存器
► (4)Push esp/rax/rcx/偏移/绝对地址 retn 类型混淆
- Push ,造成类似函数调用的效果,使反编译程序无法解析出完整反汇编程序,有切片CFG 图的效果。
► (5)垃圾指令 【可自定义】等类型混淆
- 无实质作用,也不影响程序流程,增加冗余
实战操作【call/jmp/push】
#include <stdio.h>
#include <stdlib.h>
#include <string.h>
#include <math.h>

int main()
{
//	char flag[]={"flag{huazhiling_is_very_good!}"};

	char flag[31]={};
	scanf_s("%s",&flag,31);

	int bit[30*8]={};
	int newbit[30*8]={};
	int enc[30]={};
	int enc_[30]={170,160,182,186,189,164,179,182,173,164,180,160,180,168,186,185,52,191,185,43,178,175,181,185,58,184,184,162,182,241};

	//取出每一位
	for (int i=0;i<strlen(flag);i++)
	{
		int tmp=int(flag[i]);
		for (int k=0;k<8;k++)
		{
			bit[i*8+k]=(tmp>>k)&1;
		}
	}

	//做循环右移三位
	for (int i=sizeof(bit)/sizeof(bit[0])-3;i<sizeof(bit)/sizeof(bit[0]);i++)
	{
		newbit[i-sizeof(bit)/sizeof(bit[0])+3]=bit[i];
	}

	for (int i=0;i<sizeof(bit)/sizeof(bit[0])-3;i++)
	{
		newbit[i+3]=bit[i];
	}

//		for (int i=0;i<sizeof(newbit)/sizeof(newbit[0]);i++)
//	{
//		printf("%d",newbit[i]);
//	}

	//每八位一组变为enc[i]
	int tmp=0;
	for (int i=0;i<sizeof(newbit)/sizeof(newbit[0]);i+=8)
	{
		for (int k=0;k<8;k++)
		{
			if(newbit[i+k]==1)
			{
			tmp+=pow(2,7-k);
			}else
			{
			tmp+=0;
			}
		}
		enc[int(i/8)] = tmp^0x66;
		tmp=0;
	}

	printf("\n");


	int flag_=1;
	for (int i=0;i<sizeof(enc)/sizeof(enc[0]);i++)
	{
		if (enc[i]!=enc_[i])
		{
			flag_=0;
			printf("not is flag\n");
			break;
		}
	}
	if (flag_==1)
	{
		printf("your input is flag!\n");
	}

	return 0;
 }
【注:本篇文章所有混淆都以上面源代码为基础,同时编译器使用 Visual Studio 2022,方便内联汇编指令的添加(Intel 格式),(因为dev c++使用 gcc编译器,内联汇编使用AT&T语法)。同时以debug 模式作为演示(release版本被编译器优化代码后,展示效果不佳)】
(176条消息) Linux C 语言内联汇编_magic428的博客-CSDN博客
(176条消息) 【高级C】GNU C/C++ 内联汇编——Intel与ATT汇编语法对比_从善若水的博客-CSDN博客
下图为加花之恋前ida 反汇编效果:
片段1,call 类指令混淆
	__asm  //用于调用内联汇编程序, 并且可在C或C++语句中合法使用
	{
		xor eax,eax
		jz __lable
		__emit 0xe8  //call 定义混合在代码段的数据 ,不会执行但是能干扰ida反汇编
	}
		__lable:
//下面内联汇编的作用,其实就是干扰ida解析,但是对程序执行无影响
	__asm
	{
	call    $+5
//下面三条指令,相当将esp栈顶地址对应值更新为【:esp】+0xc,eax 不变
//实现 retn 后,栈顶【:esp】+0xc,即retn后不会跳出函数,而是继续执行
	xchg    eax, ds:[esp]
	lea     eax, [eax+0Ch]
	xchg    eax, ds:[esp]
	retn
	}
//注:$是intel汇编格式中的一个预定义符号,表示当前指令所在的地址偏移
// call/jmp rax/eax/ecx 这样的花指令混淆,还没学会怎么构建,但在CTF 题目中确实遇到了【第五届“强网”拟态防御国际精英挑战赛 2022 RE Indir】。这里后续学会了再补充吧!
// 下面是按理解构建的内联汇编,但是无法使用,应该是错误的,但我保留下来
__asm
{
xor eax,eax
call eax
//__emit 0xff
//__emit 0x10 //相当于 call eax
}
int addr=0x1;
__asm
{
xor eax, eax
mov eax, addr
jmp eax
}
//短跳转和近跳转指令中包含的操作数都是相对于(E)IP的偏移。远跳转指令中包含的是目标的绝对地址。如此我们可以根据 eip 来构建 rcx 进行跳转。
//这一块的学习还有待加强,后续学会了再来补充,这里算留了个小问题吧
**************************后续补充****************************
// 后续补充,后面通过动态调试遇到的CTF题目,知道eax,ecx,esp等的值都是绝对地址,而非偏移地址,所以要实现这一混淆构建,需要获取到下一条指令的绝对地址,网上查资料(https://blog.csdn.net/xiuye2015/article/details/54563611)
了解到可以通过内联汇编,构建函数获得当前指令地址。但是这考虑到这种方式缺点很明显,不仅功能单一(只能获得当前指令地址),而且这样感觉程序的混淆也挺奇怪的。同时也为了更贴近对当前CTF遇到的call/jmp eax/ecx这类题目的解析。
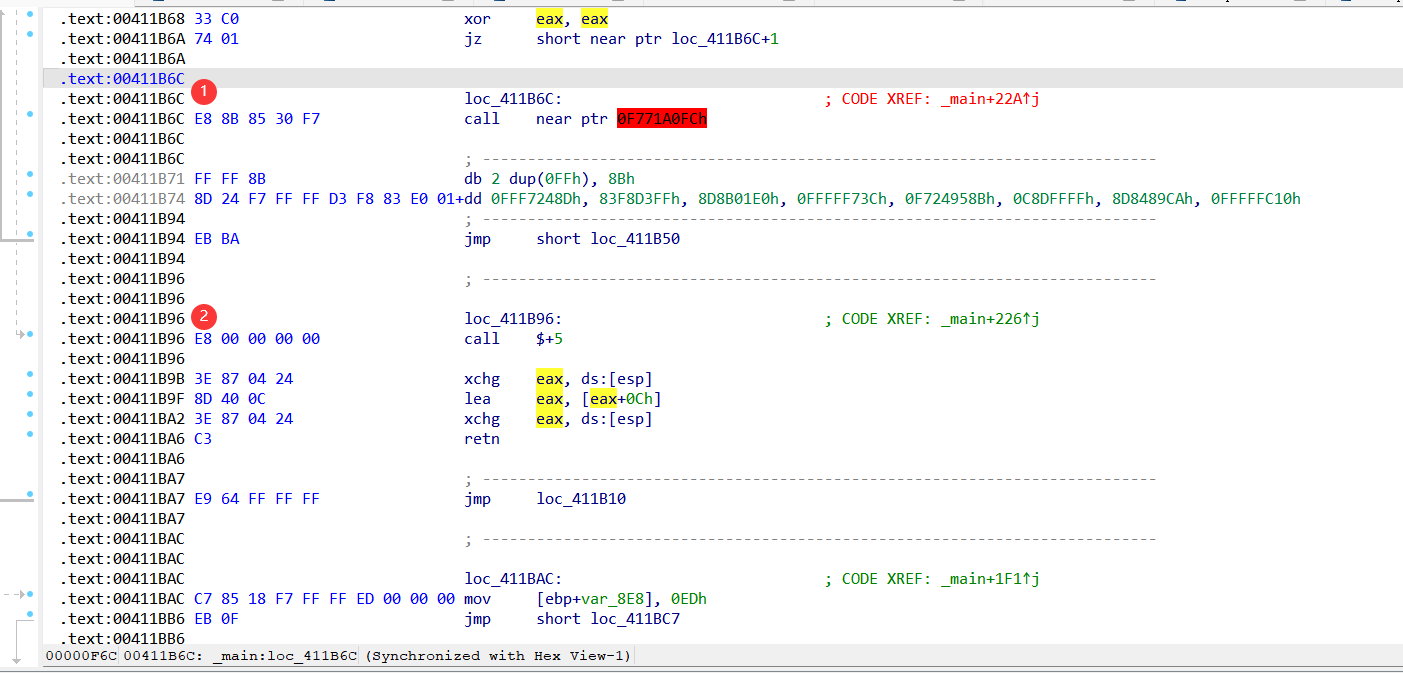
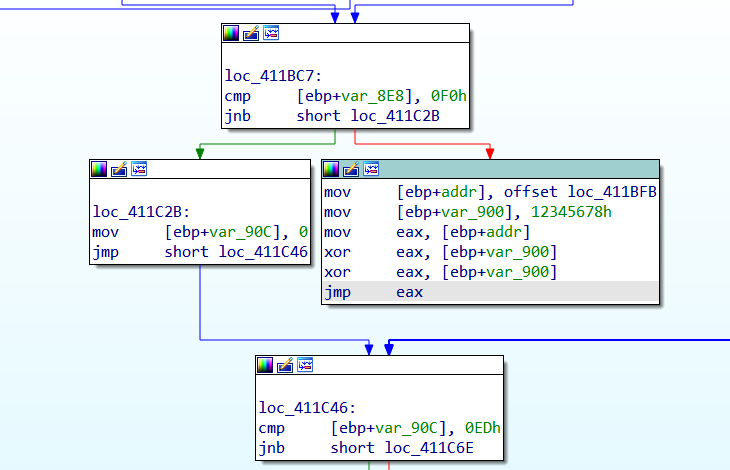
我打算采用如下方式,进行此类花之恋的构建:
首先
int addr = 0x00411BFB;
int tmp = 0x12345678;
__asm
{
mov eax, addr
xor eax, tmp
xor eax, tmp
nop
nop // call/jmp eax/ecx ...占几字节就几个nop
}
通过上述内联程序,运行得到可执行文件后,使用ida等工具,获取到待跳转指令地址。
如 eax 为 0x00411BFB
int addr = 0x00411BFB;
int tmp = 0x12345678;
__asm
{
mov eax, addr
xor eax, tmp
xor eax, tmp
jmp eax //这里换为call 也是相同的
}
(地址是随机的!这里需要关闭VS 的地址随机化,才能在找到正确跳转地址,并使得VS 2022 编译通过)
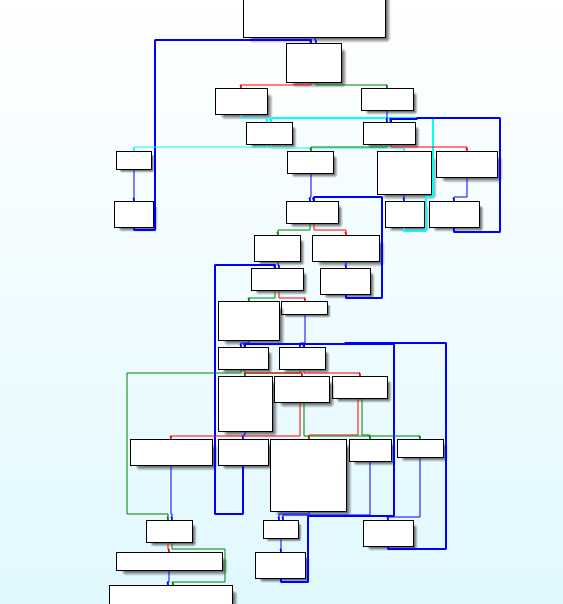
如下是加了上述三种花之恋的效果:
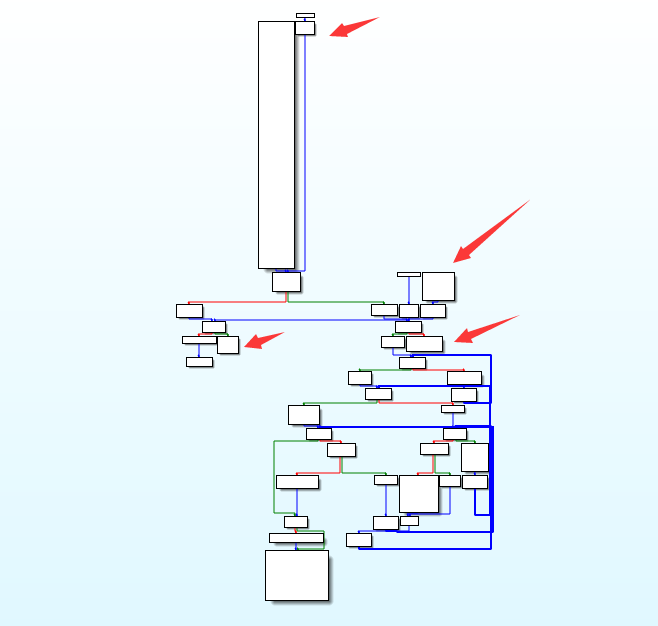
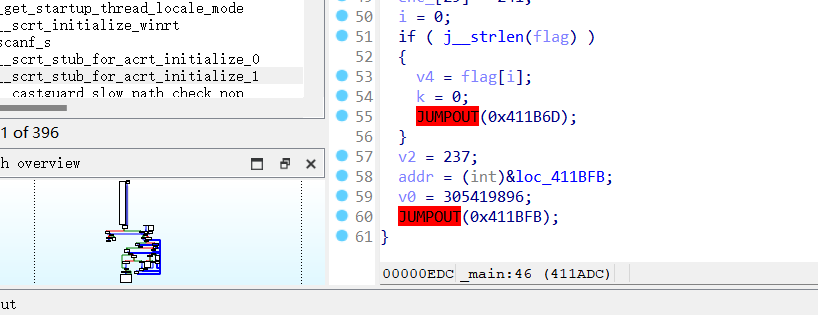
如上三种混淆已经造成了ida 反编译异常,要想逆向程序必须要首先去除花之恋,或者分析汇编,难度增加了!
片段2,jmp 类指令混淆
__asm
{
	xor eax,eax
	jz __lable

	// 这里 EB E9 EA 都是相同的
	__emit 0xeb  //jmp 定义混合在代码段的数据 ,不会执行但是能干扰ida反汇编
}
	__lable:
【鉴于OD采用递归行进扫描,上述花指令是无效的,会被OD识别出来。因为递归行进扫描中对于任一条控制转移指令,其转移的目的地址都要能确定。要迷惑这类反汇编器, 只需要让其转移的地址不确定即可, 创建一个指向无效数据地址的汇编语句】
如下:
		__asm
		{
			xor eax, eax
			jz __lable1
			//jz直接跳转到 label, 不会执行下一个jnz指令
			//动态实际不否执行此语句, 只是在给静态分析增加迷惑性
			jnz __lable2

			__lable2 :
			// 这里 EB E9 EA 都是相同的
			__emit 0xEB  //jmp 定义混合在代码段的数据 ,不会执行但是能干扰ida反汇编
		}
	__lable1:
片段3,push 类指令混淆
用上面构建 jmp/call eax/ecx 的方式进行构建,但是由于使用retn,需要保证esp栈顶指针值不紊乱【这里的解决方案是,先push esp,保存当前栈顶,构造push addr后,再pop esp,以保证当前函数栈顶不紊乱】。
首先
int addr1=0x123456;
__asm
{
push	esp
push    addr1
// retn
// pop   	esp
nop
nop
nop
nop
}
获取到,push 地址后修改如下:
int addr1=0x00411C6F;  // 该地址的获得方式不再赘述
__asm
{
push	esp
push    addr1
retn
pop   	esp
}
效果如下:
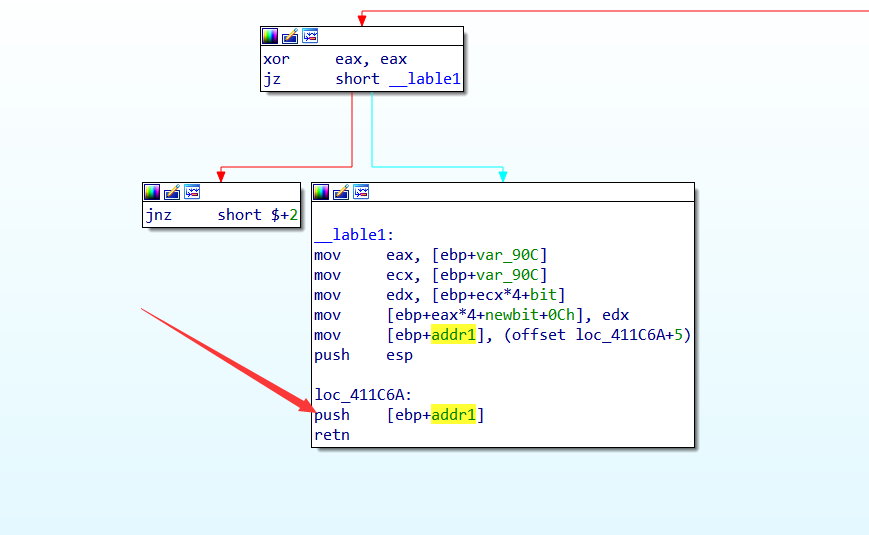
依据此种方式,多处添加push 花指令就可以导致程序四分五裂!
片段4,垃圾指令混淆
这里的垃圾指令是指:对程序流程无干扰,但又会被ida,OD等工具识别执行,导致程序存在大量冗余,干扰逆向分析。
__asm
{
popf
push    eax
pop     eax
push    edx
pop     edx
pushf
}

__asm
{
pushf
push    ecx
xor     eax, ecx
xor     ecx, eax
xor     eax, ecx
xchg    eax, ecx
pop     ecx
popf
}

__asm
{
popf
pushf
}

__asm
{
push    eax
push    ecx
pop     eax
pop     ecx
push    eax
push    ecx
pop     eax
pop     ecx
}

// 上面是几个简单例子,如何构建完全可以自行创造
同时上述垃圾指令,最好配合其他花之恋使用,单独使用很可能会被编译器自动优化过滤,使用效果不佳。
小结
显然,构造花之恋是个创造的过程。我们只需要在保证程序运行流程(或者说程序运行效果)不变的情况下,构造干扰、混淆逆向工具解析的汇编代码段,也就实现了花之恋。
在这一小结中,jmp/call/push eax/ecx/addr 等花之恋的构建是最难的,因为需要知道待跳转地址。但是个人认为,效果也是最好的,因为可以将程序块分割,使之在运行时才能知道实际跳转【更有甚者,可以精心构建一个跳转表,每次运算后,得到跳转地址(第五届“强网”拟态防御国际精英挑战赛 2022 RE Indir 就存在这样的思路) 】。
去除花之恋之替换/nop
上面提到的加花思路,其实就两种解决方案:
- 对于程序流程不起作用的或者干扰反汇编解析的指令直接nop。
- 对于程序流程起关联跳转作用的花之恋,等效替换为工具可识别指令。
【注:jmp/call/push eax/ecx/addr 类型混淆简单跳转上述方案也适用,但是如果存在地址表的多跳转,就不能通过简单的替换解决了。
了解到的思路是,将跳转表通过ida等工具将变量类型改为const,即可解决。具体还未复现,后续补充】
更改IDA识别的栈指针, 破坏栈平衡
__asm
{
xor	eax,eax
jz __lable3
add esp,0x48      //不会执行,但是会导致ida分析错误,导致堆栈失衡
}
__lable3:
解决方法就是,自行调整堆栈平衡,nop 掉干扰指令【add esp,0x48 】。
【做题时,有时候干扰指令不是那么容易找到,可借助ida➔Option➔general➔选中stack pointer,查看栈帧的偏移值进行调整,也有不错的效果】
-更改IDA识别的函数参数个数
__asm
{
xor	eax,eax
jz __lable4
ret 248      //不会执行,但是会导致ida识别参数个数错误
}
__lable4:
原理:stdcall函数调用约定,子函数压栈多少个参数(字节),ret返回参数时,就返回多个参数对应的字节。在stdcall调用约定当中,这个平衡栈帧操作由被调 用的子函数负责,因此,使得IDA才在反编译时,出现返回62个参数。
修复代码, 只需要将ret 248 nop掉即可。
0x03 SMC 代码自修改
SMC 原理
- 在执行某一段代码时,程序会对自身的该段代码进行自修改,只有在修改后的代码才是可汇编、可执行的。
- 在程序未对该段代码进行修改之前, 在静态分析状态下, 均是不可读的字节码,IDA之类的反汇编器无法识别程序的正常逻辑。
SMC 实现
方式1
- 先写出可运行的程序,包括加密逻辑。
- 得到可执行程序后,借助ida、OD等逆向工具,导出待加密代码段或待加密函数的字节码。
- 通过设定好的SMC加密算法,加密上一步骤导出字节码,得到字节码密文。
- 在可运行程序的源代码中添加字节码密文,并在调用SMC加密函数前,使用SMC加密字节码的逆算法解密代码段,然后通过函数指针的方式进行调用。
【实现思路很多,这里的方式1算是最简单的方式,具体详见SMC自解码总结-安全客 – 安全资讯平台 (anquanke.com)】
大概实现如下:
#include<stdio.h>

char enc_bytecode[]={xxxxxxxxxxx} //存放加密后字节码

int main()
{

int (*Check)(char*,char*); //函数指针

// 一些代码

// SMC 解密块,这里以异或 加密的SMC 为例
for(int i=0;i<lenth(enc_bytecode);i++)
{
	enc_bytecode[i]^=0x66;
}

// 通过函数指针的方式调用
cheak=int(*)(char*, char*))&enc_bytecode;
cheak(reg1,reg2);   //调用该函数

return 0;
}

// 注,上述只是实现SMC的简要思路,具体代码未给出
同时上述SMC自修改,可能存在下面这样一些限制条件。
限制条件
如果使用其他编译器(VC++ 6.0除外), 可能需要关闭数据执行保护(DEP), 缓冲区安全监测机制(GS), 地址随机化(ASLR)这三个安全保护机制。
数据执行保护(DEP)
数据执行保护, 能够阻止除.text段外其他段数据的可执行,在windows中, 在开启了数据执行保护之后, 只有使用Virtual Protect改变相应数据段的可执行属性, 才能在该数据段执行我们的代码。 而本程序中写的解密后执行的代码是在.data段上, 所以要关闭数据执行保护。
缓冲区安全监测机制(GS)
对于GS而言, 在拥有GS保护机制的函数当中, 当函数返回的时候, 会调用系统的GS系统检测函数检测GS保护机制是否被破坏。
那么如果解密后的函数中存在GS保护机制, 在我们每次编译的过程中, 随着代码量的增加, 代码布局可能会发生变化, 系统API 的地址可能发生变化, 这样再去call这个API地址, 就有可能引发内存访问错误, 造成程序的崩溃。 就算关闭了地址随机化(ASLR),也是有可能产生这种问题的。
地址随机化(ASLR)
开启了ASLR, 系统API的地址, 甚至常量, 全局变量, 字符串等的地址都会发生变化, 这对于SMC来说, 极容易引发内存访问错误。
而解密完以后的代码之所以能够成功执行, 就在于设计者在设计时,是将正常程序需要加密的代码枢出来, 对其进行加密的。 如果存在call某处地址, 就一定要保证这处地址是固定的, 不会变化的。【这里其实也和 jmp/call/push 类花指令一致,需要保证地址固定,否则程序就会崩溃】
注意事项
在写类似SMC代码保护的时候,尽量不要引入系统API,系统API的功能也最好自己使用语言去实现, 避免最后生成的源程序, 运行时产生不必要的错误。系统API加载时偏移地址不同, 字节码不同, 在上面的程序中把API字节码固定了, 所以要关闭ASDL。
加大 SMC 自修改难度
-
可以多层嵌套SMC, 增加逆向的难度。
-
每一层代码的解密, 不一定要设计成一个解密函数进行解密,可以多个解密函数对同一处代码进行解密, 最终才能执行。
-
在解密函数中加入算法或者是反调试方法, 阻止逆向人员逆向, 增加逆向成本, 提高逆向难度。
-
为了得到隐蔽、不易发现的效果,对较少指令进行SMC加密。
-
使用交替加密,将两个相同函数类型但不同加密方式的函数进行异或,得到一串数据,使用这串数据对加密函数的代码块进行异或,即可得到另一个加密函数。
【这里方式还有很多,完全可以自己脑洞大开,去出题目(值得注意的是,逆向终归是逆向,这个脑洞必须符合逆向逻辑,反正不要出了有misc的感觉就好,做题靠脑波)】
SMC 自修改逆向分析思路
- 分析SMC加密流程,使用 idcpython/idc 进行程序patch(修改),恢复正常逻辑。【这种方式适用于静态分析,但容易漏掉加密细节,patch后不能动态调试】
- 断点+动态调试,让程序在运行过程中自行解密,再进行分析。【这要求找到合适的断点位置【存在多次SMC时,可能遗漏加密环节】,绕过可能存在debug等等】
【其实,最一致的思路是灵活结合上述两种方式,进行SMC自修改逆向分析】
0x04 OLLVM 混淆
OLLVM简介
- OLLVM(Obfuscator-LLVM)是瑞士西部应用科学大学安全小组于2010年6月发起的一个项目。该项目的目的是提供一套开源的基于LLVM的代码混淆工具, 通过代码混淆和防篡改提供更高的软件安全性。
LLVM
简介
-
LLVM是一个开源的编译器架构,利用虚拟技术对源代码提供现代化的、 与目标无关的、针对多种CPU的, 代码优化和代码生成功能。
LLVM核心库提供了与编译器相关的支持,可以作为多种语言编译器的后台来使用, 能够进行程序语言的编译期优化、 链接优化、 在线编译优化、 代码生成。
LLVM 三段式架构
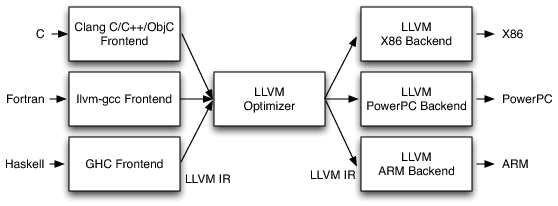
前端
前端解析源代码, 由语法分析器和语义分析协同工作, 检查语 法错误, 并构建语言的抽象语法树AST来表示输入代码, 然后将分析好的代码转化为LLVM的中间表示IR (Intermediate Representation) 。
【注:通常先构建AST,然后将AST(抽象语法树)转换为LLVM IR】
优化器
优化器通过一系列的Pass对中间代码IR进行优化, 改善代码的运行时间使代码更高效。
后端
后端负责将优化器优化后的中间代码IR转换为目标机器的代码。
LLVM IR
LLVM IR是LLVM的中间表示,用来在编译器中表示代码的形式,优化器通过一系列的Pass对IR进行优化操作,直至生成后端可用的IR。
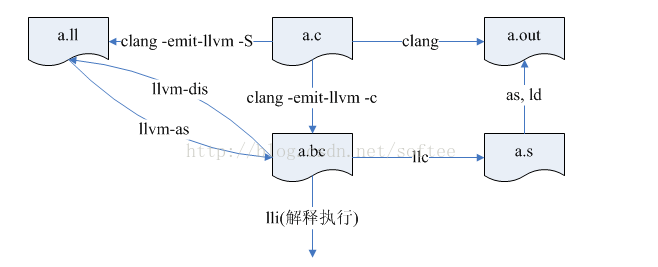
【附上这些相关文件的转换关系】
// 转化指令【NewStarCTF2022 Week5 babycode 给的就是.ll 中间文件】

将C文件编译为LLVM bitcode 文件
clang -o3  -emit-llvm hello.c -c -o hello.bc

由于.bc 是bitcode的二进制格式,.ll 文件 llvm bitcode 的可读文本
clang -o3  -emit-llvm hello.c -S -o hello.ll

llvm-dis 工具反汇编llvm bitcode 文件, 可以将bc文件转为.ll文件

llvm-dis hello.bc

用 llvm-as 工具通过汇编文件(.ll 文件)得到字节码文件(.bc 文件)
llvm-as hello.ll hello.bc

.bc编译成.o
第一种方法:用clang直接将其编译为可执行文件
clang a.o.bc -o struct

第二种方法:用llc先将bc编译为汇编,再用本地的gcc将其编译为可执行文件。

	llc a.o.bc -o hello.s
	gcc hello.s -o hello

编译生成可执行文件
clang hello.c -o hello

或者

clang -emit-llvm -c hello.c

.bc到.s编译指令
clang -S -fobjc-arc struct.bc -o struct.s


// 一些IR语法知识

@ - 全局变量
% - 局部变量
alloca - 在当前执行的函数的堆栈帧中分配内存,当该函数返回到其调用者时,将自动释放内存
i32 - 32位4字节的整数
align - 对齐
load - 读出,store写入
icmp - 两个整数值比较,返回布尔值
br - 选择分支,根据条件来转向label,不根据条件跳转的话类型goto
label - 代码标签
call - 调用函数
OLLVM 工作原理
- OLLVM工作在LLVM IR中间表示层,通过编写Pass来混淆IR, 后端依照IR转换的目标机器的代码也就达到了混淆的目的。

- 因为OLLVM是基于LLVM设计的,因此它支持LLVM支持的所有编程语(C,C++, Objective-C, Ada和Fortran)以及目标平台(x86,x86-64,PowerPC,PowerPC-64, ARM, Thumb, SPARC, Alpha, CellSPU,MIPS,MSP430, SystemZ和XCore)。
OLLVM 提供三种混淆模式
指令替换(Instructions Substitution) 参数为-sub
虚假控制流程(BogusControl Flow) 参数为-bcf
控制流平展(Control Flow Flattening) 参数为-fla
【注:三个参数可以单独使用,也可以一起配合使用】
【OLLVM目前正在开发函数合并、防篡改等混淆功能,未来可能出现常量加密、垃圾代码插入、 反调试技巧插入等混淆模式(目前提到的多数功能已经实现)】
OLLVM编译与安装
【使用 Kali 2022.3、Ubuntu 2022.10 等环境配置都失败,最终使用docker 镜像辅助编译安装】
OLLVM 安装【Fail】
# 虽然安装失败了,但安装流程做一下保留,说不一定下次还想再试一下呢!

# 安装OLLVM前需要安装git

sudo apt-get install git

# 编译ollvm要用到的工具是

#cmake
sudo apt-get install cmake -y

#gcc
#g++

sudo apt-get install gcc-8 g++-8 -y

# 切换gcc 版本
sudo update-alternatives --config gcc

# g++切换版本 默认g++ 8
sudo update-alternatives --config g++
OLLVM的编译安装命令
git clone -b llvm-4.0 --depth=1 https://github.com/obfuscator-llvm/obfuscator.git  //无法git 时,可以直接下载

mkdir build
cd build
cmake -DCMAKE_BUILD_TYPE=Release -DLLVM_INCLUDE_TESTS=OFF ../obfuscator-llvm-4.0/
make -j7
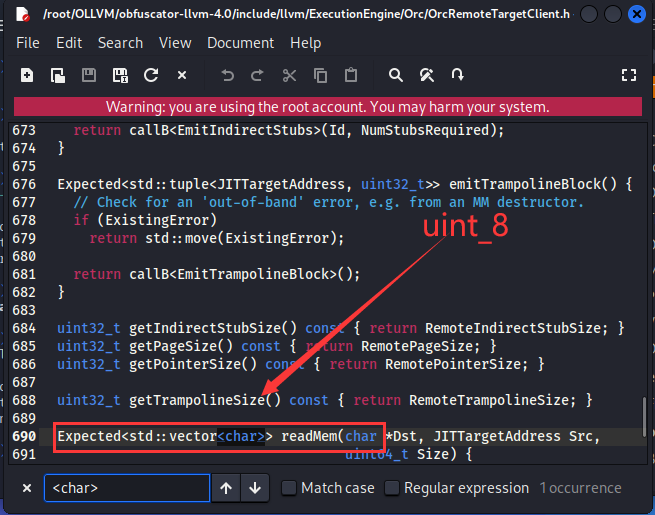
【注:修改ollvm源码(处理一些报错),进入ollvm目录
./include/llvm/ExecutionEngine/Orc/OrcRemoteTargetClient.h
定位到第690行 把char 改成 uint_8】
【历经重重困难,还是配置好了,但是编译时各种报错,安装失败!!!<这里遇到各种环境问题、不再赘述(也没装成功)>】
OLLVM docker 安装
docker 安装
sudo apt-get install curl
curl -sSL https://get.daocloud.io/docker | sh
pull OLLVM docker 镜像【拉取】
docker pull nickdiego/ollvm-build
然后下载安装脚本和ollvm源码
git clone https://github.com/nickdiego/docker-ollvm.git
git clone -b llvm-4.0 https://github.com/obfuscator-llvm/obfuscator.git
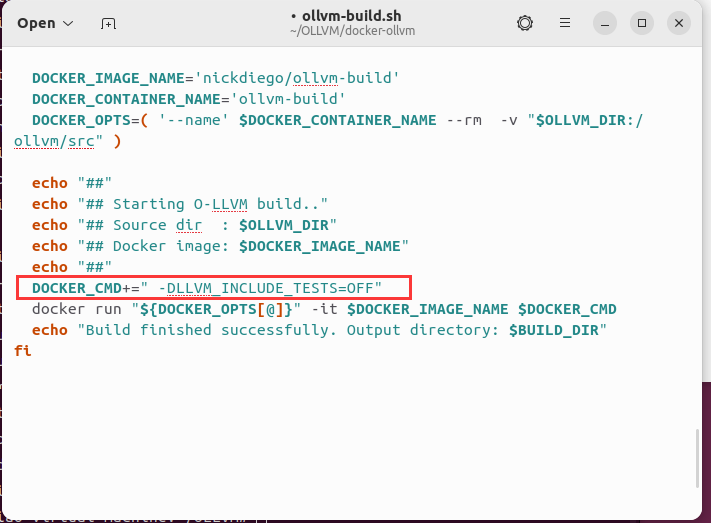
在docker-ollvm内的ollvm-build.sh的末尾作如下添加:
DOCKER_CMD+=" -DLLVM_INCLUDE_TESTS=OFF"
改完后执行
chmod 777 ollvm-build.sh            //赋予执行权限
sudo ./ollvm-build.sh ../obfuscator // 借助docker 镜像进行编译
在 obfuscator/build_release 目录执行指令创建软链接【使得进行软链接的文件能够同步更新】
sudo ln ./bin/* /usr/bin/
clang --version
一个多小时,编译成功【麻了,对比自己安装OLLVM ,通过镜像真的好了太多】
【这里必须提一下,github 上有很多前辈们在这个项目基础上进行创作的项目,资源很丰富。下一步要深入学习的话,是很好的学习途径,打call】
OLLVM 的使用及原理
OLLVM 关键代码目录结构
$ tree obfuscator-llvm-4.0
.\obfuscator-llvm-4.0
    ├── CMakeLists.txt    # 关联 LLVM 的文件
    └── .\lib\Transforms\Obfuscation
                ├── BogusControlFlow.cpp
                ├── CMakeLists.txt # 编译出 Pass 的动态库文件
                ├── CryptoUtils.cpp
                ├── Flattening.cpp
                ├── SplitBasicBlocks.cpp
                ├── Substitution.cpp
                ├── Utils.cpp
                └──
    └── .\include\llvm\Transforms\Obfuscation
                ├── BogusControlFlow.h
                ├── CryptoUtils.h
                ├── Flattening.h
                ├── Split.h
                ├── Substitution.h
                └── Utils.h
指令替换
原理及代码分析
通过功能上等价的但更复杂的指令序列, 替换标准二元运算符(如加法、 减法或布尔运算符), 当有多个可用的等效指令序列时, 随机选择一个。
【指令替换运算举例,如官网示】Instructions Substitution · obfuscator-llvm/obfuscator Wiki (github.com)
Addition
a = b - (-c)
a = -(-b + (-c))
r = rand (); a = b + r; a = a + c; a = a - r
r = rand (); a = b - r; a = a + b; a = a + r

Subtraction
a = b + (-c)
r = rand (); a = b + r; a = a - c; a = a - r
r = rand (); a = b - r; a = a - c; a = a + r

AND
a = b & c => a = (b ^ ~c) & b

OR
a = b | c => a = (b & c) | (b ^ c)

XOR
a = a ^ b => a = (~a & b) | (a & ~b)
代码简单分析:
-
第一步:调用
toObfuscate函数进行处理,进入至substitute方法后,ollvm对加、减、或、与、异或这五种操作进行替换,func__变量是函数数组,随机的选择一种变换进行操作。ObfTimes对应的是指令切割次数:-sub_loop。
bool Substitution::runOnFunction(Function &F) {
   // Check if the percentage is correct,检查输入参数,替换次数>=1
   if (ObfTimes <= 0) {
     errs()<<"Substitution application number -sub_loop=x must be x > 0";
	 return false;
   }

  Function *tmp = &F;
  // Do we obfuscate
  if (toObfuscate(flag, tmp, "sub")) {
    substitute(tmp);                 // 指令替换入口
	return true;
  }

  return false;
}

bool Substitution::substitute(Function *f) {
  Function *tmp = f;

  // Loop for the number of time we run the pass on the function
  int times = ObfTimes;
  do {
    for (Function::iterator bb = tmp->begin(); bb != tmp->end(); ++bb) {
      for (BasicBlock::iterator inst = bb->begin(); inst != bb->end(); ++inst) {
        if (inst->isBinaryOp()) {
          switch (inst->getOpcode()) {      // 解析每个函数及基本块,并匹配要实现替换的指令 [调用相应函数处理]
          //llvm::cryptoutils->get_range就是一个随机函数,随机选用函数进行替换
          case BinaryOperator::Add:
            // case BinaryOperator::FAdd:
            // Substitute with random add operation
            (this->*funcAdd[llvm::cryptoutils->get_range(NUMBER_ADD_SUBST)])(
                cast<BinaryOperator>(inst));
            ++Add;
            break;
          case BinaryOperator::Sub:
            // case BinaryOperator::FSub:
            // Substitute with random sub operation
            (this->*funcSub[llvm::cryptoutils->get_range(NUMBER_SUB_SUBST)])(
                cast<BinaryOperator>(inst));
            ++Sub;
            break;

            // .........

          case Instruction::And:
            (this->*
             funcAnd[llvm::cryptoutils->get_range(2)])(cast<BinaryOperator>(inst));
            ++And;
            break;
          case Instruction::Or:
            (this->*
             funcOr[llvm::cryptoutils->get_range(2)])(cast<BinaryOperator>(inst));
            ++Or;
            break;
          case Instruction::Xor:
            (this->*
             funcXor[llvm::cryptoutils->get_range(2)])(cast<BinaryOperator>(inst));
            ++Xor;
            break;
          default:
            break;
          }              // End switch
        }                // End isBinaryOp
      }                  // End for basickblock
    }                    // End for Function
  } while (--times > 0); // for times
  return false;
}
- 以funcSub 为例
// Implementation of a = b + (-c)
void Substitution::subNeg(BinaryOperator *bo) {
  BinaryOperator *op = NULL;

  if (bo->getOpcode() == Instruction::Sub) {
    op = BinaryOperator::CreateNeg(bo->getOperand(1), "", bo);    // c取反
    op =
        BinaryOperator::Create(Instruction::Add, bo->getOperand(0), op, "", bo);   // 改写成加法
  } else {
    op = BinaryOperator::CreateFNeg(bo->getOperand(1), "", bo);
    op = BinaryOperator::Create(Instruction::FAdd, bo->getOperand(0), op, "",
                                bo);
  }

  bo->replaceAllUsesWith(op);
}
使用举例
# 可用选项如下

-mllvm -sub : 激活指令替代
-mllvm -sub_loop=3 : 混淆次数,一个函数会被混淆3次,默认为 1次
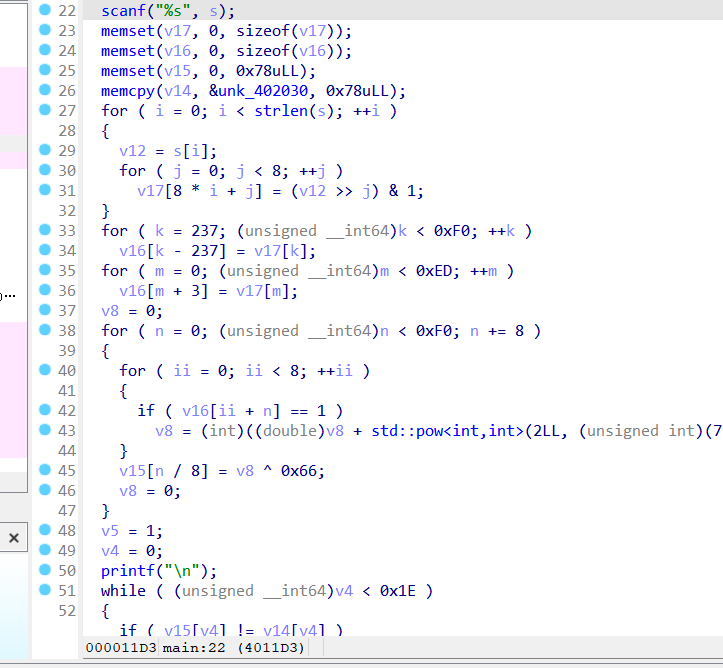
测试代码仍然使用花指令构造时用到的代码。
clang -mllvm -sub -mllvm -sub_loop=3 main.cpp -lm -o main-sub
clang main.cpp -lm -o main    # -lm 是由于程序引用math.h
# 注:如果提示stdio.h头文件找不到可以尝试下载g++和gcc。如果提示stddef.h或者stdarg.h头文件找不到可以sudo find -L /usr -name "*文件名*" -type f[查找文件]将其复制到 /usr/include目录下

sudo cp /usr/lib/gcc/x86_64-linux-gnu/8/include/stddef.h /usr/include
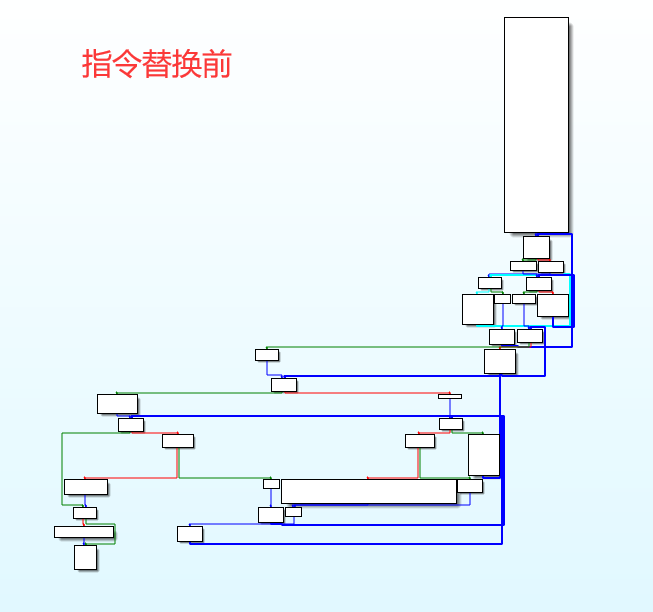
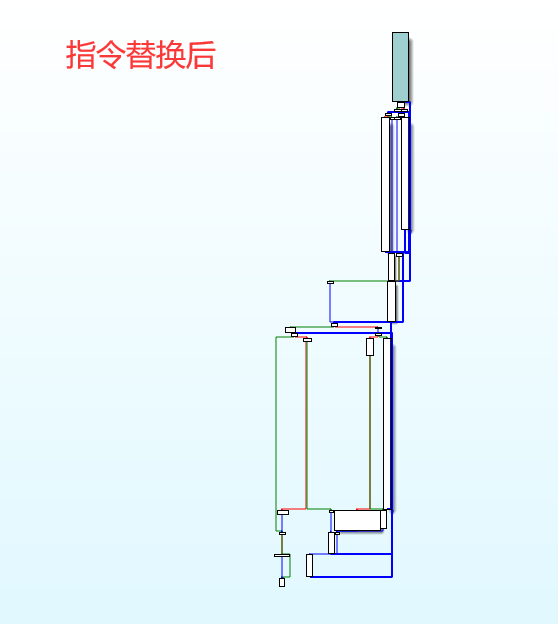
CFG【控制流图】,前后对比:
| 指令替换前 | 指令替换后 |
|---|---|
 |
 |
 |
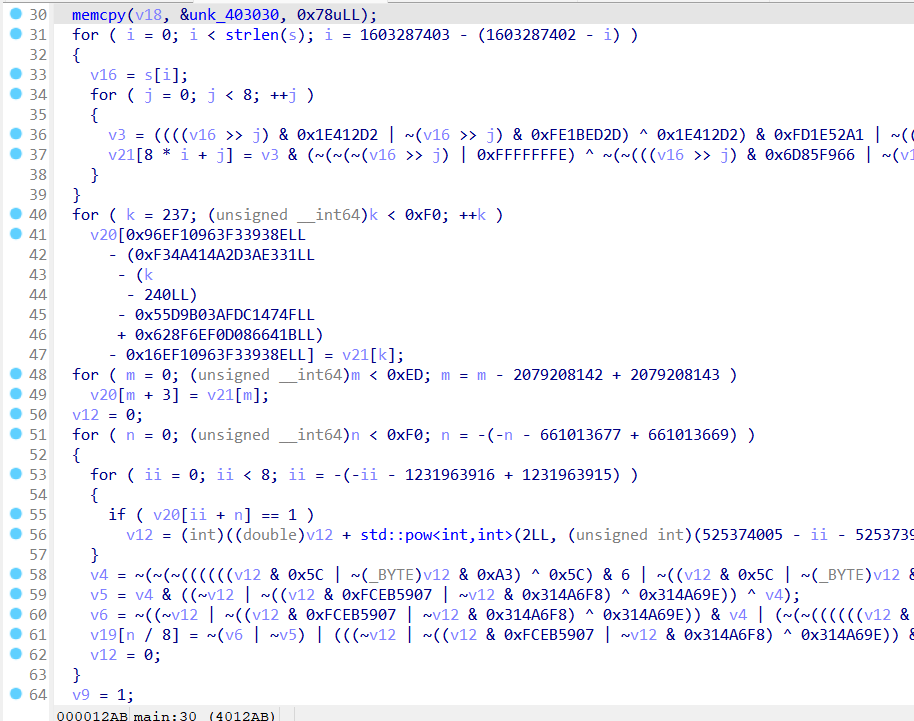 |
虚假控制流
原理及代码分析
虚假控制流程(Bogus Control Flow): 通过在当前基本块之前添加基本块来修改程序的控制流图, 原始的基本块也会被克隆, 并插入随机的垃圾指令。
混淆前后CFG变化如下:
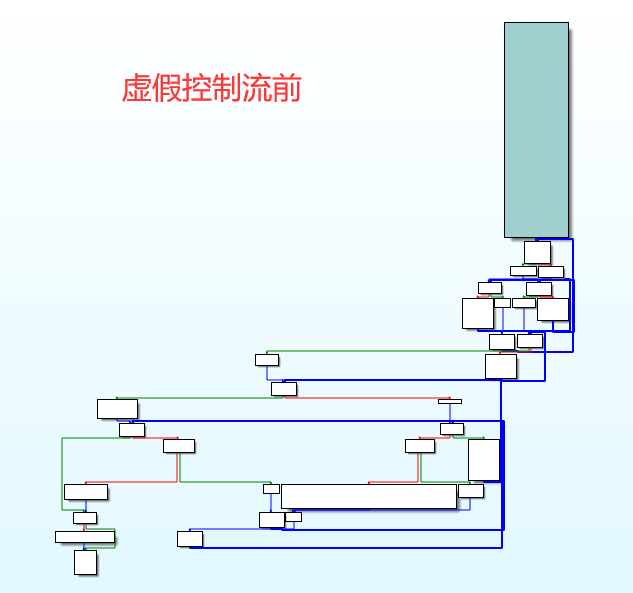
具体来说,就是克隆原程序中的基本块,利用不透明谓词【表达式(开发过程中值是固定的)】使得克隆的基本块作为永不可达的虚假分支【还可以在该分支中添加垃圾指令】,得到混淆的效果。虚假控制处理后程序的CFG呈现出长条形!
BogusControlFlow.cpp代码分析:
- runOnFunction()进行参数处理,包括bcf_prob(基本块混淆概率)、bcf_loop(混淆次数)、bcf(是否激活此功能)。
   virtual bool runOnFunction(Function &F){
      // Check if the percentage is correct
      if (ObfTimes <= 0) {
        errs()<<"BogusControlFlow application number -bcf_loop=x must be x > 0";
		return false;
      }

      // Check if the number of applications is correct
      if ( !((ObfProbRate > 0) && (ObfProbRate <= 100)) ) {
        errs()<<"BogusControlFlow application basic blocks percentage -bcf_prob=x must be 0 < x <= 100";
		return false;
      }
      // If fla annotations
      if(toObfuscate(flag,&F,"bcf")) {
        bogus(F);
        doF(*F.getParent());
        return true;
      }

      return false;
    } // end of runOnFunction()
- 一些准备工作,生成所有函数块清单,并依据设定参数【混淆次数、概率】,进行虚假控制混淆。真正功能函数是addBogusFlow(basicBlock, F)。
    void bogus(Function &F) {
      // For statistics and debug
      ++NumFunction;
      int NumBasicBlocks = 0;
      bool firstTime = true; // First time we do the loop in this function
      bool hasBeenModified = false;
      DEBUG_WITH_TYPE("opt", errs() << "bcf: Started on function " << F.getName() << "\n");
      DEBUG_WITH_TYPE("opt", errs() << "bcf: Probability rate: "<< ObfProbRate<< "\n");
      if(ObfProbRate < 0 || ObfProbRate > 100){
        DEBUG_WITH_TYPE("opt", errs() << "bcf: Incorrect value,"
            << " probability rate set to default value: "
            << defaultObfRate <<" \n");
        ObfProbRate = defaultObfRate;
      }
      DEBUG_WITH_TYPE("opt", errs() << "bcf: How many times: "<< ObfTimes<< "\n");
      if(ObfTimes <= 0){
        DEBUG_WITH_TYPE("opt", errs() << "bcf: Incorrect value,"
            << " must be greater than 1. Set to default: "
            << defaultObfTime <<" \n");
        ObfTimes = defaultObfTime;
      }
      NumTimesOnFunctions = ObfTimes;
      int NumObfTimes = ObfTimes;

        // Real begining of the pass
        // Loop for the number of time we run the pass on the function
        do{
          DEBUG_WITH_TYPE("cfg", errs() << "bcf: Function " << F.getName()
              <<", before the pass:\n");
          DEBUG_WITH_TYPE("cfg", F.viewCFG());
          // Put all the function's block in a list              得到所有函数块清单
          std::list<BasicBlock *> basicBlocks;
          for (Function::iterator i=F.begin();i!=F.end();++i) {
            basicBlocks.push_back(&*i);
          }
          DEBUG_WITH_TYPE("gen", errs() << "bcf: Iterating on the Function's Basic Blocks\n");

          while(!basicBlocks.empty()){
            NumBasicBlocks ++;
            // Basic Blocks' selection
            if((int)llvm::cryptoutils->get_range(100) <= ObfProbRate){  // 按照设定好的概率,对基本块进行混淆
              DEBUG_WITH_TYPE("opt", errs() << "bcf: Block "
                  << NumBasicBlocks <<" selected. \n");
              hasBeenModified = true;
              ++NumModifiedBasicBlocks;
              NumAddedBasicBlocks += 3;
              FinalNumBasicBlocks += 3;
              // Add bogus flow to the given Basic Block (see description)
              BasicBlock *basicBlock = basicBlocks.front();
              addBogusFlow(basicBlock, F);               //添加虚假控制入口,
            }
            else{
              DEBUG_WITH_TYPE("opt", errs() << "bcf: Block "
                  << NumBasicBlocks <<" not selected.\n");
            }
            // remove the block from the list
            basicBlocks.pop_front();

            if(firstTime){ // first time we iterate on this function
              ++InitNumBasicBlocks;
              ++FinalNumBasicBlocks;
            }
          } // end of while(!basicBlocks.empty())
          DEBUG_WITH_TYPE("gen", errs() << "bcf: End of function " << F.getName() << "\n");
          if(hasBeenModified){ // if the function has been modified
            DEBUG_WITH_TYPE("cfg", errs() << "bcf: Function " << F.getName()
                <<", after the pass: \n");
            DEBUG_WITH_TYPE("cfg", F.viewCFG());
          }
          else{
            DEBUG_WITH_TYPE("cfg", errs() << "bcf: Function's not been modified \n");
          }
          firstTime = false;
        }while(--NumObfTimes > 0);
    }
-
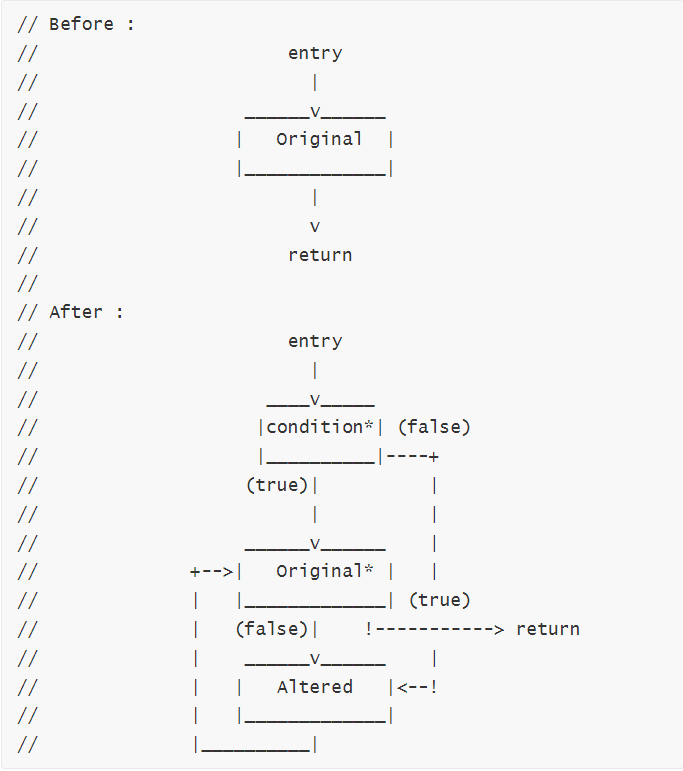
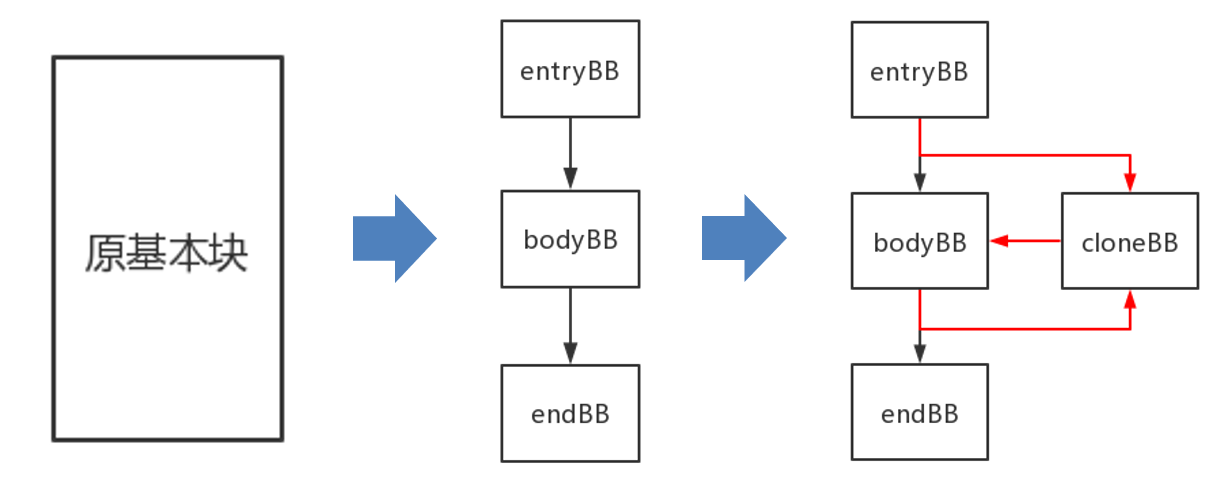
如上图示, 在addBogusFlow(basicBlock, F)函数中,splitBasicBlock(i1, *var)和createAlteredBasicBlock(originalBB, *var3, &F)分别完成基本块的分割和克隆。此时有三个模块,一块是与混淆无关的basickbloak,一块是由basickboak切割出来originalBB,一块是由addBogusFlow产生的alteredBB,将三者拼凑起来【下图左示】
addBogusFlow函数的最后,将originalBB的最后一条语句分割出来【下图右示】
|
 |
| 
|
| ———————————————————— | ———————————————————— |
    /* addBogusFlow
     *
     * Add bogus flow to a given basic block, according to the header's description
     */
    virtual void addBogusFlow(BasicBlock * basicBlock, Function &F){


      // Split the block: first part with only the phi nodes and debug info and terminator
      //                  created by splitBasicBlock. (-> No instruction)
      //                  Second part with every instructions from the original block
      // We do this way, so we don't have to adjust all the phi nodes, metadatas and so on
      // for the first block. We have to let the phi nodes in the first part, because they
      // actually are updated in the second part according to them.
      BasicBlock::iterator i1 = basicBlock->begin();
      if(basicBlock->getFirstNonPHIOrDbgOrLifetime())
        i1 = (BasicBlock::iterator)basicBlock->getFirstNonPHIOrDbgOrLifetime();
      Twine *var;
      var = new Twine("originalBB");
      BasicBlock *originalBB = basicBlock->splitBasicBlock(i1, *var);
      DEBUG_WITH_TYPE("gen", errs() << "bcf: First and original basic blocks: ok\n");

      // Creating the altered basic block on which the first basicBlock will jump
      Twine * var3 = new Twine("alteredBB");
      BasicBlock *alteredBB = createAlteredBasicBlock(originalBB, *var3, &F);
      DEBUG_WITH_TYPE("gen", errs() << "bcf: Altered basic block: ok\n");

      // Now that all the blocks are created,
      // we modify the terminators to adjust the control flow.

      alteredBB->getTerminator()->eraseFromParent();
      basicBlock->getTerminator()->eraseFromParent();
      DEBUG_WITH_TYPE("gen", errs() << "bcf: Terminator removed from the altered"
          <<" and first basic blocks\n");

      // Preparing a condition..
      // For now, the condition is an always true comparaison between 2 float
      // This will be complicated after the pass (in doFinalization())
      Value * LHS = ConstantFP::get(Type::getFloatTy(F.getContext()), 1.0);
      Value * RHS = ConstantFP::get(Type::getFloatTy(F.getContext()), 1.0);
      DEBUG_WITH_TYPE("gen", errs() << "bcf: Value LHS and RHS created\n");


      // The always true condition. End of the first block
      Twine * var4 = new Twine("condition");
      FCmpInst * condition = new FCmpInst(*basicBlock, FCmpInst::FCMP_TRUE , LHS, RHS, *var4);
      DEBUG_WITH_TYPE("gen", errs() << "bcf: Always true condition created\n");

      // Jump to the original basic block if the condition is true or
      // to the altered block if false.
      BranchInst::Create(originalBB, alteredBB, (Value *)condition, basicBlock);
      DEBUG_WITH_TYPE("gen",
          errs() << "bcf: Terminator instruction in first basic block: ok\n");

      // The altered block loop back on the original one.
      BranchInst::Create(originalBB, alteredBB);
      DEBUG_WITH_TYPE("gen", errs() << "bcf: Terminator instruction in altered block: ok\n");


      // The end of the originalBB is modified to give the impression that sometimes
      // it continues in the loop, and sometimes it return the desired value
      // (of course it's always true, so it always use the original terminator..
      //  but this will be obfuscated too;) )

      // iterate on instruction just before the terminator of the originalBB
      BasicBlock::iterator i = originalBB->end();

      // Split at this point (we only want the terminator in the second part)
      Twine * var5 = new Twine("originalBBpart2");
      BasicBlock * originalBBpart2 = originalBB->splitBasicBlock(--i , *var5);
      DEBUG_WITH_TYPE("gen", errs() << "bcf: Terminator part of the original basic block"
          << " is isolated\n");
      // the first part go either on the return statement or on the begining
      // of the altered block.. So we erase the terminator created when splitting.
      originalBB->getTerminator()->eraseFromParent();
      // We add at the end a new always true condition
      Twine * var6 = new Twine("condition2");
      FCmpInst * condition2 = new FCmpInst(*originalBB, CmpInst::FCMP_TRUE , LHS, RHS, *var6);
      BranchInst::Create(originalBBpart2, alteredBB, (Value *)condition2, originalBB);
      DEBUG_WITH_TYPE("gen", errs() << "bcf: Terminator original basic block: ok\n");
      DEBUG_WITH_TYPE("gen", errs() << "bcf: End of addBogusFlow().\n");

    } // end of addBogusFlow()
- 最后执行dof()函数,遍历模块的所有基本块,搜索出条件永远为true的比较语句。用(x – 1) * x % 2 == 0 || y < 0这一永真句替换掉找到的true的比较语句。
bool doF(Module &M){
      // In this part we extract all always-true predicate and replace them with opaque predicate:
      // For this, we declare two global values: x and y, and replace the FCMP_TRUE predicate with
      // (y < 10 || x * (x + 1) % 2 == 0)
      // A better way to obfuscate the predicates would be welcome.
      // In the meantime we will erase the name of the basic blocks, the instructions
      // and the functions.
      DEBUG_WITH_TYPE("gen", errs()<<"bcf: Starting doFinalization...\n");

      //  The global values
      Twine * varX = new Twine("x");
      Twine * varY = new Twine("y");
      Value * x1 =ConstantInt::get(Type::getInt32Ty(M.getContext()), 0, false);
      Value * y1 =ConstantInt::get(Type::getInt32Ty(M.getContext()), 0, false);

      GlobalVariable 	* x = new GlobalVariable(M, Type::getInt32Ty(M.getContext()), false,
          GlobalValue::CommonLinkage, (Constant * )x1,
          *varX);
      GlobalVariable 	* y = new GlobalVariable(M, Type::getInt32Ty(M.getContext()), false,
          GlobalValue::CommonLinkage, (Constant * )y1,
          *varY);


      std::vector<Instruction*> toEdit, toDelete;
      BinaryOperator *op,*op1 = NULL;
      LoadInst * opX , * opY;
      ICmpInst * condition, * condition2;
      // Looking for the conditions and branches to transform
      for(Module::iterator mi = M.begin(), me = M.end(); mi != me; ++mi){
        for(Function::iterator fi = mi->begin(), fe = mi->end(); fi != fe; ++fi){
          //fi->setName("");
          TerminatorInst * tbb= fi->getTerminator();
          if(tbb->getOpcode() == Instruction::Br){
            BranchInst * br = (BranchInst *)(tbb);
            if(br->isConditional()){
              FCmpInst * cond = (FCmpInst *)br->getCondition();
              unsigned opcode = cond->getOpcode();
              if(opcode == Instruction::FCmp){
                if (cond->getPredicate() == FCmpInst::FCMP_TRUE){
                  DEBUG_WITH_TYPE("gen",
                      errs()<<"bcf: an always true predicate !\n");
                  toDelete.push_back(cond); // The condition
                  toEdit.push_back(tbb);    // The branch using the condition
                }
              }
            }
          }
          /*
          for (BasicBlock::iterator bi = fi->begin(), be = fi->end() ; bi != be; ++bi){
            bi->setName(""); // setting the basic blocks' names
          }
          */
        }
      }
      // Replacing all the branches we found
      for(std::vector<Instruction*>::iterator i =toEdit.begin();i!=toEdit.end();++i){
        //if y < 10 || x*(x+1) % 2 == 0
        opX = new LoadInst ((Value *)x, "", (*i));
        opY = new LoadInst ((Value *)y, "", (*i));

        op = BinaryOperator::Create(Instruction::Sub, (Value *)opX,
            ConstantInt::get(Type::getInt32Ty(M.getContext()), 1,
              false), "", (*i));
        op1 = BinaryOperator::Create(Instruction::Mul, (Value *)opX, op, "", (*i));
        op = BinaryOperator::Create(Instruction::URem, op1,
            ConstantInt::get(Type::getInt32Ty(M.getContext()), 2,
              false), "", (*i));
        condition = new ICmpInst((*i), ICmpInst::ICMP_EQ, op,
            ConstantInt::get(Type::getInt32Ty(M.getContext()), 0,
              false));
        condition2 = new ICmpInst((*i), ICmpInst::ICMP_SLT, opY,
            ConstantInt::get(Type::getInt32Ty(M.getContext()), 10,
              false));
        op1 = BinaryOperator::Create(Instruction::Or, (Value *)condition,
            (Value *)condition2, "", (*i));

        BranchInst::Create(((BranchInst*)*i)->getSuccessor(0),
            ((BranchInst*)*i)->getSuccessor(1),(Value *) op1,
            ((BranchInst*)*i)->getParent());
        DEBUG_WITH_TYPE("gen", errs() << "bcf: Erase branch instruction:"
            << *((BranchInst*)*i) << "\n");
        (*i)->eraseFromParent(); // erase the branch
      }
      // Erase all the associated conditions we found
      for(std::vector<Instruction*>::iterator i =toDelete.begin();i!=toDelete.end();++i){
        DEBUG_WITH_TYPE("gen", errs() << "bcf: Erase condition instruction:"
            << *((Instruction*)*i)<< "\n");
        (*i)->eraseFromParent();
      }

      // Only for debug
      DEBUG_WITH_TYPE("cfg",
          errs() << "bcf: End of the pass, here are the graphs after doFinalization\n");
      for(Module::iterator mi = M.begin(), me = M.end(); mi != me; ++mi){
        DEBUG_WITH_TYPE("cfg", errs() << "bcf: Function " << mi->getName() <<"\n");
        DEBUG_WITH_TYPE("cfg", mi->viewCFG());
      }

      return true;
    } // end of doFinalization
  }; // end of struct BogusControlFlow : public FunctionPass
}
使用举例
# 可用选项如下:

-mllvm -bcf : 激活虚假控制流
-mllvm -bcf_loop=3 : 混淆次数,一个函数会被混淆3次,默认为 1
-mllvm -bcf_prob=40 : 每个基本块被混淆的概率,当前每个基本块被混淆的概率为40%,默认为 30 %
生成可执行程序
clang -mllvm -bcf -mllvm -bcf_loop=3 -mllvm -bcf_prob=40 main.cpp -lm -o main-bcf
CFG【控制流图】,前后对比:
| 虚假控制流前 | 虚假控制流后 |
|---|---|
 |
 |
 |
 |
控制流平坦化
原理及代码分析
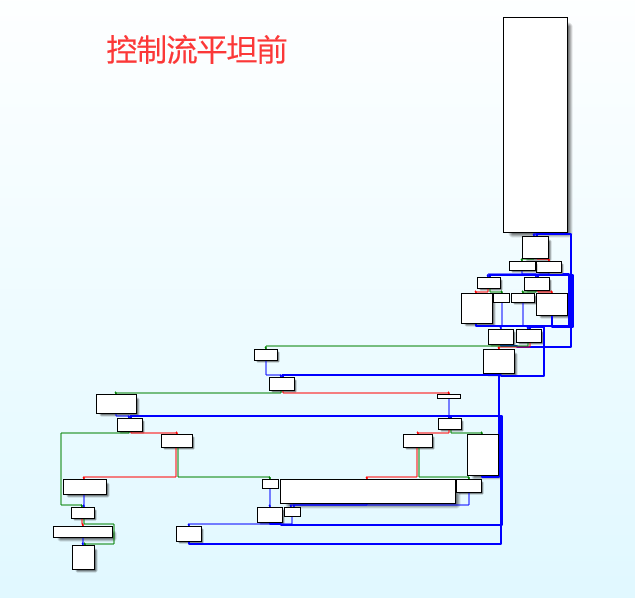
控制流平展(Control Flow Flattening):使用该模式后,程序的控制流图被完全压扁。
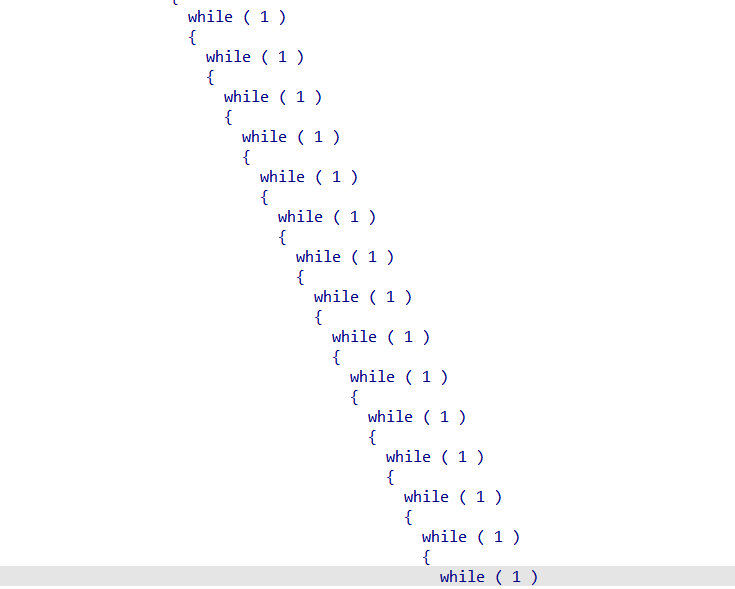
具体而言,就是消除正常程序控制流中基本块的相互关联,使用一个集中的主分发块来调度基本块的执行顺序。【最终效果,得到一个循环嵌套Switch的执行逻辑】
效果如下图示:
 |
|---|
 |
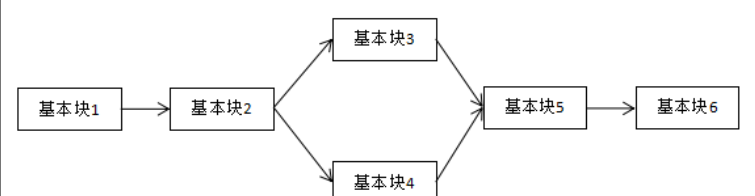
控制流平坦化的基本结构【CFG】
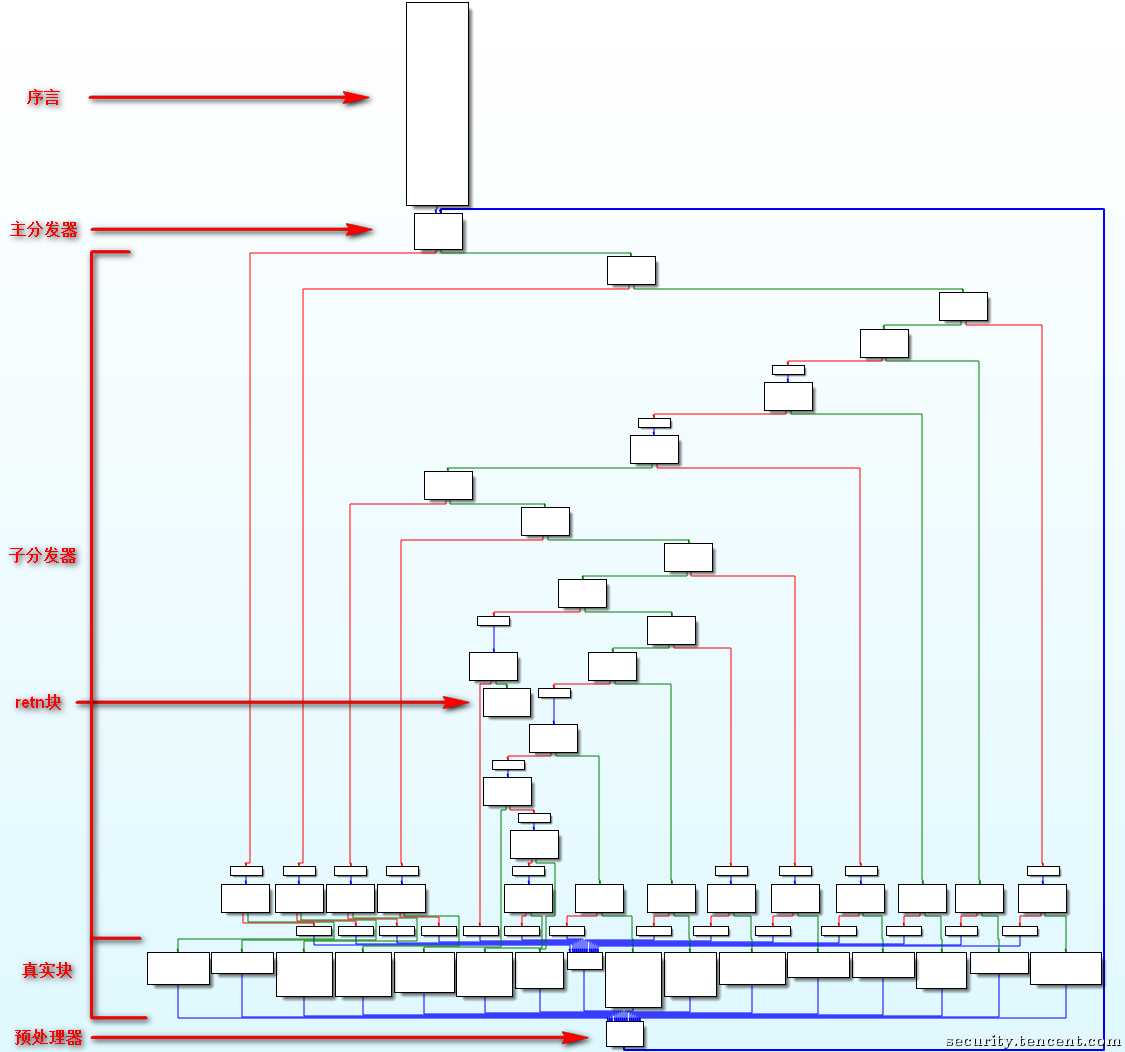
- 序言:函数的第一个执行的基本块
- 主(子)分发器:控制程序跳转到下一个待执行的基本块
- retn块:函数出口
- 真实块:混淆前的基本块,程序真正执行工作的版块
- 预处理器:跳转到主分发器
Flattening.cpp代码分析【具体实现】
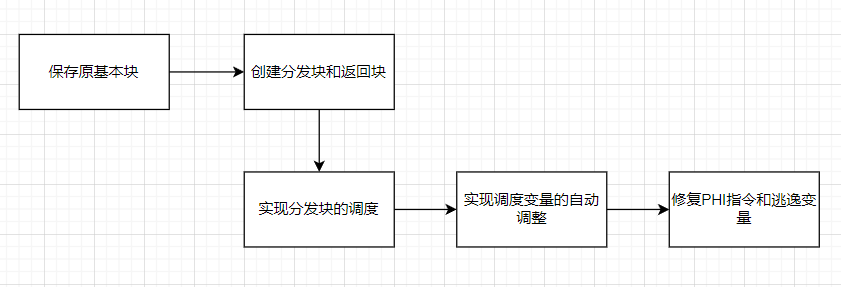
-
保留原基本块:如果入口块的终结指令是条件分支指令,则将该指令单独分离出来作为一个基本块,来保证入口块最后一条指令一定是非条件跳转指令。
// Save all original BB 保留所有基本块 for (Function::iterator i = f->begin(); i != f->end(); ++i) { BasicBlock *tmp = &*i; origBB.push_back(tmp); BasicBlock *bb = &*i; if (isa<InvokeInst>(bb->getTerminator())) { return false; } } // Nothing to flatten if (origBB.size() <= 1) { return false; } // Remove first BB 去除入口块 origBB.erase(origBB.begin()); // Get a pointer on the first BB Function::iterator tmp = f->begin(); //++tmp; BasicBlock *insert = &*tmp; // If main begin with an if 若第一个基本块的末尾是条件跳转,就将其作为新的基本块单独分离出来 BranchInst *br = NULL; if (isa<BranchInst>(insert->getTerminator())) { br = cast<BranchInst>(insert->getTerminator()); } if ((br != NULL && br->isConditional()) || insert->getTerminator()->getNumSuccessors() > 1) { BasicBlock::iterator i = insert->end(); --i; if (insert->size() > 1) { --i; } BasicBlock *tmpBB = insert->splitBasicBlock(i, "first"); origBB.insert(origBB.begin(), tmpBB); } -
创建分发块和返回块:分发块用来调度基本块的执行顺序,我们需要一个入口块到分发块的非条件跳转【上面步骤完成】。基本块执行完毕后都需要跳转到返回块【预处理器】,返回块会直接跳转到分发块【主分发器】。
// Create switch variable and set as it 分发块 switchVar = new AllocaInst(Type::getInt32Ty(f->getContext()), 0, "switchVar", insert); new StoreInst( ConstantInt::get(Type::getInt32Ty(f->getContext()), llvm::cryptoutils->scramble32(0, scrambling_key)), switchVar, insert); // Create main loop loopEntry = BasicBlock::Create(f->getContext(), "loopEntry", f, insert); loopEnd = BasicBlock::Create(f->getContext(), "loopEnd", f, insert); load = new LoadInst(switchVar, "switchVar", loopEntry); // Move first BB on top insert->moveBefore(loopEntry); BranchInst::Create(loopEntry, insert); // loopEnd jump to loopEntry BranchInst::Create(loopEntry, loopEnd); BasicBlock *swDefault = BasicBlock::Create(f->getContext(), "switchDefault", f, loopEnd); BranchInst::Create(loopEnd, swDefault); -
实现分发块调度:在入口块中创建并初始化switch变量,在调度块中插入switch指令实现分发功能。将原基本块移动到返回块之前,并分配case值,将其添加到switch指令的分支中。
// Create switch instruction itself and set condition switchI = SwitchInst::Create(&*f->begin(), swDefault, 0, loopEntry); switchI->setCondition(load); // Remove branch jump from 1st BB and make a jump to the while f->begin()->getTerminator()->eraseFromParent(); BranchInst::Create(loopEntry, &*f->begin()); // Put all BB in the switch for (vector<BasicBlock *>::iterator b = origBB.begin(); b != origBB.end(); ++b) { BasicBlock *i = *b; ConstantInt *numCase = NULL; // Move the BB inside the switch (only visual, no code logic) i->moveBefore(loopEnd); // Add case to switch numCase = cast<ConstantInt>(ConstantInt::get( switchI->getCondition()->getType(), llvm::cryptoutils->scramble32(switchI->getNumCases(), scrambling_key))); switchI->addCase(numCase, i); } -
实现调度变量自动调整:在每个原基本块最后添加修改 switch 要使用的变量值的指令,以便返回分发块之后,能够正确执行到下一个基本块。删除原基本块末尾的跳转,使其结束执行后跳转到返回块。
// Recalculate switchVar for (vector<BasicBlock *>::iterator b = origBB.begin(); b != origBB.end(); ++b) { BasicBlock *i = *b; ConstantInt *numCase = NULL; // Ret BB if (i->getTerminator()->getNumSuccessors() == 0) { continue; } // If it's a non-conditional jump if (i->getTerminator()->getNumSuccessors() == 1) { // Get successor and delete terminator BasicBlock *succ = i->getTerminator()->getSuccessor(0); i->getTerminator()->eraseFromParent(); // Get next case numCase = switchI->findCaseDest(succ); // If next case == default case (switchDefault) if (numCase == NULL) { numCase = cast<ConstantInt>( ConstantInt::get(switchI->getCondition()->getType(), llvm::cryptoutils->scramble32( switchI->getNumCases() - 1, scrambling_key))); } // Update switchVar and jump to the end of loop new StoreInst(numCase, load->getPointerOperand(), i); BranchInst::Create(loopEnd, i); continue; } // If it's a conditional jump if (i->getTerminator()->getNumSuccessors() == 2) { // Get next cases ConstantInt *numCaseTrue = switchI->findCaseDest(i->getTerminator()->getSuccessor(0)); ConstantInt *numCaseFalse = switchI->findCaseDest(i->getTerminator()->getSuccessor(1)); // Check if next case == default case (switchDefault) if (numCaseTrue == NULL) { numCaseTrue = cast<ConstantInt>( ConstantInt::get(switchI->getCondition()->getType(), llvm::cryptoutils->scramble32( switchI->getNumCases() - 1, scrambling_key))); } if (numCaseFalse == NULL) { numCaseFalse = cast<ConstantInt>( ConstantInt::get(switchI->getCondition()->getType(), llvm::cryptoutils->scramble32( switchI->getNumCases() - 1, scrambling_key))); } // Create a SelectInst BranchInst *br = cast<BranchInst>(i->getTerminator()); SelectInst *sel = SelectInst::Create(br->getCondition(), numCaseTrue, numCaseFalse, "", i->getTerminator()); // Erase terminator i->getTerminator()->eraseFromParent(); // Update switchVar and jump to the end of loop new StoreInst(sel, load->getPointerOperand(), i); BranchInst::Create(loopEnd, i); continue; } } -
修复PHI指令和逃逸变量:PHI 指令的值由前驱块决定,平坦化后所有原基本块的前驱块都变成了分发块,因此 PHI 指令发生了损坏。逃逸变量指在一个基本块中定义,并且在另一个基本块被引用的变量。在原程序中某些基本块可能引用之前某个基本块中的变量,然而平坦化后原基本块间不存在确定的前后关系(由分发块决定),因此某些变量的引用可能会损坏。
修复方案是,将 PHI 指令和逃逸变量都转化为内存存取指令。
fixStack(f);

//没找到这个函数的具体实现,这里借用中提到的 fixStack()
https://github.com/bluesadi/Pluto-Obfuscator/tree/kanxue
https://jev0n.com/2022/07/08/ollvm-1.html

void fixStack(Function &F) {
    vector<PHINode*> origPHI;
    vector<Instruction*> origReg;
    BasicBlock &entryBB = F.getEntryBlock();
    // 搜索PHI指令和逃逸变量添加到对应vector容器
    for(BasicBlock &BB : F){
        for(Instruction &I : BB){
            if(PHINode *PN = dyn_cast<PHINode>(&I)){
                origPHI.push_back(PN);
            }else if(!(isa<AllocaInst>(&I) && I.getParent() == &entryBB)
                && I.isUsedOutsideOfBlock(&BB)){
                origReg.push_back(&I);
            }
        }
    }
    for(PHINode *PN : origPHI){
        DemotePHIToStack(PN, entryBB.getTerminator());
    }
    for(Instruction *I : origReg){
        DemoteRegToStack(*I, entryBB.getTerminator());
    }
}
使用举例
# 可用选项如下:

-mllvm -fla : 激活控制流平坦化
-mllvm -split : 激活基本块分割
-mllvm -split_num=3 : 指定基本块分割的数目
生成可执行程序
clang -mllvm -fla -mllvm -split -mllvm -split_num=3 main.cpp -lm -o main-bcf
CFG【控制流图】,前后对比:
| 控制流平坦前 | 控制流平坦后 |
|---|---|
 |
 |
 |
 |
OLLVM 指令切割功能补充
在虚假控制流、控制流平坦化中都有用到指令切割功能。
代码分析
实现于SplitBasicBlock.cpp中,继承自FunctionPass,并重写了runOnFunction方法。
功能实现分为如下步骤:
-
判断切割次数是否符合OLLVM的要求,对于splitNum在1~10 之外的情况,提示分割次数错误,即分割次数必须在1~10次之内。
-
对于符合要求的splitNum,调用toObfuscate函数进行处理。主要是各种检查以及判断是否启用了split功能,判断依据就是Functions annotations和flag。
bool SplitBasicBlock::runOnFunction(Function &F) { // Check if the number of applications is correct if (!((SplitNum > 1) && (SplitNum <= 10))) { errs()<<"Split application basic block percentage\ -split_num=x must be 1 < x <= 10"; return false; } Function *tmp = &F; // Do we obfuscate if (toObfuscate(flag, tmp, "split")) { split(tmp); ++Split; } return false; } -
利用split函数进行分割处理。
(1)定义了一个vector数组origBB用于保存所有的block块,

(2)遍历origBB,对每一个blockcurr,如果它的size(即包含的指令数)只有1个或者包含PHI节点,则不分割该block。

(3)待分割的block,首先生成分割点,用test数组存放分割点,用shuffle打乱指令的顺序,使sort函数排序前splitN个数能尽量随机。

(4)分割block是调用splitBasicBlock函数分割基本块。
void SplitBasicBlock::split(Function *f) { std::vector<BasicBlock *> origBB; int splitN = SplitNum; // Save all basic blocks for (Function::iterator I = f->begin(), IE = f->end(); I != IE; ++I) { origBB.push_back(&*I); } for (std::vector<BasicBlock *>::iterator I = origBB.begin(), IE = origBB.end(); I != IE; ++I) { BasicBlock *curr = *I; // No need to split a 1 inst bb // Or ones containing a PHI node if (curr->size() < 2 || containsPHI(curr)) { continue; } // Check splitN and current BB size if ((size_t)splitN > curr->size()) { splitN = curr->size() - 1; } // Generate splits point std::vector<int> test; for (unsigned i = 1; i < curr->size(); ++i) { test.push_back(i); } // Shuffle if (test.size() != 1) { shuffle(test); std::sort(test.begin(), test.begin() + splitN); } // Split BasicBlock::iterator it = curr->begin(); BasicBlock *toSplit = curr; int last = 0; for (int i = 0; i < splitN; ++i) { for (int j = 0; j < test[i] - last; ++j) { ++it; } last = test[i]; if(toSplit->size() < 2) continue; toSplit = toSplit->splitBasicBlock(it, toSplit->getName() + ".split"); } ++Split; } }
0x05 结语
总算整理完了,零零总总花了一个周吧!但收获很大。在这之前对代码混淆的认识都是处在解题者的角度。知其然,不知其所以然。现在在解题之外,对代码混淆有了一些自己的理解。
比如说,如何自行构造花指令,让ida、OD、X64debug等工具解析异常,让逆向者只能从汇编代码出发或者去除花指令后,再进行程序逆向;又比如说,如何实现在程序运行过程中,解密数据段,并当作程序执行。以此加大逆向难度;最后呢,也是最难的一块——代码混淆。知道了如何给自己的程序加混淆:指令替换、虚假控制流、控制流平坦化。也学习了各个混淆功能的基本实现原理【基于OLLVM 4.0 版本】和实现代码一览。如此说来,的确收获满满,也算建立起了代码混淆的知识框架。
但是也有一些不足,这次整理学习姑且只能称之为初探代码混淆和简单反混淆补充。为何?
源于对各板块的学习与论述,不够深入:
- 例如花指令 jmp eax 的多次跳转构建方案并未真正实践,此类花指令的处理方案也不明确【主要是现在还不会,也没查阅到相关解决方案】。
- 还有SMC 代码自修改的构建方式有很多种,在文章中我只举例了最简单的实现,其余方案还有极大的学习空间。
- 最后,也是最不足的板块,代码混淆。从做题到混淆原理的学习,这一步的跨越已经完成。但是对三种代码混淆方案的具体实现代码的理解,还是比较生疏【代码比较抽象,没学好C++、还有LLVM了解不多的锅】。并且如何去除混淆是个难点,之前做题都是套路般的使用deflat.py进行处理,去除成功与否都是看运气(特指出题人,是否做过相应处理)。若不成功就只能硬调或者放弃!而这个现状就是接下来要克服的【当然这也是当前逆向学习者的一大难题】。如何进行去混淆?
到这,逝真的写完了。后续有了提升又再进行升级学习。。。
原文地址:http://www.cnblogs.com/Only-xiaoxiao/p/16888611.html