
一、短信注册接口
# 注册前端就只有一个短信注册 那么接收的就只需要接收三个参数即可
    mobile,password,code

# 视图类
class UserView(ViewSet):
    @action(methods=['POST'], detail=False)  # 其实可以另写一个视图类 但是也可以在这个类中继续编写
    def register(self, request):
        ser = UserRegisterSerializer(data=request.data)
        ser.is_valid(raise_exception=True)
        ser.save()
        return APIResponse('注册成功')

# 序列化类
class UserRegisterSerializer(serializers.ModelSerializer):  # 只用来做数据校验和反序列化
    code = serializers.CharField()  # 因为表中没有code字段 所以需要重写

    class Meta:
        model = UserInfo
        fields = ['mobile', 'password', 'code']

    def validate(self, attrs):
        mobile = attrs.get('mobile')
        code = attrs.get('code')
        old_code = cache.get('sms_code_%s' % mobile)

        if not (code == old_code or code == '8888'):
            raise APIException('验证码不正确')

        attrs.pop('code')  # 因为表中没有code字段 所以需要去除code字段
        attrs['username'] = mobile

        return attrs

    def create(self, validated_data):  # 因为密码是密文的 所以需要重写create方法 使用 create_user创建
        user = UserInfo.objects.create_user(**validated_data)
        return user
二、登入前端
<script>
export default {
  name: "Login",
  data() {
    return {
      username: '',
      password: '',
      mobile: '',
      code: '',
      login_method: 'is_pwd',
      sms_interval: '获取验证码',
      is_send: false,  // 如果为true 就可以发送短信
    }
  },
  methods: {
    close_login() {
      this.$emit('close')
    },
    go_register() {
      this.$emit('go')
    },
    change_login_method(method) {
      this.login_method = method;
    },
    check_mobile() {  // 输入框失去焦点就会触发
      if (!this.mobile) return;
      if (!this.mobile.match(/^1[3-9][0-9]{9}$/)) {
        this.$message({
          message: '手机号有误',
          type: 'warning',
          duration: 1000,
          onClose: () => {
            this.mobile = '';
          }
        });
        return false;
      }
      this.$axios.get(this.$settings.BASE_URL + 'user/mobile/?mobile=' + this.mobile).then(res => {
        if (res.data.code !== 100) {
          this.mobile = ''
          this.$message({
            message: '该手机号没注册,请先注册',
            type: 'error'
          });
          return  // 函数结束掉
        } else {
          this.is_send = true;
        }
      })
    },
    send_sms() {  // 发送短信
      if (!this.is_send) return;
      this.is_send = false;
      let sms_interval_time = 60;
      this.sms_interval = "发送中...";
      let timer = setInterval(() => {
        if (sms_interval_time <= 1) {
          clearInterval(timer);
          this.sms_interval = "获取验证码";
          this.is_send = true; // 重新回复点击发送功能的条件
        } else {
          sms_interval_time -= 1;
          this.sms_interval = `${sms_interval_time}秒后再发`;
        }
      }, 1000);
      this.$axios.get(this.$settings.BASE_URL + 'user/send_sms/?mobile=' + this.mobile).then(res => {  // 向后端发送短信
        if (res.data.code === 100) {
          this.$message({
            message: res.data.msg,
            type: 'success'
          });
        } else {
          this.$message({
            message: res.data.msg,
            type: 'error'
          });
        }
      })
    },
    clickPWDLogin() { // 多方式登入
      if (this.username && this.password) {
        this.$axios.post(this.$settings.BASE_URL + 'user/mul_login/', {
          username: this.username, password: this.password
        }).then(res => {
          if (res.data.code === 100) {
            this.$cookies.set('userToken', res.data.token)
            this.$cookies.set('username', res.data.username)
            this.$cookies.set('icon', res.data.icon)
            this.$emit('close')
          } else {
            this.$message({
              message: res.data.msg,
              type: 'error'
            });
          }
        })
      } else {
        this.$message({
          message: '用户名和密码不能为空',
          type: 'error'
        });
      }
    },
    clickSMSLogin() {  // 短信登入
      if (this.mobile && this.code) {
        this.$axios.post(this.$settings.BASE_URL + 'user/mobile_login/', {
          mobile: this.mobile, code: this.code
        }).then(res => {
          if (res.data.code === 100) {
            this.$cookies.set('userToken', res.data.token)
            this.$cookies.set('username', res.data.username)
            this.$cookies.set('icon', res.data.icon)
            this.$emit('close')
          } else {
            this.$message({
              message: res.data.msg,
              type: 'error'
            });
          }
        })
      } else {
        this.$message({
          message: '手机号和验证码不能为空',
          type: 'error'
        });
      }
    },
  },
}
</script>
三、注册前端
<script>
export default {
  name: "Register",
  data() {
    return {
      mobile: '',
      password: '',
      code: '',
      sms_interval: '获取验证码',
      is_send: false,
    }
  },
  methods: {
    close_register() {
      this.$emit('close', false)
    },
    go_login() {
      this.$emit('go')
    },
    check_mobile() {
      if (!this.mobile) return;
      if (!this.mobile.match(/^1[3-9][0-9]{9}$/)) {
        this.$message({
          message: '手机号有误',
          type: 'warning',
          duration: 1000,
          onClose: () => {
            this.mobile = '';
          }
        });
        return false;
      }
      this.$axios.get(this.$settings.BASE_URL + 'user/mobile/?mobile=' + this.mobile).then(res => {
        if (res.data.code === 100) {
          this.mobile = ''
          this.$message({
            message: '改手机号已注册,请直接登入',
            type: 'error'
          });
          return  // 函数结束掉
        } else {
          console.log(res.data)
          this.is_send = true;
        }
      })
    },
    send_sms() {
      if (!this.is_send) return;
      this.is_send = false;
      let sms_interval_time = 60;
      this.sms_interval = "发送中...";
      let timer = setInterval(() => {
        if (sms_interval_time <= 1) {
          clearInterval(timer);
          this.sms_interval = "获取验证码";
          this.is_send = true; // 重新回复点击发送功能的条件
        } else {
          sms_interval_time -= 1;
          this.sms_interval = `${sms_interval_time}秒后再发`;
        }
      }, 1000);
      this.$axios.get(this.$settings.BASE_URL + 'user/send_sms/?mobile=' + this.mobile).then(res => {
        console.log(res.data)
        if (res.data.code !== 100) {
          this.error = res.data.msg
        }
      })
    },
    ClickRegister() {
      if (this.mobile && this.password && this.code) {
        this.$axios.post(this.$settings.BASE_URL + 'register/', {
          mobile: this.mobile, password: this.password, code: this.code
        }).then(res => {
          if (res.data.code === 100) {
            this.$emit('go')
          } else {
            this.$message({
              message: res.data.msg,
              type: 'error'
            });
          }
        })
      } else {
        this.$message({
          message: '不能为空',
          type: 'error'
        });
      }
    },
  }
}
</script>
四、header.vue
<div class="right-part">
  <div v-if="!username">
    <span @click="put_login">登录</span>
    <span class="line">|</span>
    <span @click="put_register">注册</span>
  </div>
  <div v-else>
<!--          <img :src="headerImg" alt="" width="20px" height="20px">-->
    <span>{{ username }}</span>
    <span class="line">|</span>
    <span @click="logout">注销</span><!--注销事件-->
  </div>

<script>
import Login from "@/components/Login";
import Register from "@/components/Register";

export default {
  name: "Header",
  data() {
    return {
      url_path: sessionStorage.url_path || '/',
      is_login: false,
      is_register: false,
      headerImg: '',
      username: ''
    }
  },
  methods: {
    goPage(url_path) {
      // 已经是当前路由就没有必要重新跳转
      if (this.url_path !== url_path) {
        // 传入的参数,如果不等于当前路径,就跳转
        this.$router.push(url_path)
      }
      sessionStorage.url_path = url_path;
    },
    put_login() {
      this.is_login = true;
      this.is_register = false;
    },
    put_register() {
      this.is_login = false;
      this.is_register = true;
    },
    close_login() {
      this.is_login = false;
    },
    close_register() {
      this.is_register = false;
    },
    logout() {
      this.username = ''
      this.$cookies.remove('token')
      this.$cookies.remove('username')
      this.$cookies.remove('icon')
    }
  },
  created() {
    sessionStorage.url_path = this.$route.path
    this.url_path = this.$route.path
    this.username = this.$cookies.get('username')  // 从cookie中获取username
  },
  components: {
    Login,
    Register
  }
}
</script>
五、redis介绍
# redis是一个cs架构
    redis是一个非关系型数据库 nosql,是存储与内存中的,所以存取速度非常快,可以数据持久化(数据同步到硬盘中),数据类型丰富【5大数据类型:字符串,列表,哈希(字典),集合,有序集合】,key-value形式存储【根本没有表的结构,相当于咱们的字典】

    -nosql:指非关系型数据库:1 不限于SQL  2 没有sql

# redis为什么这么快
    -1 高性能的网络模型:IO多路复用的epoll模型,可以承载住非常高的并发量
    -2 纯内存操作,避免了很多io
    -3 单线程操作,避免了线程间切换的消耗
        -6.x之前:单线程,单进程
        -6.x以后,多线程架构,数据操作还是使用单线程,别的线程做数据持久化,其他操作

# reids应用场景
    1 当缓存数据库使用,接口缓存,提高接口响应速度
        -请求进到视图---》去数据查询[多表查询,去硬盘取数据:速度慢]----》转成json格式字符串---》返回给前端
        -请求进到视图---》去redis[内存]----》取json格式字符串---》返回给前端
    2 做计数器:单线程,不存在并发安全问题
        -统计网站访问量
        -个人站点浏览量
        -文章阅读量

    3 去重操作:集合
    4 排行榜:有序集合
        -阅读排行榜
        -游戏金币排行榜

    5 布隆过滤器
    6 抽奖
    7 消息队列
5.1 reids安装
# 开源软件:使用c语言写的---【编译型语言,在操作系统运行,要编译成可执行文件,由于采用了IO多路复用的epoll模型,所以它不支持windows,只有linux操作系统支持epoll】

# 微软官方:改了,编译成可执行的安装包,下载一路下一步安装
    -版本没有最新

# 官网:https://redis.io/
    -下载完是源代码:c语言源码 :https://redis.io/download/#redis-stack-downloads
    -最稳定:6.x
    -最新7.x

# 中文网:http://redis.cn/download.html
    -上面最新只到5.x

# win版本下载地址
    # 最新5.x版本 https://github.com/tporadowski/redis/releases/
    # 最新3.x版本 https://github.com/microsoftarchive/redis/releases
    下载完一路下一步即可,具体可参照:https://www.cnblogs.com/liuqingzheng/p/9831331.html

# win装完会有redis服务
    -启动服务,手动停止
    -客户端链接:redis-cli -h 127.0.0.1 -p 6379
    -简单命令:
        set name lqz
        get name
        ping

    -停掉服务:
        -去win服务点关闭
        -客户端关闭:shutdown

#mysql 服务端
#mysql客户端
    -navicate
    -命令窗口cmd
    -python操作

# redis 服务器端
# redis 客户端
    -redis-cli
    -图形化工具:redis-destop-management
    -python操作
六、python操作redis
# 需要安装redis
    pip install redis

from redis import Redis

coon = Redis()  # 默认链接本地redis
coon.set('name', 'jason')  # 设置值
print(coon.get('name'))  # 获取值
coon.close()  # 需要关闭
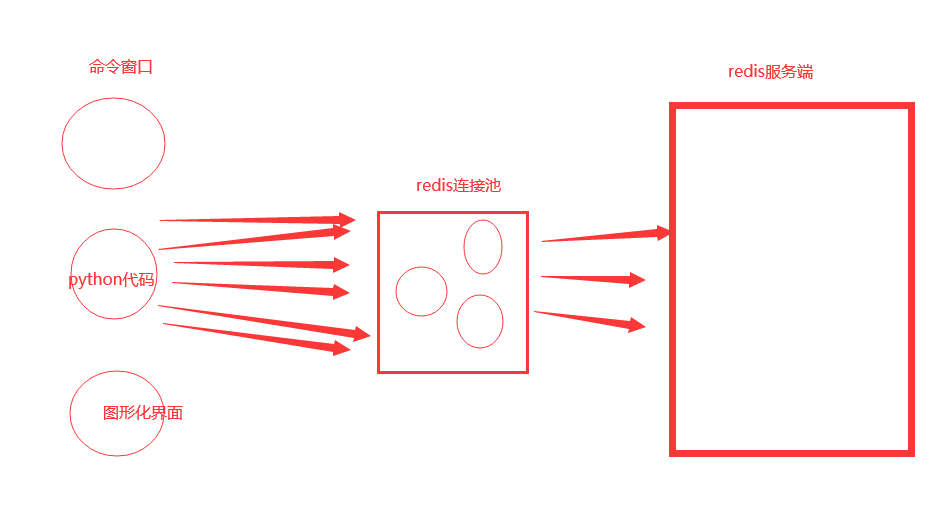
七、链接池
# 现在我们开启线程来操作redis
from redis import Redis
from threading import Thread


def get_name_from_redis():
    coon = Redis()  # 创建链接
    print(coon.get('name'))
    coon.close()


for i in range(100):  # 我们开启了100个线程来操作redis
    t = Thread(target=get_name_from_redis)
    t.start()

# 但是这样不好 因为这样 每次开一个线程 就会创建一个链接 这样是不好的
7.1 链接池 代码
from threading import Thread
import redis


def get_name_from_redis():
    pool = redis.ConnectionPool(max_connections=3, host='127.0.0.1', port=6379)  # 创建连接池
    coon = redis.Redis(connection_pool=pool)
    print(coon.get('name'))
    coon.close()


for i in range(100):
    t = Thread(target=get_name_from_redis)
    t.start()

# 但是这样也不行 现在每一个线程都创建了一个连接池 那就是创建了 100个连接池 这样肯定也是不行的

# 所以我们需要把创建连接池 设计成 单例模式 这样不管多少线程 都只有一个连接池 这样连接池中有多少 最多就有多少链接
7.2 最终版 连接池 代码
7.2.1 POOL
import redis

pool = redis.ConnectionPool(max_connections=3, host='127.0.0.1', port=6379)  # 创建连接池 最多只有3个链接
7.2.2 reids连接池
from threading import Thread
from scripts.POOL import pool
import redis

def get_name_from_redis():
    # 通过导入模块实现 单例模式
    coon = redis.Redis(connection_pool=pool)  # 这样就只有一个连接池 连接池中设置多少 就有多少链接
    print(coon.get('name'))
    coon.close()


for i in range(100):
    t = Thread(target=get_name_from_redis)
    t.start()
原文地址:http://www.cnblogs.com/stephenwzh/p/16889518.html
1. 本站所有资源来源于用户上传和网络,如有侵权请邮件联系站长!
2. 分享目的仅供大家学习和交流,请务用于商业用途!
3. 如果你也有好源码或者教程,可以到用户中心发布,分享有积分奖励和额外收入!
4. 本站提供的源码、模板、插件等等其他资源,都不包含技术服务请大家谅解!
5. 如有链接无法下载、失效或广告,请联系管理员处理!
6. 本站资源售价只是赞助,收取费用仅维持本站的日常运营所需!
7. 如遇到加密压缩包,默认解压密码为"gltf",如遇到无法解压的请联系管理员!
8. 因为资源和程序源码均为可复制品,所以不支持任何理由的退款兑现,请斟酌后支付下载
声明:如果标题没有注明"已测试"或者"测试可用"等字样的资源源码均未经过站长测试.特别注意没有标注的源码不保证任何可用性